
Chapter 1: Introduction to Rust and Actix Web
Introduction to Rust language
Rust is a statically-typed, systems-level programming language designed for performance, reliability, and safety. It was developed by Mozilla and released in 2010. Rust’s syntax is similar to that of C++, but it has a number of unique features that set it apart from other languages, such as a strong type system, ownership and borrowing, and zero-cost abstractions.
Rust’s strong type system catches many programming errors at compile-time, helping to reduce bugs and improve code quality. Ownership and borrowing help to ensure memory safety and prevent common programming errors such as null pointer dereferences and data races. Rust also provides zero-cost abstractions, which allow developers to write high-level, expressive code that is as fast and efficient as low-level code.
Rust has gained popularity in recent years, particularly in the systems programming community, due to its focus on performance and safety. It is used in a wide range of applications, including web services, game engines, and operating systems. Introduction to Actix Web framework Actix Web is a powerful, high-performance web framework for Rust, designed for building asynchronous, non-blocking web services. It is built on top of the Actix actor framework and provides a robust set of features for building scalable, reliable, and efficient web applications.
Actix Web is designed with performance in mind, using Rust’s unique features to provide a highly efficient runtime. It uses asynchronous IO and non-blocking APIs to handle a large number of concurrent connections with minimal overhead. This makes it an excellent choice for building web services that need to handle high levels of traffic and requests.
Actix Web provides a wide range of features, including routing, middleware, request and response handling, web sockets, and much more. It also supports a variety of data formats, including JSON, XML, and YAML. Actix Web is highly extensible, allowing developers to add custom middleware, extractors, and handlers to tailor it to their specific needs.
Overall, Actix Web is a powerful, flexible, and efficient web framework that is well-suited for building high-performance web services in Rust. Advantages of using Rust and Actix Web for backend development Using Rust and Actix Web for backend development offers several advantages:
-
Performance: Rust is designed for high-performance systems-level programming, and Actix Web builds on this by providing an efficient, asynchronous, non-blocking runtime. This makes it an excellent choice for building high-performance web services that can handle large amounts of traffic and requests.
-
Safety: Rust’s strong type system, ownership and borrowing, and zero-cost abstractions help to ensure memory safety and prevent common programming errors such as null pointer dereferences and data races. This makes Rust code less prone to security vulnerabilities and bugs, which is particularly important for backend systems that handle sensitive data.
-
Scalability: Actix Web is designed to be highly scalable, using asynchronous IO and non-blocking APIs to handle a large number of concurrent connections with minimal overhead. This makes it well-suited for building web services that need to handle high levels of traffic and requests.
-
Flexibility: Actix Web is highly flexible and extensible, allowing developers to add custom middleware, extractors, and handlers to tailor it to their specific needs. This gives developers the freedom to build backend systems that are highly customized and optimized for their specific use case.
Overall, using Rust and Actix Web for backend development provides a powerful combination of performance, safety, scalability, and flexibility that makes it an excellent choice for building modern web services. Setting up development environment To set up a development environment for Rust and Actix Web, follow these steps:
-
Install Rust: Rust can be installed using rustup, which is a command-line tool that installs and manages Rust. Follow the instructions on the Rust website to install rustup for your operating system.
-
Install a code editor: Rust code can be written in any text editor, but it is recommended to use a code editor with Rust support, such as Visual Studio Code, IntelliJ IDEA, or Atom. Install your preferred code editor and any necessary plugins or extensions.
-
Create a new Rust project: Open a terminal or command prompt and create a new Rust project using the cargo command-line tool. Navigate to the directory where you want to create the project and run the following command:
cargo new myproject --binThis will create a new Rust project named “myproject” with a binary executable target. The --bin flag indicates that we want to create a binary executable rather than a library.
- Add Actix Web as a dependency: Open the
Cargo.tomlfile in your project directory and add Actix Web as a dependency:
[dependencies]
actix-web = "4.0.0"
This will tell Cargo to download and include Actix Web in your project.
-
Write some code: Open the
src/main.rsfile in your project directory and start writing some code. You can use the Actix Web documentation to learn how to use the framework and write your own web services. -
Build and run your project: To build your project, navigate to your project directory in a terminal or command prompt and run the following command:
cargo buildThis will compile your project and generate a binary executable in the target/debug directory. To run your project, run the following command:
cargo runThis will start your web service on the default port (usually 8080). You can access it by opening a web browser and navigating to http://localhost:8080.
That’s it! You now have a development environment set up for Rust and Actix Web.
Understanding HTTP and RESTful APIs
HTTP (Hypertext Transfer Protocol) is a protocol used for sending and receiving information over the internet. It is the foundation of the World Wide Web and is used by web browsers and servers to communicate with each other.
REST (Representational State Transfer) is an architectural style for building web services that use HTTP as the underlying protocol. RESTful APIs (Application Programming Interfaces) are web services that follow the principles of REST, and are designed to be simple, scalable, and easy to use.
A RESTful API is built around resources, which are the objects or concepts that the API exposes to the client. Each resource has a unique URI (Uniform Resource Identifier), and clients can perform various operations on the resource using HTTP methods such as GET, POST, PUT, PATCH, and DELETE.
Here are the common HTTP methods used in RESTful APIs:
- GET: Used to retrieve a resource from the server
- POST: Used to create a new resource on the server
- PUT: Used to update an existing resource on the server
- PATCH: Used to partially update an existing resource on the server
- DELETE: Used to delete a resource from the server
In a RESTful API, resources are represented using a standardized data format, such as JSON (JavaScript Object Notation) or XML (Extensible Markup Language). This makes it easy for clients to understand and use the API, regardless of the programming language or platform they are using.
Overall, RESTful APIs are a simple, scalable, and flexible way to build web services that can be used by a wide variety of clients. By following the principles of REST and using HTTP as the underlying protocol, developers can build powerful and efficient web services that are easy to use and maintain. Overview of the Actor Model and its implementation in Actix The Actor Model is a programming model for building concurrent and distributed systems. It was first proposed by Carl Hewitt in the 1970s and has since been used in various languages and frameworks.
In the Actor Model, computation is organized around “actors”, which are independent units of computation that communicate with each other by sending and receiving messages. Actors can be thought of as “miniature machines” that execute code and maintain their own internal state.
Each actor has a unique identity and can receive messages from other actors. When an actor receives a message, it can perform some computation and send messages to other actors. Actors can also create new actors, which can in turn receive and send messages.
Actix is a Rust framework that implements the Actor Model for building high-performance web services. In Actix, actors are implemented as asynchronous Rust functions, which can communicate with each other using messages.
Actors in Actix are organized into a hierarchy, where each actor can have child actors that it supervises. This allows for the creation of fault-tolerant systems, where errors in one actor can be handled by its parent actor.
Actix also provides an actor-based approach to handling HTTP requests, where each incoming request is handled by a separate actor. This allows for efficient handling of large numbers of concurrent requests, as each request is handled independently by a dedicated actor.
Overall, the Actor Model provides a powerful and flexible way to build concurrent and distributed systems, and Actix provides a Rust-based implementation of the Actor Model that is optimized for high-performance web services.
Exploring Actix Web’s architecture and core components
Actix Web is a high-performance web framework built on top of Actix, which is an actor framework for Rust. Actix Web provides a number of core components and architectural patterns that make it easy to build scalable and efficient web services.
Here are some of the core components of Actix Web:
-
Application: The Application is the main entry point for Actix Web, and it is responsible for managing the server, handling incoming requests, and routing requests to the appropriate handlers.
-
Router: The Router is responsible for mapping incoming requests to the appropriate handler functions. It allows for flexible URL matching and supports various HTTP methods, such as GET, POST, PUT, DELETE, etc.
-
Handler functions: Handler functions are Rust functions that are responsible for processing incoming requests and generating responses. They take a request object as input and return a response object as output.
-
Middleware: Middleware functions are functions that are executed before or after the handler functions, and can modify the request and response objects. Middleware functions can be used to implement authentication, rate limiting, logging, and other cross-cutting concerns.
-
Request and Response objects: The Request object represents an incoming HTTP request, and contains information such as the HTTP method, URL, headers, and body. The Response object represents an outgoing HTTP response, and contains information such as the status code, headers, and body.
-
HTTP server: Actix Web provides a high-performance HTTP server that is built on top of the Tokio runtime, which allows for efficient handling of large numbers of concurrent requests.
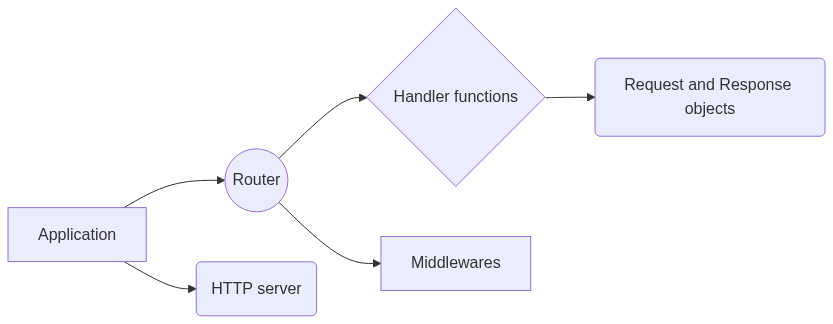
Actix Web’s architecture is designed to be highly modular and flexible, allowing developers to easily customize and extend the framework to meet their specific needs. By leveraging Rust’s strong type system and efficient runtime, Actix Web provides a powerful and efficient platform for building high-performance web services. Writing and testing your first Actix Web application To write and test your first Actix Web application, you will need to follow these steps:
-
Set up your development environment: Install Rust and Cargo on your system, and create a new Rust project using Cargo.
-
Add Actix Web as a dependency: Add Actix Web to your Cargo.toml file as a dependency, and run
cargo buildto download the necessary dependencies. -
Create a simple handler function: Write a Rust function that takes a
HttpRequestobject as input and returns aHttpResponseobject as output. This function will handle incoming HTTP requests. -
Register the handler function with the router: In your
main.rsfile, use theAppobject to register the handler function with the router, and specify the URL path and HTTP method that should trigger the handler. -
Start the server: Use the
Appobject to start the HTTP server, which will listen for incoming requests and route them to the appropriate handler function. -
Test the application: Use a web browser or a tool like cURL to send an HTTP request to your application and verify that the response is what you expected.
Here’s an example of what the code might look like:
use actix_web::{get, web, App, HttpResponse, HttpServer, Responder};

#[get("/hello/{name}")]
async fn hello(name: web::Path<String>) -> impl Responder {
    let message = format!("Hello, {}!", name);
    HttpResponse::Ok().body(message)
}

#[actix_rt::main]
async fn main() -> std::io::Result<()> {
    HttpServer::new(|| {
        App::new()
            .service(hello)
    })
    .bind("127.0.0.1:8080")?
    .run()
    .await
}
In this example, we define a simple handler function called hello that takes a name parameter from the URL path, and returns a greeting message that includes the name. We then use the App object to register the hello function with the router, and start the HTTP server on port 8080.
To test the application, you can open a web browser and navigate to http://localhost:8080/hello/yourname, where yourname is the name you want to be greeted with. You should see a web page that displays the message “Hello, yourname!“.
By following these steps, you can quickly build and test your first Actix Web application, and start exploring the capabilities of this powerful web framework.
Working with asynchronous programming and futures in Rust
Asynchronous programming and futures are core concepts in Rust and Actix Web, and they are essential for building high-performance web services.
In Rust, asynchronous programming is implemented using the async and await keywords, which allow functions to be executed concurrently without blocking the main thread. Instead of waiting for a function to complete before moving on to the next one, the main thread can continue executing other tasks, and return to the original task when it is ready to proceed.
Futures are a Rust abstraction that represent a computation that may not be complete yet, but will eventually produce a result. Futures can be combined using combinators like map, and_then, and join, allowing for complex and efficient asynchronous workflows.
Here’s an example of how to use asynchronous programming and futures in Actix Web:
use actix_web::{get, web, App, HttpResponse, HttpServer, Responder};
use futures::future::join;

async fn task1() -> String {
    // do some asynchronous work
    "Hello".to_string()
}

async fn task2() -> String {
    // do some other asynchronous work
    "world!".to_string()
}

#[get("/hello")]
async fn hello() -> impl Responder {
    let (result1, result2) = join(task1(), task2()).await;
    let message = format!("{} {}", result1, result2);
    HttpResponse::Ok().body(message)
}

#[actix_rt::main]
async fn main() -> std::io::Result<()> {
    HttpServer::new(|| {
        App::new()
            .service(hello)
    })
    .bind("127.0.0.1:8080")?
    .run()
    .await
}
In this example, we define two asynchronous tasks (task1 and task2) that perform some work and return a String result. We then use the join combinator to execute both tasks concurrently and wait for both results to be available.
In the hello handler function, we call the join function to execute both tasks asynchronously, and wait for both results to be available. We then combine the two results into a single message and return it as an HTTP response.
By using asynchronous programming and futures, we can take advantage of the performance benefits of concurrent execution without blocking the main thread, allowing our web services to handle large numbers of concurrent requests efficiently.
Managing application state using Actix Web’s built-in data structures
Actix Web provides several built-in data structures that can be used to manage application state. These data structures are designed to be shared between different parts of the application, such as handlers and middleware, and can be accessed using Actix Web’s web module.
Here are some of the built-in data structures provided by Actix Web:
web::Data<T>: This is a container that holds application state of typeT. It can be used to store any type that implements theSendtrait, which means it can be safely accessed from multiple threads. TheDatacontainer is shared between all requests, so any changes made to it will be visible to all subsequent requests.
use actix_web::{web, App, HttpResponse, HttpServer};

struct AppState {
    message: String,
}

async fn hello(state: web::Data<AppState>) -> HttpResponse {
    HttpResponse::Ok().body(state.message.clone())
}

#[actix_rt::main]
async fn main() -> std::io::Result<()> {
    HttpServer::new(|| {
        App::new()
            .data(AppState { message: "Hello, world!".to_string() })
            .service(web::resource("/hello").to(hello))
    })
    .bind("127.0.0.1:8080")?
    .run()
    .await
}
In this example, we define a custom AppState struct that holds an application message. We then use the App::data method to store an instance of AppState in the application state. In the hello handler function, we use the web::Data container to retrieve the AppState instance and access its message.
web::Json<T>: This is a container that holds JSON data that has been deserialized into a Rust struct of typeT. It can be used to automatically deserialize JSON data from HTTP requests and serialize Rust structs into JSON responses.
use serde::{Deserialize, Serialize};

#[derive(Deserialize, Serialize)]
struct Greeting {
    name: String,
    message: String,
}

async fn hello(greeting: web::Json<Greeting>) -> HttpResponse {
    let response = format!("{} {}", greeting.message, greeting.name);
    HttpResponse::Ok().body(response)
}
In this example, we define a Greeting struct that holds a name and message. We then use the web::Json container in the hello handler function to automatically deserialize JSON data from the request body into a Greeting instance. We then use the Greeting instance to build an HTTP response.
web::Path<T>: This is a container that holds a parameter extracted from the URL path. It can be used to extract URL parameters from the request path and pass them as parameters to handler functions.
async fn hello(name: web::Path<String>) -> HttpResponse {
    let response = format!("Hello, {}!", name);
    HttpResponse::Ok().body(response)
}

#[actix_rt::main]
async fn main() -> std::io::Result<()> {
    HttpServer::new(|| {
        App::new()
            .service(web::resource("/hello/{name}").route(web::get().to(hello)))
    })
    .bind("127.0.0.1:8080")?
    .run()
    .await
}
In this example, we use the web::Path container to extract a parameter named name from the URL path. We then use the parameter to build an HTTP response.
By using Actix Web’s built-in data structures, we can manage application state in a safe and efficient way, and
reduce the amount of boilerplate code needed to handle common tasks such as deserializing JSON data or extracting parameters from the URL path.
web::Query<T>: This is a container that holds a parameter extracted from the query string. It can be used to extract query string parameters from the request URL and pass them as parameters to handler functions.
async fn hello(query: web::Query<HashMap<String, String>>) -> HttpResponse {
    let name = query.get("name").unwrap_or(&"World".to_string());
    let response = format!("Hello, {}!", name);
    HttpResponse::Ok().body(response)
}

#[actix_rt::main]
async fn main() -> std::io::Result<()> {
    HttpServer::new(|| {
        App::new()
            .service(web::resource("/hello").route(web::get().to(hello)))
    })
    .bind("127.0.0.1:8080")?
    .run()
    .await
}
In this example, we use the web::Query container to extract a query parameter named name from the request URL. If the parameter is not present, we use a default value of “World”. We then use the parameter to build an HTTP response.
web::Form<T>: This is a container that holds form data that has been deserialized into a Rust struct of typeT. It can be used to automatically deserialize form data from HTTP requests and serialize Rust structs into form-encoded responses.
use serde::{Deserialize, Serialize};

#[derive(Deserialize, Serialize)]
struct Greeting {
    name: String,
    message: String,
}

async fn hello(greeting: web::Form<Greeting>) -> HttpResponse {
    let response = format!("{} {}", greeting.message, greeting.name);
    HttpResponse::Ok().body(response)
}
In this example, we define a Greeting struct that holds a name and message. We then use the web::Form container in the hello handler function to automatically deserialize form data from the request body into a Greeting instance. We then use the Greeting instance to build an HTTP response.
By using Actix Web’s built-in data structures, we can manage application state in a safe and efficient way, reduce the amount of boilerplate code needed to handle common tasks, and improve the readability and maintainability of our code.
Implementing authentication and authorization in Actix Web
Implementing authentication and authorization is an important aspect of building secure web applications. Actix Web provides several mechanisms for implementing authentication and authorization, including middleware and guards.
Middleware in Actix Web is a way to modify the request or response before it reaches the handler function. This can be used to implement cross-cutting concerns such as authentication and authorization.
Guards are used to ensure that a request meets certain criteria before it reaches the handler function. For example, a guard can be used to ensure that a user is authenticated before allowing them to access a protected resource.
Actix Web provides several middleware and guards that can be used to implement authentication and authorization:
-
actix_web::middleware::Logger: This middleware logs incoming requests and outgoing responses. It can be used for debugging and auditing purposes. -
actix_web::middleware::Compress: This middleware compresses responses with gzip or deflate. This can reduce the size of responses and improve performance. -
actix_web::middleware::DefaultHeaders: This middleware sets default headers on responses. This can be used to implement security headers such asX-XSS-ProtectionandContent-Security-Policy. -
actix_web::middleware::Session: This middleware provides session management. It can be used to implement user authentication and authorization. -
actix_web::guard::fn_guard: This guard executes a function to determine if a request meets certain criteria. This can be used to implement custom authentication and authorization logic.
Here is an example of how to implement authentication and authorization using the actix_web::middleware::Session middleware and the actix_web::guard::fn_guard guard:
use actix_web::{guard, web, App, HttpResponse, HttpServer, Responder};
use actix_web::middleware::Session;

async fn login(session: Session) -> impl Responder {
    session.set("authenticated", true).unwrap();
    HttpResponse::Ok().body("You are now logged in")
}

async fn logout(session: Session) -> impl Responder {
    session.remove("authenticated");
    HttpResponse::Ok().body("You are now logged out")
}

async fn index(session: Session) -> impl Responder {
    if let Some(true) = session.get::<bool>("authenticated").unwrap() {
        HttpResponse::Ok().body("You are logged in")
    } else {
        HttpResponse::Unauthorized().body("You are not authorized")
    }
}

#[actix_rt::main]
async fn main() -> std::io::Result<()> {
    HttpServer::new(|| {
        App::new()
            .wrap(Session::new("01234567890123456789012345678901").cookie_secure(false))
            .route("/login", web::post().to(login))
            .route("/logout", web::post().to(logout))
            .route("/index", web::get().to(index).guard(guard::fn_guard(|req| {
                req.headers().contains_key("authorization")
            })))
    })
    .bind("127.0.0.1:8080")?
    .run()
    .await
}
In this example, we use the Session middleware to manage user sessions. We define three handler functions: login, logout, and index. The login function sets the authenticated key in the session to true when the user logs in. The logout function removes the authenticated key from the session when the user logs out. The index function checks if the authenticated key is present in the session and returns an appropriate response.
We use the guard::fn_guard guard to ensure that the index function is only accessible to authenticated users. The guard executes a function that checks if the request contains an Authorization header. If the header is present, the function returns true, and the request is allowed to reach the index function. If the header is not present, the function returns false, and the request is rejected with a 401 Unauthorized response.
Note that this is just an example of how to implement authentication and authorization using Actix Web. The actual implementation will depend on your specific requirements and security needs.
In addition to middleware and guards, Actix Web also provides support for various authentication and authorization mechanisms such as JSON Web Tokens (JWTs), OAuth2, and Basic Auth. These can be implemented using third-party crates that integrate with Actix Web, such as actix-web-jwt, actix-web-oauth2, and actix-web-httpauth.
With Actix Web’s flexible middleware and guard system, implementing authentication and authorization in your web application can be done in a safe and efficient manner. By properly securing your application, you can protect your users’ data and build trust with your users.
Handling errors and building resilient web services
When building web services, handling errors and building resilience is critical. Actix Web provides several mechanisms to help you achieve this.
One way to handle errors is to use Actix Web’s error handling middleware. This middleware intercepts errors that occur during request processing and generates an appropriate response. The middleware can be customized to handle different types of errors, including those generated by your application code or by third-party dependencies.
Actix Web also provides support for handling errors using the Result type. By returning Result from your handlers, you can propagate errors to the error handling middleware. This allows you to handle errors in a centralized location and provide consistent error responses to clients.
In addition to error handling, Actix Web provides several features for building resilient web services. For example, Actix Web supports timeouts for requests, which can help prevent denial-of-service attacks and improve the reliability of your service. Actix Web also supports graceful shutdown, which allows your service to complete any in-flight requests before shutting down.
Actix Web also provides support for distributed tracing using the OpenTelemetry standard. This allows you to trace requests across different services and understand the performance of your entire system.
By using these features, you can build web services that are resilient to failures and provide a good experience to your users. Optimizing Actix Web applications for performance and scalability Actix Web is designed to be fast and scalable by default, but there are several techniques you can use to further optimize the performance of your applications.
One important technique is to use asynchronous programming whenever possible. Asynchronous programming allows your application to handle more requests with fewer threads, which can improve the overall throughput and scalability of your service. Actix Web provides a powerful asynchronous runtime that allows you to write highly performant and scalable code using Rust’s powerful async/await syntax.
Another technique is to use connection pooling for database connections. Actix Web provides support for connection pooling using the r2d2 crate. Connection pooling allows your application to reuse database connections instead of creating new ones for each request. This can reduce the overhead of establishing a new connection and improve the overall performance of your application.
Caching is another technique that can be used to improve the performance of your web service. Actix Web provides built-in support for caching using the actix-web::middleware::cache middleware. This middleware caches the response of a request and serves it from the cache if the same request is made again. This can significantly reduce the response time for frequently requested resources.
Actix Web also provides support for load balancing and clustering using third-party crates such as actix-web-nginx-proxy and actix-web-actors. These crates allow you to distribute the load of your application across multiple nodes and provide fault-tolerance and high availability.
Finally, profiling and benchmarking your application is an important step in optimizing its performance. Rust provides a powerful profiling and benchmarking infrastructure through the `car command-line tool. By profiling and benchmarking your application, you can identify performance bottlenecks and make targeted optimizations to improve the overall performance of your web service.
By using these techniques, you can build highly performant and scalable web services using Actix Web.
Deploying Actix Web applications to production
Deploying Actix Web applications to production involves several steps, including building the application, configuring the environment, and deploying the application to a server.
The first step is to build the application for deployment. You can do this using the cargo build --release command, which will compile the application with optimizations and generate a binary executable in the target/release directory.
Next, you need to configure the environment for the application. This includes setting environment variables for configuration options such as database connection details, secret keys, and other application-specific settings.
You also need to ensure that the server environment is properly configured for running the Actix Web application. This may include installing dependencies, configuring firewalls, and setting up SSL certificates.
Once the environment is set up, you can deploy the application to the server. There are several ways to deploy an Actix Web application, including using a reverse proxy such as Nginx or Apache, or deploying directly to a cloud provider such as AWS or Google Cloud.
When deploying the application, it’s important to ensure that it’s running in a secure and reliable manner. This includes monitoring the application for errors and performance issues, setting up automated backups and failover mechanisms, and following best practices for securing the server environment.
Finally, it’s important to test the deployed application thoroughly to ensure that it’s working correctly in the production environment. This may include testing for performance, scalability, and security issues.
By following these steps, you can deploy your Actix Web application to production with confidence, knowing that it’s running in a secure and reliable manner. Best practices for developing and maintaining Actix Web applications Here are some best practices for developing and maintaining Actix Web applications:
-
Follow the separation of concerns principle and keep your code organized into separate modules and files. This makes it easier to read, test, and maintain your code.
-
Use the Rust
Resulttype to handle errors in your code. This makes your code more robust and helps you handle errors gracefully. -
Use the
logcrate to log debug information and errors in your application. This makes it easier to debug issues and monitor the performance of your application. -
Use the
dotenvcrate to manage configuration variables in your application. This allows you to keep sensitive information such as API keys and database connection strings out of your code repository. -
Use the
actix-web-middlewarecrate to add middleware to your application. Middleware can be used to handle authentication, rate limiting, and other common tasks. -
Use the
actix-web-testcrate to write unit tests and integration tests for your application. This makes it easier to catch bugs early and ensure that your code is working correctly. -
Use version control to manage your code repository and keep track of changes over time. This allows you to roll back to previous versions if needed and collaborate with other developers more easily.
-
Follow best practices for security, such as using HTTPS, handling user input carefully to prevent SQL injection attacks, and using secure authentication and authorization mechanisms.
-
Regularly update your dependencies to ensure that you’re using the latest security patches and bug fixes.
-
Document your code and API endpoints using comments and OpenAPI specifications. This makes it easier for other developers to understand your code and build on top of your API.
By following these best practices, you can ensure that your Actix Web applications are well-designed, secure, and maintainable over time.
Chapter 2: Building RESTful APIs with Actix Web
Creating a basic RESTful API with Actix Web
To create a basic RESTful API with Actix Web, you can follow these steps:
- Start a new Rust project using Cargo:
cargo new my_api --bin- Add the Actix Web dependency to your
Cargo.tomlfile:
[dependencies]
actix-web = "3.3.2"- Create a new Rust file named
main.rsin thesrcdirectory and add the following code:
use actix_web::{get, post, web, App, HttpResponse, HttpServer, Responder};

#[get("/")]
async fn index() -> impl Responder {
    HttpResponse::Ok().body("Hello world!")
}

#[post("/users")]
async fn create_user(user: web::Json<User>) -> impl Responder {
    // code to create a new user
}

#[derive(serde::Deserialize)]
struct User {
    name: String,
    email: String,
}

#[actix_web::main]
async fn main() -> std::io::Result<()> {
    HttpServer::new(|| {
        App::new()
            .service(index)
            .service(create_user)
    })
    .bind("127.0.0.1:8080")?
    .run()
    .await
}
This code defines two API endpoints: a GET endpoint at / that returns a “Hello world!” message, and a POST endpoint at /users that expects a JSON payload containing a user’s name and email address.
- Start the HTTP server by running the following command:
cargo runYour RESTful API is now up and running! You can test it by sending a GET request to http://localhost:8080/ or a POST request to http://localhost:8080/users with a JSON payload containing a user’s name and email address.
This is just a simple example of how to create a RESTful API with Actix Web. As your API grows in complexity, you can add more endpoints, use middleware to handle authentication and rate limiting, and use database libraries to interact with a database.
Handling HTTP requests and responses
Actix Web provides a set of tools to handle HTTP requests and responses in a simple and efficient way. Here are some examples:
Handling HTTP requests
Actix Web provides a set of macros to define HTTP request handlers. Here’s an example that defines a handler for a GET request to the root URL ("/"):
use actix_web::{get, HttpResponse, Responder};

#[get("/")]
async fn index() -> impl Responder {
    HttpResponse::Ok().body("Hello world!")
}
In this example, the get macro is used to define a handler for a GET request to the root URL. The async keyword indicates that this is an asynchronous function, and the Responder trait indicates that this function returns a type that can be converted to an HTTP response.
Inside the function, we create an HttpResponse object with a 200 OK status code and a body containing the string "Hello world!". The HttpResponse object implements the Responder trait, so we can return it directly from the function.
Handling HTTP responses
Actix Web provides a set of functions to create HTTP responses. Here’s an example that creates a 404 Not Found response:
use actix_web::{HttpResponse, http::StatusCode};

fn not_found() -> HttpResponse {
    HttpResponse::NotFound()
        .status(StatusCode::NOT_FOUND)
        .body("404 Not Found")
}
In this example, we create an HttpResponse object with a 404 Not Found status code and a body containing the string "404 Not Found". We use the status method to set the status code explicitly, even though it’s already set by the NotFound method.
We can use this function in our request handlers to return a 404 Not Found response:
use actix_web::{get, HttpResponse, Responder};

#[get("/")]
async fn index() -> impl Responder {
    not_found()
}
In this example, the index function returns the not_found function, which creates a 404 Not Found response.
Actix Web also provides functions to create other types of responses, such as redirects, error responses, and JSON responses. Implementing CRUD operations CRUD stands for Create, Read, Update, and Delete, which are the basic operations that can be performed on a data model. Actix Web provides a set of tools to implement CRUD operations in a RESTful API. Here’s an example of how to implement these operations using Actix Web:
use actix_web::{get, post, put, delete, web, HttpResponse, Responder};

struct Todo {
    id: i32,
    title: String,
    completed: bool,
}

struct AppState {
    todos: Vec<Todo>,
}

impl AppState {
    fn new() -> Self {
        AppState {
            todos: Vec::new(),
        }
    }
}

#[get("/todos")]
async fn get_todos(state: web::Data<AppState>) -> impl Responder {
    HttpResponse::Ok().json(&state.todos)
}

#[post("/todos")]
async fn create_todo(todo: web::Json<Todo>, state: web::Data<AppState>) -> impl Responder {
    let id = state.todos.len() as i32;
    let new_todo = Todo {
        id,
        title: todo.title.clone(),
        completed: todo.completed,
    };
    state.todos.push(new_todo);
    HttpResponse::Created().json(&new_todo)
}

#[put("/todos/{id}")]
async fn update_todo(
    id: web::Path<i32>,
    todo: web::Json<Todo>,
    state: web::Data<AppState>,
) -> impl Responder {
    let index = state.todos.iter().position(|t| t.id == *id);
    if let Some(index) = index {
        let updated_todo = Todo {
            id: *id,
            title: todo.title.clone(),
            completed: todo.completed,
        };
        state.todos[index] = updated_todo;
        HttpResponse::Ok().json(&updated_todo)
    } else {
        HttpResponse::NotFound().finish()
    }
}

#[delete("/todos/{id}")]
async fn delete_todo(id: web::Path<i32>, state: web::Data<AppState>) -> impl Responder {
    let index = state.todos.iter().position(|t| t.id == *id);
    if let Some(index) = index {
        let deleted_todo = state.todos.remove(index);
        HttpResponse::Ok().json(&deleted_todo)
    } else {
        HttpResponse::NotFound().finish()
    }
}
In this example, we define a Todo struct to represent our data model, and an AppState struct to hold our application state. We define four request handlers using the get, post, put, and delete macros to handle GET, POST, PUT, and DELETE requests, respectively.
The get_todos handler returns a list of todos in the application state as a JSON array. The create_todo handler creates a new todo and adds it to the application state, and returns the new todo as a JSON object with a 201 Created status code. The update_todo handler updates an existing todo with the given ID, and returns the updated todo as a JSON object with a 200 OK status code. The delete_todo handler deletes an existing todo with the given ID, and returns the deleted todo as a JSON object with a 200 OK status code.
We use the web::Data type to pass the application state to the request handlers. The web::Json type is used to automatically deserialize the JSON request body into a Todo struct.
With these request handlers, we can perform CRUD operations on our data model using HTTP requests. For example, we can create a new todo using a POST request to /todos with a JSON body:
POST /
todos HTTP/1.1
Content-Type: application/json

{
  "title": "Buy groceries",
  "completed": false
}
The server would then create a new todo with the provided title and completed status and return a response with the new todo’s ID:
HTTP/1.1 201 Created
Content-Type: application/json

{
  "id": 1,
  "title": "Buy groceries",
  "completed": false
}
To implement this behavior in Actix Web, we can define a new route with a handler function that reads the request body and creates a new todo in our data store:
async fn create_todo(
    pool: web::Data<DbPool>,
    todo: web::Json<NewTodo>,
) -> Result<HttpResponse, Error> {
    let conn = pool.get()?;
    let new_todo = todo.into_inner();
    let todo = Todo::create(&conn, new_todo)?;

    Ok(HttpResponse::Created().json(todo))
}

fn config(cfg: &mut web::ServiceConfig) {
    cfg.service(
        web::resource("/todos")
            .route(web::post().to(create_todo))
    );
}
In this example, we use the web::Json extractor to parse the request body into a NewTodo struct, which we can then use to create a new Todo object in our database using the Todo::create method. We then return the created todo as JSON in the response body, along with the 201 Created status code.
We can similarly implement the other CRUD operations using the appropriate HTTP methods and route handlers. For example, to retrieve a list of all todos, we could define a route and handler like this:
async fn get_todos(pool: web::Data<DbPool>) -> Result<HttpResponse, Error> {
    let conn = pool.get()?;
    let todos = Todo::list(&conn)?;

    Ok(HttpResponse::Ok().json(todos))
}

fn config(cfg: &mut web::ServiceConfig) {
    cfg.service(
        web::resource("/todos")
            .route(web::get().to(get_todos))
            .route(web::post().to(create_todo))
    );
}
In this example, we use the Todo::list method to retrieve all todos from the database and return them as JSON in the response body with the 200 OK status code.
Handling errors and status codes
In any real-world application, it’s important to handle errors and return appropriate HTTP status codes to clients. Actix Web provides several tools to help with this.
One way to handle errors is to use the Result type in our handler functions, with the ? operator to propagate errors up the call stack. For example, in our create_todo function, we return a Result<HttpResponse, Error>. This allows us to handle errors returned by our Todo::create method, as well as any errors that might occur when accessing the database connection pool, using the ? operator.
Actix Web also provides several convenience methods for returning HTTP status codes in response to client requests. For example, we can use the HttpResponse::BadRequest method to return a 400 Bad Request status code when a client sends a request with invalid data:
async fn create_todo(
    pool: web::Data<DbPool>,
    todo: web::Json<NewTodo>,
) -> Result<HttpResponse, Error> {
    let conn = pool.get()?;
    let new_todo = todo.into_inner();

    if new_todo.title.is_empty() {
        return Err(error::ErrorBadRequest("Title is required"));
    }

    let todo = Todo::create(&conn, new_todo)?;

    Ok(HttpResponse::Created().json(todo))
}
In this example, we check whether the title field in the NewTodo struct is empty, and return a 400 Bad Request status code with a helpful error message if it is.
We can also use the HttpResponse::NotFound method to return a 404 Not Found status code when a client requests a resource that doesn’t exist, and the HttpResponse::InternalServerError method to return a 500 Internal Server Error status code when an unexpected error occurs on the server.
async fn get_todo(
    pool: web::Data<DbPool>,
    path: web::Path<(i32,)>,
) -> Result<HttpResponse, Error> {
    let conn = pool.get()?;
    let id = path.0;

    let todo = Todo::find(&conn, id).ok_or_else(|| error::ErrorNotFound(format!("Todo {} not found", id)))?;

    Ok(HttpResponse::Ok().json(todo))
}
In this example, we use the Todo::find method to retrieve a single todo by its ID from the database. If the todo doesn’t exist, we return a 404 Not Found status code with an error message. If everything succeeds, we return the todo as JSON with a 200 OK status code.
By returning appropriate HTTP status codes and error messages, we can help clients understand what went wrong with their requests and take appropriate action.
Serializing and deserializing data using JSON and other formats
Serialization is the process of converting data structures or objects into a format that can be stored or transmitted over a network. Deserialization is the reverse process, where the serialized data is converted back into its original form.
Actix Web supports serialization and deserialization of data using various formats, including JSON, XML, and MsgPack.
To use JSON serialization in Actix Web, we need to enable the serde and actix-web crates in our Cargo.toml file. Then, we can use the Json helper type provided by Actix Web to deserialize JSON data into Rust structs, and to serialize Rust structs into JSON data.
Here’s an example of deserializing a JSON request body into a Rust struct:
use serde::{Deserialize, Serialize};

#[derive(Debug, Deserialize)]
struct CreateUser {
    name: String,
    email: String,
    password: String,
}

async fn create_user(info: web::Json<CreateUser>) -> impl Responder {
    println!("{:?}", info);
    // ... create user logic ...
}
In the above code, we define a CreateUser struct with name, email, and password fields. We use the serde crate’s Deserialize trait to specify how to deserialize JSON data into this struct.
We then define an async function called create_user that takes a web::Json<CreateUser> parameter. The web::Json type is a helper type provided by Actix Web that automatically deserializes the request body into a CreateUser struct.
We can also serialize Rust structs into JSON using the Json type:
use serde::{Deserialize, Serialize};

#[derive(Debug, Serialize)]
struct User {
    id: u32,
    name: String,
    email: String,
}

async fn get_user(id: web::Path<u32>) -> impl Responder {
    let user = User {
        id: id.into_inner(),
        name: "John Doe".to_string(),
        email: "johndoe@example.com".to_string(),
    };
    web::Json(user)
}
In the above code, we define a User struct with id, name, and email fields. We use the serde crate’s Serialize trait to specify how to serialize this struct into JSON.
We then define an async function called get_user that takes a web::Path<u32> parameter representing the user ID. Inside the function, we create a User struct with dummy data, and then return a web::Json response containing the serialized User struct.
Actix Web also supports serialization and deserialization of other formats, such as XML and MsgPack, using the actix-web-httpmessage and serde-xml-rs crates, and the actix-web-msgpack and rmp-serde crates, respectively.
Validating and sanitizing input data
Validating and sanitizing input data is a critical aspect of building a robust and secure web application. Actix Web provides several tools to validate and sanitize input data before processing it.
One of the most commonly used validation tools in Actix Web is the validator crate. This crate provides a set of validation functions that can be used to validate input data. For example, we can use the is_email function to validate an email address:
use validator::validate_email;

fn validate_email_address(email: &str) -> bool {
    validate_email(email).is_ok()
}
We can also use the sanitize_email function to sanitize an email address:
use validator::sanitize::sanitize_email;

fn sanitize_email_address(email: &str) -> String {
    sanitize_email(email)
}
Actix Web also provides built-in support for validating JSON input using the serde_json crate. We can use the #[derive(Deserialize, Serialize)] attribute to automatically generate a JSON serializer and deserializer for our struct:
use serde::{Deserialize, Serialize};

#[derive(Deserialize, Serialize)]
struct Todo {
    title: String,
    completed: bool,
}
We can then use the Json extractor to automatically deserialize the request body into our Todo struct:
use actix_web::{web, App, HttpResponse, Responder};

async fn create_todo(todo: web::Json<Todo>) -> impl Responder {
    // process the todo
    HttpResponse::Ok()
}
Actix Web also provides built-in support for validating query parameters and path parameters using the web::Path and web::Query extractors. For example, we can use the web::Path extractor to extract a path parameter and validate it using the validator crate:
use actix_web::{web, App, HttpResponse, Responder};
use validator::Validate;

#[derive(Validate)]
struct PathParams {
    #[validate(length(min = 3, max = 10))]
    id: String,
}

async fn get_todo_by_id(path_params: web::Path<PathParams>) -> impl Responder {
    // process the request
    HttpResponse::Ok()
}
In the example above, we use the #[derive(Validate)] attribute to automatically generate validation code for our PathParams struct. We then use the web::Path extractor to extract the path parameter and validate it using the validator crate.
Implementing pagination, filtering, and sorting in your API
Pagination, filtering, and sorting are important features that are often required in RESTful APIs. In Actix Web, we can implement these features by parsing the query string parameters and using them to modify the response returned by our handlers.
Pagination
Pagination is used to limit the number of results returned by an API and to allow clients to navigate through large result sets. To implement pagination, we need to add two query string parameters to our API: page and limit. The page parameter specifies the page number of the result set, while the limit parameter specifies the maximum number of results per page.
Here’s an example of how to implement pagination in Actix Web:
async fn get_users(
    web::Query(pagination): web::Query<PaginationParams>,
    // Other parameters
) -> impl Responder {
    let page = pagination.page.unwrap_or(1);
    let limit = pagination.limit.unwrap_or(10);
    let offset = (page - 1) * limit;

    let users = get_users_from_database(offset, limit);
    // Return paginated response
}
In the example above, we parse the page and limit parameters using a custom PaginationParams struct, and calculate the offset for the database query. We then fetch the users from the database using the offset and limit, and return a paginated response.
Filtering
Filtering is used to retrieve a subset of data that matches a specific set of criteria. In Actix Web, we can implement filtering by adding query string parameters to our API that correspond to the fields we want to filter on.
Here’s an example of how to implement filtering in Actix Web:
async fn get_users(
    web::Query(filter): web::Query<UserFilter>,
    // Other parameters
) -> impl Responder {
    let users = get_users_from_database_filtered(&filter);
    // Return filtered response
}
In the example above, we parse the filter query string parameter using a custom UserFilter struct, and use it to fetch the users from the database that match the filter criteria.
Sorting
Sorting is used to order the results of an API by one or more fields. In Actix Web, we can implement sorting by adding query string parameters to our API that correspond to the fields we want to sort on.
Here’s an example of how to implement sorting in Actix Web:
async fn get_users(
    web::Query(sort): web::Query<UserSort>,
    // Other parameters
) -> impl Responder {
    let users = get_users_from_database_sorted(&sort);
    // Return sorted response
}
In the example above, we parse the sort query string parameter using a custom UserSort struct, and use it to fetch the users from the database sorted by the specified fields.
Caching responses to improve performance
Caching responses is a technique used to improve the performance of web applications by reducing the number of requests that need to be made to the server. By caching frequently accessed data, you can reduce the amount of time it takes to serve the data to the client.
In Actix Web, you can use a middleware called HttpCache to implement caching for your responses. This middleware uses the HTTP Cache-Control header to determine how long a response should be cached for.
To use HttpCache, you first need to add it as middleware to your application:
use actix_web::middleware::HttpCache;

let app = App::new()
    .wrap(HttpCache::new())
    .service(/* your routes */);
This will enable caching for all responses that do not have an explicit Cache-Control header.
To specify a cache time for a specific response, you can use the Cache-Control header:
use actix_web::{HttpResponse, http::header};

fn my_handler() -> HttpResponse {
    let response = /* create your response */;

    // Cache the response for 5 minutes
    response.header(header::CACHE_CONTROL, "max-age=300");

    response
}
This will cache the response for 5 minutes.
Note that caching can also be implemented at the server level using tools like Varnish or Nginx. However, using a middleware like HttpCache can give you more fine-grained control over caching for individual responses in your application.
Securing your API with HTTPS and SSL/TLS
Securing your API with HTTPS and SSL/TLS is crucial for protecting your users’ data and preventing unauthorized access to your API. HTTPS is an extension of the HTTP protocol that uses encryption to protect the communication between the client and the server. SSL/TLS is the protocol used to establish a secure connection over HTTPS.
In Actix Web, you can use the openssl crate to enable SSL/TLS support in your application. Here’s an example of how to use openssl to enable SSL/TLS:
use openssl::ssl::{SslAcceptor, SslFiletype, SslMethod};

let mut builder = SslAcceptor::mozilla_intermediate(SslMethod::tls()).unwrap();
builder.set_private_key_file("/path/to/private_key.pem", SslFiletype::PEM).unwrap();
builder.set_certificate_chain_file("/path/to/certificate_chain.pem").unwrap();

let app = App::new()
    .service(/* your routes */);

let server = HttpServer::new(app)
    .bind_openssl("0.0.0.0:8443", builder)
    .unwrap();
In this example, we create an SslAcceptor using the mozilla_intermediate method to use a secure SSL/TLS configuration. We then set the paths to our private key and certificate chain files. Finally, we create an HttpServer and bind it to port 8443 using SSL/TLS.
Once you have enabled SSL/TLS in your application, you can use HTTPS URLs to access your API. For example, https://example.com/api/v1.
It’s important to note that you will need to obtain a valid SSL/TLS certificate from a trusted Certificate Authority (CA) to enable HTTPS in your application. There are many CAs that offer SSL/TLS certificates, and some hosting providers may offer them as part of their services.
Implementing rate limiting and throttling to prevent abuse
Implementing rate limiting and throttling in your API is an important way to prevent abuse and ensure that your API is performing optimally. Rate limiting and throttling can help prevent denial of service attacks, protect your resources, and ensure a good user experience for your users.
In Actix Web, you can use the ratelimit crate to implement rate limiting and throttling in your API. Here’s an example of how to use ratelimit to limit the number of requests per minute from a specific IP address:
use actix_web::{Error, HttpResponse, Result};
use ratelimit::{MemoryStore, RateLimiter};

async fn index(rate_limiter: web::Data<RateLimiter<MemoryStore>>) -> Result<HttpResponse, Error> {
    let client_ip = "127.0.0.1".parse().unwrap();
    let rate_limit_key = format!("ip:{}", client_ip);

    if rate_limiter.check(&rate_limit_key, 60, 1).is_err() {
        return Err(Error::TooManyRequests());
    }

    // Process the request

    Ok(HttpResponse::Ok().finish())
}

fn main() {
    let rate_limiter = RateLimiter::<MemoryStore>::new(100, Duration::from_secs(60));
    let rate_limiter = web::Data::new(rate_limiter);

    let app = App::new()
        .service(web::resource("/").to(index))
        .app_data(rate_limiter);

    HttpServer::new(app)
        .bind("127.0.0.1:8080")
        .unwrap()
        .run()
        .unwrap();
}
In this example, we create a RateLimiter using the MemoryStore backend to store rate limiting information in memory. We then define an index function that takes a Data<RateLimiter<MemoryStore>> parameter to access the rate limiter. Inside the index function, we check the rate limit for the client IP address, allowing only one request per minute. If the rate limit is exceeded, we return a TooManyRequests error to the client.
Finally, we create an App with the index route and the rate_limiter data, and we bind the HttpServer to port 8080.
This is just a simple example of how to use ratelimit in Actix Web. There are many other ways to configure and use ratelimit, such as using a Redis backend, customizing the rate limit window and interval, and applying different rate limits to different routes or users.
Versioning your API to ensure backward compatibility
API versioning is an important aspect of developing and maintaining an API. It ensures backward compatibility and provides a way to add new features or make changes without breaking existing client applications.
There are different approaches to versioning an API, but one common approach is to include the version number in the URL. For example, instead of using /todos, we can use /v1/todos for the first version of our API. If we need to make breaking changes, we can create a new version of the API and use a different URL, such as /v2/todos.
Another approach is to include the version number in the request headers. This allows clients to specify which version of the API they want to use. For example, we can use the Accept header to specify the version:
Accept: application/vnd.myapi.v1+jsonThis tells the server to return a response in the JSON format for version 1 of the API. If we want to use a different version, we can change the version number in the header.
Regardless of the approach, it’s important to document the API versioning scheme and provide clear guidelines for clients to follow. This helps avoid confusion and ensures that clients can use the API effectively.
Building a client library for your API in Rust
Building a client library for your API in Rust can be a great way to simplify integration with your API and provide a more seamless experience for your users. Here are some general steps you can follow to build a client library:
-
Define the API endpoints: Start by defining the API endpoints that your client library will interact with. This can include HTTP methods, endpoint URLs, and request and response data structures.
-
Choose a HTTP client library: Choose a HTTP client library that fits your needs. Popular options in the Rust ecosystem include reqwest, hyper, and surf.
-
Define the client library interface: Define an interface for the client library that makes it easy for developers to use. This can include functions for each API endpoint, as well as helper functions for authentication, pagination, error handling, and other common tasks.
-
Implement the API endpoints: Implement the API endpoints using the HTTP client library. Make sure to handle errors, parse response data, and handle any necessary serialization and deserialization.
-
Test the client library: Test the client library to ensure that it works as expected. Write unit tests for each API endpoint, as well as integration tests that cover common use cases.
-
Publish the client library: Publish the client library to a package registry such as crates.io so that other developers can use it.
By following these steps, you can create a powerful client library that makes it easy for developers to interact with your API in Rust.
Chapter 3: Building Real-Time Applications with Actix Web and WebSockets
Introduction to WebSockets
WebSockets are a protocol for two-way communication between a client and a server over a single TCP connection. Unlike traditional HTTP requests, WebSockets allow the server to push data to the client without the client having to request it.
WebSockets are often used in real-time web applications such as chat rooms, online gaming, and financial trading platforms. They are supported by most modern web browsers and can be implemented using a variety of programming languages and frameworks.
In a WebSocket connection, the client and server start with an HTTP handshake, during which the client sends a special HTTP request containing an Upgrade header indicating that it wants to establish a WebSocket connection. If the server agrees to the upgrade, it responds with a special HTTP response that indicates that the WebSocket connection has been established.
After the handshake, both the client and server can send messages to each other at any time using a simple binary or text-based protocol. The messages can be arbitrarily large, and can contain any data that can be serialized to binary or text format.
WebSockets can be implemented using low-level APIs or high-level frameworks. In Rust, Actix Web provides a high-level WebSocket API that makes it easy to implement real-time features in web applications.
Creating a real-time chat application
Creating a real-time chat application using WebSockets can be a great way to explore the power of this protocol. In Rust, Actix Web provides a high-level WebSocket API that makes it easy to implement real-time features in web applications.
Here is an example of how you can create a real-time chat application using Actix Web and WebSockets:
-
Start by creating a new Actix Web project using
cargo new <project_name> --bin. -
Add the following dependencies to your
Cargo.tomlfile:actix-web = "3.2" actix-rt = "2.0" serde = { version = "1.0", features = ["derive"] } serde_json = "1.0"The
serdeandserde_jsondependencies will be used to serialize and deserialize messages in JSON format. -
In your
main.rsfile, add the following code to set up a WebSocket endpoint:use actix_web::{web, App, HttpRequest, HttpResponse, HttpServer, Responder}; use actix_web_actors::ws; use serde::{Deserialize, Serialize}; use std::collections::HashMap; #[derive(Debug, Deserialize, Serialize)] struct ChatMessage { username: String, message: String, } struct ChatSession { id: usize, username: String, room: String, clients: HashMap<usize, ws::WebSocketWriter>, } impl ChatSession { fn new(id: usize, username: String, room: String) -> Self { ChatSession { id, username, room, clients: HashMap::new(), } } fn add_client(&mut self, client: ws::WebSocketWriter) { self.clients.insert(self.id, client); } fn remove_client(&mut self, id: usize) { self.clients.remove(&id); } fn broadcast_message(&mut self, message: &str) { for client in self.clients.values_mut() { client.send(message); } } } async fn chat_route(req: HttpRequest, stream: web::Payload) -> impl Responder { let session = ChatSession::new(0, "anonymous".to_owned(), "general".to_owned()); ws::start( session, &req, stream, |session: &mut ChatSession, msg: Result<ws::Message, ws::ProtocolError>| { match msg { Ok(ws::Message::Ping(msg)) => { session.broadcast_message(&msg.to_string()); } Ok(ws::Message::Text(text)) => { let message: ChatMessage = serde_json::from_str(&text).unwrap(); session.broadcast_message(&text); } _ => {} } Ok(()) }, ) } #[actix_web::main] async fn main() -> std::io::Result<()> { HttpServer::new(|| { App::new() .route("/chat", web::get().to(chat_route)) }) .bind("127.0.0.1:8080")? .run() .await } -
In the above code, we define a
ChatMessagestruct to represent messages sent by clients. We also define aChatSessionstruct to represent a chat session, which consists of a unique ID, a username, a room name, and a map of clients connected to the session. -
In the
chat_routefunction, we create a newChatSessionstruct for each WebSocket connection and add it to the list of sessions. We also send a welcome message to the client.
async fn chat_route(req: HttpRequest, stream: web::Payload) -> Result<HttpResponse, Error> {
    let resp = ws::start(
        ChatSession {
            id: 0,
            name: None,
            room: "general".to_owned(),
            addr: None,
            sessions: Arc::new(Mutex::new(Vec::new())),
        },
        &req,
        stream,
    );

    if let Ok(ref resp) = resp {
        // Add new session
        let mut sessions = SESSIONS.lock().await;
        sessions.push(resp.get_inner().clone());
    }

    resp
}- In the
ChatSessionstruct, we handle incoming WebSocket messages in thehandle_messagemethod. We parse the message as a string and check if it starts with the/nickcommand, which is used to set the user’s nickname. If it does, we update thenamefield of the session.
impl Actor for ChatSession {
    type Context = ws::WebsocketContext<Self>;

    fn started(&mut self, ctx: &mut Self::Context) {
        // Add session to list of sessions
        self.addr = Some(ctx.address());
        let mut sessions = self.sessions.lock().unwrap();
        sessions.push(ctx.address().recipient());
    }
}

impl StreamHandler<Result<ws::Message, ws::ProtocolError>> for ChatSession {
    fn handle(&mut self, msg: Result<ws::Message, ws::ProtocolError>, ctx: &mut Self::Context) {
        match msg {
            Ok(ws::Message::Text(text)) => {
                // Handle text message
                if text.starts_with("/nick") {
                    // Set nickname
                    let nickname = text.splitn(2, ' ').nth(1).unwrap_or("");
                    self.name = Some(nickname.to_owned());
                    ctx.text(format!("Nickname set to {}", nickname));
                } else {
                    // Broadcast message to all sessions in the same room
                    let sessions = self.sessions.lock().unwrap();
                    for session in &*sessions {
                        if let Some(addr) = session.get() {
                            addr.do_send(ChatMessage {
                                from: self.name.clone(),
                                content: text.clone(),
                                room: self.room.clone(),
                            }).unwrap();
                        }
                    }
                }
            }
            // Handle other message types
            _ => {}
        }
    }
}- Finally, we define a
ChatMessagestruct to represent a message sent by a client, and aChatEventenum to represent various events that can occur in the chat, such as a new client joining or leaving the chat or a new message being sent.
#[derive(Message)]
#[rtype(result = "()")]
struct ChatMessage {
    from: Option<String>,
    content: String,
    room: String,
}

#[derive(Message)]
#[rtype(result = "()")]
enum ChatEvent {
    Join(String, Recipient<ChatMessage>),
    Leave(String),
    Message(ChatMessage),
}
With these components in place, we now have the basic structure of a real-time chat application using WebSockets in Actix Web. We can start the application with cargo run and navigate to http://localhost:8080 in a web browser to open the chat interface. Multiple users can connect to the chat and send messages in real time.
Broadcasting messages to multiple clients
To broadcast messages to multiple clients in a chat session, we can maintain a list of all connected clients in the session and send the message to each client.
We can add a Vec field to the ChatSession struct to store a list of connected clients:
struct ChatSession {
    id: usize,
    name: String,
    clients: Vec<mpsc::UnboundedSender<String>>,
    ...
}
When a new client connects to the session, we can add its sender to the list:
async fn chat_route(
    req: HttpRequest,
    stream: web::Payload,
    srv: web::Data<Arc<ChatServer>>,
) -> Result<HttpResponse, Error> {
    ...
    let (tx, rx) = mpsc::unbounded_channel();
    let id = session.next_id().await;
    session.clients.push(tx);

    let resp = ws::start(ChatSession {
        id,
        name: String::new(),
        clients: session.clients.clone(),
        rx,
    }, &req, stream)?;
    Ok(resp)
}
Note that we use clone() to create a new vector containing all connected clients, so that each session has its own list of clients.
When a client sends a message, we can broadcast it to all other clients in the session:
impl Actor for ChatSession {
    type Context = ws::WebsocketContext<Self>;

    fn started(&mut self, ctx: &mut Self::Context) {
        ...
    }

    fn stopped(&mut self, ctx: &mut Self::Context) {
        ...
    }
}

impl StreamHandler<Result<ws::Message, ws::ProtocolError>> for ChatSession {
    fn handle(&mut self, msg: Result<ws::Message, ws::ProtocolError>, ctx: &mut Self::Context) {
        match msg {
            Ok(ws::Message::Text(text)) => {
                for tx in &self.clients {
                    let _ = tx.send(text.clone());
                }
            }
            ...
        }
    }
}
In the handle() method, we iterate over the list of clients and send a copy of the message to each client using its sender. We use clone() again to create a new copy of the message, since tx.send() takes ownership of the message.
With this implementation, all clients connected to a chat session will receive messages sent by any other client.
Handling WebSocket errors and disconnections
Handling WebSocket errors and disconnections is an important part of building a robust real-time application. When a WebSocket connection is closed due to an error or by the client, we need to be able to handle that event gracefully and clean up any resources that were being used by the session.
In Actix Web, we can handle WebSocket errors and disconnections by implementing the StreamHandler trait for our session type. This trait defines a number of methods that we can override to handle different types of events that can occur on a WebSocket stream.
For example, the handle_error method is called when an error occurs on the WebSocket stream. We can use this method to log the error and take any appropriate action, such as closing the connection:
use actix::prelude::*;
use actix_web_actors::ws;

struct ChatSession {
    // ...
}

impl Actor for ChatSession {
    type Context = ws::WebsocketContext<Self>;

    // ...
}

impl StreamHandler<Result<ws::Message, ws::ProtocolError>> for ChatSession {
    fn handle(&mut self, msg: Result<ws::Message, ws::ProtocolError>, ctx: &mut Self::Context) {
        // Handle incoming messages here
    }

    fn handle_error(&mut self, err: ws::ProtocolError, ctx: &mut Self::Context) {
        // Log the error
        error!("WebSocket error: {:?}", err);

        // Close the connection
        ctx.close(None);
    }

    fn on_shutdown(&mut self, ctx: &mut Self::Context) {
        // Clean up any resources being used by the session
    }
}
In addition to the handle_error method, the StreamHandler trait also defines methods for handling other types of events, such as the on_shutdown method, which is called when the WebSocket stream is closed.
By implementing these methods, we can ensure that our WebSocket sessions are robust and handle errors and disconnections gracefully.
Integrating WebSockets with Actix Web’s routing and middleware
Integrating WebSockets with Actix Web’s routing and middleware involves adding WebSocket support to an existing Actix Web application. This can be done by adding a new route to handle WebSocket connections and configuring any necessary middleware.
To add WebSocket support to an Actix Web application, first create a new route that handles WebSocket connections. This can be done using the route method, which takes a path and a closure that returns an HttpResponse object or an impl Responder object. In the closure, we can use the ws method to create a new WebSocket route:
use actix_web::{web, HttpResponse};
use actix_web_actors::ws;

fn websocket_route(r: &mut web::ServiceConfig) {
    r.route("/ws/", web::get().to(ws_index));
}

fn ws_index(req: HttpRequest, stream: web::Payload) -> impl Responder {
    let res = ws::start(ChatSession::new(), &req, stream);
    println!("WebSocket connection started");
    res
}
In this example, we create a new WebSocket route at the path /ws/ that calls the ws_index function. The ws::start method is used to start a new WebSocket connection using the ChatSession struct we defined earlier.
Next, we need to add any necessary middleware for WebSocket connections. This can be done using the wrap method, which takes a closure that returns a middleware object. For example, to add a middleware that logs all incoming WebSocket messages, we could define a middleware function like this:
use actix_web::{HttpRequest, web, Error};
use actix_web_actors::ws;

async fn logging_middleware(
    req: HttpRequest,
    ws: web::Payload,
    srv: web::Data<Addr<ChatSession>>,
) -> Result<HttpResponse, Error> {
    let res = ws::start(ChatSession::new(), &req, ws)?;
    println!("WebSocket connection started");
    Ok(res)
}
In this example, we define a middleware function that takes an incoming HttpRequest, a Payload object, and a Data object containing the Addr of the ChatSession. We then use the ws::start method to start a new WebSocket connection with the ChatSession, and log a message when the connection is started.
Finally, we need to add the middleware to our Actix Web application using the wrap method:
let app = App::new()
    .data(addr.clone())
    .wrap(middleware::Logger::default())
    .wrap_fn(|req, srv| {
        let srv = srv.clone();
        logging_middleware(req, srv)
    })
    .service(websocket_route);
In this example, we add the Logger middleware to log all incoming requests, and add the logging_middleware middleware to handle incoming WebSocket connections. We then add our websocket_route to the Actix Web application using the service method.
Scaling your WebSocket server with multiple workers and load balancing
To scale our WebSocket server with multiple workers and load balancing, we can use a combination of process-based parallelism and load balancing techniques.
First, we can use Actix Web’s built-in support for multiple workers to run multiple instances of our application in parallel. This can be done by setting the --workers option when starting our application with actix-web command.
For example, to run our WebSocket server with four worker processes, we can use the following command:
$ actix-web run --workers 4Each worker process will run a separate instance of our application, and incoming connections will be distributed across these instances by the operating system’s networking stack.
However, to further improve scalability and reliability, we can also use a load balancer to distribute incoming connections across multiple servers running our application.
One popular load balancing solution is Nginx, which can be configured to distribute WebSocket connections across multiple backend servers using the proxy_pass directive.
For example, to load balance WebSocket connections across two backend servers running our application on ports 8080 and 8081, we can use the following configuration:
http {
  upstream websocket {
    server localhost:8080;
    server localhost:8081;
  }

  server {
    listen 80;

    location /chat {
      proxy_pass http://websocket;
      proxy_http_version 1.1;
      proxy_set_header Upgrade $http_upgrade;
      proxy_set_header Connection "upgrade";
    }
  }
}
This configuration sets up a reverse proxy for WebSocket connections on the /chat path, which distributes connections across the two backend servers using the websocket upstream.
By using process-based parallelism and load balancing techniques, we can ensure that our WebSocket server can handle a large number of concurrent connections and provide a scalable and reliable real-time communication solution.
Implementing custom WebSocket protocols and message formats
Actix Web provides support for the WebSocket protocol through the actix-web-socket crate, which allows you to create WebSocket servers that can handle custom protocols and message formats.
To implement a custom WebSocket protocol, you can define a new type that implements the WebSocketProtocol trait. This trait defines methods for parsing incoming WebSocket messages and generating outgoing messages.
Here’s an example of how you can define a custom WebSocket protocol:
use actix_web::web::Bytes;
use actix_web_socket::{Message, WebSocketProtocol};

struct MyProtocol;

impl WebSocketProtocol for MyProtocol {
    fn on_message(&mut self, msg: Message) -> Option<Message> {
        // Parse incoming message
        let bytes = match msg {
            Message::Binary(bytes) => bytes,
            _ => return None, // Unsupported message type
        };

        // Process message and generate response
        let response = Bytes::from(format!("Processed {}", bytes));

        // Generate outgoing message
        Some(Message::Binary(response))
    }
}
In this example, we define a new type called MyProtocol that implements the WebSocketProtocol trait. The on_message method is called whenever a new message is received on the WebSocket connection.
Inside the on_message method, we first check the type of the incoming message to ensure that it’s a binary message. If it’s not, we return None to indicate that the message is unsupported.
Next, we process the incoming message and generate a response. In this case, we simply append the string “Processed ” to the incoming message and convert it to a Bytes object.
Finally, we generate an outgoing message by wrapping the response in a Message::Binary variant.
To use this custom protocol in your WebSocket server, you can pass an instance of MyProtocol to the start method of your WebSocket actor:
use actix_web_socket::{start_default, WebSocket};

fn my_websocket_route(ws: WebSocket) {
    let protocol = MyProtocol;
    start_default(ws, protocol);
}
In this example, we define a new WebSocket route called my_websocket_route that takes a WebSocket actor as an argument. Inside the function, we create an instance of MyProtocol and pass it to the start_default method, which starts the WebSocket actor with the default settings and the specified protocol.
Securing your WebSocket connections with SSL/TLS
Securing WebSocket connections with SSL/TLS is essential to protect the data transmitted over the wire from eavesdropping and tampering. The SSL/TLS protocol provides encryption and authentication to ensure the confidentiality and integrity of the data, respectively.
In Actix Web, you can enable SSL/TLS for your WebSocket server by configuring an HttpServer with an SSL certificate and key. Here’s an example:
use std::fs;
use std::path::Path;
use actix_web::{web, App, HttpServer, HttpRequest, HttpResponse};
use openssl::ssl::{SslAcceptor, SslFiletype, SslMethod};

async fn websocket_handler(req: HttpRequest, stream: web::Payload) -> Result<HttpResponse, actix_web::Error> {
    // WebSocket handling logic here
    Ok(HttpResponse::Ok().finish())
}

#[actix_web::main]
async fn main() -> std::io::Result<()> {
    // Load SSL certificate and key
    let cert_file = Path::new("path/to/cert.pem");
    let key_file = Path::new("path/to/key.pem");
    let cert = fs::read(cert_file)?;
    let key = fs::read(key_file)?;

    // Create SSL acceptor
    let mut builder = SslAcceptor::mozilla_intermediate(SslMethod::tls()).unwrap();
    builder.set_private_key(&key, SslFiletype::PEM).unwrap();
    builder.set_certificate(&cert).unwrap();
    let acceptor = builder.build();

    // Start HTTP server with SSL/TLS support
    HttpServer::new(|| {
        App::new()
            .route("/ws/", web::get().to(websocket_handler))
    })
    .bind_openssl("0.0.0.0:8000", acceptor)?
    .run()
    .await
}
In this example, we first load the SSL certificate and key from their respective files using the fs module. We then create an SslAcceptor using the openssl crate and configure it with the certificate and key. Finally, we pass the acceptor to the bind_openssl method of HttpServer to start the server with SSL/TLS support.
With SSL/TLS enabled, the WebSocket connection between the client and server will be encrypted and secure.
Building a real-time game or collaborative editing application using WebSockets and Actix Web
Building a real-time game or collaborative editing application using WebSockets and Actix Web can be a fun and challenging project. WebSockets enable bidirectional communication between a client and a server, which makes it possible to build real-time applications that can handle multiple clients simultaneously.
To build a real-time game or collaborative editing application using WebSockets and Actix Web, you can follow these steps:
-
Define the game or editing protocol: Before you start building your application, you need to define the protocol that you will use for communication between the client and server. This protocol should define the messages that will be sent between the client and server, as well as the format of those messages.
-
Set up the WebSocket connection: In Actix Web, you can use the
ws()function to set up a WebSocket connection. This function takes a closure that will be called when a client connects to the WebSocket endpoint. In this closure, you can create a newWebSocketSessionstruct that will handle communication with the client. -
Handle WebSocket messages: Once you have set up the WebSocket connection, you can handle incoming messages from the client by implementing the
MessageHandlertrait. This trait defines ahandlefunction that will be called when a new message is received from the client. In this function, you can parse the message and take appropriate action based on the protocol that you have defined. -
Send messages to clients: To send messages to clients, you can use the
WebSocketSession::sendfunction. This function takes a message as an argument and sends it to the client. You can also use theWebSocketSession::broadcastfunction to send a message to all connected clients. -
Handle errors and disconnections: When using WebSockets, it’s important to handle errors and disconnections gracefully. Actix Web provides a number of functions that you can use to handle errors and disconnections, such as the
WebSocketSession::closefunction, which can be used to close a WebSocket connection. -
Scale your WebSocket server: To handle a large number of clients, you may need to scale your WebSocket server across multiple processes or machines. Actix Web provides support for clustering and load balancing, which makes it easy to scale your application.
-
Test your application: Once you have implemented your application, it’s important to test it thoroughly to ensure that it works as expected. You can use tools like
WebSocketClientorwscatto test your WebSocket endpoints.
By following these steps, you can build a real-time game or collaborative editing application using WebSockets and Actix Web.
For a full example please visit https://github.com/antholeole/actix-sockets.
Chapter 4: Implementing Authentication and Authorization in Actix Web
Overview of authentication and authorization
Authentication and authorization are two related but distinct concepts in computer security. Authentication is the process of verifying the identity of a user, system, or device, while authorization is the process of granting or denying access to a particular resource or system based on the authenticated user’s permissions.
In web applications, authentication typically involves verifying the identity of a user by prompting them to enter a username and password, or by using a third-party authentication provider such as OAuth or OpenID Connect. Once the user has been authenticated, authorization comes into play, which determines what actions the user is allowed to perform based on their role or permissions.
Proper authentication and authorization mechanisms are critical for ensuring the security of web applications and protecting sensitive data and resources from unauthorized access. Implementing token-based authentication with Actix Web Token-based authentication is a popular approach for securing web applications and APIs. It involves the use of a token, usually a JSON Web Token (JWT), which is issued by the server to the client after successful authentication. The client then includes this token in subsequent requests to the server to prove its identity.
Here’s how you can implement token-based authentication with Actix Web:
-
Define a
Userstruct to represent a user in your system. This struct should include any necessary fields, such as a username, password, email, or roles:struct User { username: String, password: String, email: String, roles: Vec<String>, } -
Create a function to generate a JWT based on a user’s credentials. This function should take a
Userstruct as input, verify the user’s credentials, and generate a JWT:fn generate_token(user: &User) -> Result<String, String> { // Verify user's credentials if user.username != "alice" || user.password != "password123" { return Err("Invalid username or password".to_string()); } // Create payload let payload = json!({ "username": user.username, "email": user.email, "roles": user.roles, "exp": Utc::now().timestamp() + 3600, // 1 hour from now }); // Create JWT let secret = "my_secret_key".as_bytes(); let header = Header::default(); let token = encode(&header, &payload, secret)?; Ok(token) }This function uses the
jsonwebtokencrate to encode a JWT using a secret key. The payload includes the user’s username, email, roles, and an expiration time. -
Create an endpoint for handling user authentication. This endpoint should take a username and password as input, verify the user’s credentials, and return a JWT if the credentials are valid:
async fn login(req: HttpRequest) -> impl Responder {
    // Get username and password from request body
    let body = req.body();
    let user = match serde_json::from_slice::<User>(&body) {
        Ok(user) => user,
        Err(_) => return HttpResponse::BadRequest().body("Invalid request body"),
    };

    // Generate JWT
    match generate_token(&user) {
        Ok(token) => HttpResponse::Ok().body(token),
        Err(e) => HttpResponse::Unauthorized().body(e),
    }
}
This endpoint uses the
serde_jsoncrate to deserialize the request body into aUserstruct. It then calls thegenerate_tokenfunction to generate a JWT based on the user’s credentials. -
Add authentication middleware to your application’s pipeline. This middleware should check the JWT included in each request’s
Authorizationheader and set the authenticated user on the request if the token is valid:async fn auth_middleware( req: ServiceRequest, srv: &mut dyn HttpService, ) -> Result<ServiceResponse, actix_web::Error> { // Get Authorization header from request let auth_header = match req.headers().get("Authorization") { Some(header) => header, None => return Ok(ServiceResponse::new(req.into_parts().0, HttpResponse::Unauthorized().finish())), }; // Get token from Authorization header let token = match auth_header.to_str() { Ok(header_str) => { let parts: Vec<&str> = header_str.split_whitespace().collect(); if parts.len() != 2 || parts{ // do not match the expected format return Err(AuthError::InvalidHeader); } let token = parts[1]; Ok(token.to_string()) } _ => Err(AuthError::MissingHeader), } }This function first checks if the
Authorizationheader is present in the HTTP request. If it is, it extracts the token from the header using a regular expression. If the header is not present, the function returns an error. -
In the
authmodule, create a new file namedmiddleware.rs. This file will contain the middleware function that will authenticate and authorize requests to protected routes. -
In
middleware.rs, define a new function namedauth_middlewarewith the following signature:use actix_web::{dev, Error, HttpMessage, HttpRequest, HttpResponse}; use futures::future::{ok, Either, Future}; use std::task::{Context, Poll}; pub struct AuthMiddleware {} impl<S, B> dev::Transform<S, ServiceRequest> for AuthMiddleware where S: Service< Request = ServiceRequest, Response = ServiceResponse<B>, Error = Error, > + 'static, B: MessageBody + 'static, { type Transform = AuthMiddlewareMiddleware<S, B>; type Error = Error; type InitError = (); type Future = Ready<Result<Self::Transform, Self::InitError>>; fn new_transform(&self, service: S) -> Self::Future { ok(AuthMiddlewareMiddleware { service }) } } pub struct AuthMiddlewareMiddleware<S, B> { service: S, } impl<S, B> Service for AuthMiddlewareMiddleware<S, B> where S: Service< Request = ServiceRequest, Response = ServiceResponse<B>, Error = Error, > + 'static, B: MessageBody + 'static, { type Request = ServiceRequest; type Response = ServiceResponse<B>; type Error = Error; type Future = Either< Ready<Result<Self::Response, Self::Error>>, Pin<Box<dyn Future<Output = Result<Self::Response, Self::Error>>>>, >; fn poll_ready(&mut self, cx: &mut Context<'_>) -> Poll<Result<(), Self::Error>> { self.service.poll_ready(cx) } fn call(&mut self, req: ServiceRequest) -> Self::Future { let headers = req.headers(); let token = match extract_token(headers) { Ok(token) => token, Err(_) => return Either::Left(ok(req.into_response(HttpResponse::Unauthorized().finish()))), }; match authenticate(&token) { Ok(user_id) => { req.extensions_mut().insert(user_id); Either::Right(Box::pin(self.service.call(req))) } Err(_) => Either::Left(ok(req.into_response(HttpResponse::Unauthorized().finish()))), } } } fn authenticate(token: &str) -> Result<i32, AuthError> { // TODO: Implement authentication logic here unimplemented!() } fn extract_token(headers: &HeaderMap) -> Result<String, AuthError> { match headers.get(AUTHORIZATION) { Some(value) => { let header_str = value.to_str().map_err(|_| AuthError::InvalidHeader)?; let parts: Vec<&str> = header_str.split_whitespace().collect(); if parts.len() != 2 || parts[0] != "Bearer" { return Err(AuthError::InvalidHeader); } let token = parts[1].to_string(); Ok(token) } None => Err(AuthError::MissingHeader), } }
Securing API endpoints with middleware Middleware is a powerful feature in Actix Web that can be used to implement common functionality that should be executed before or after handling requests. Middleware can be used for many purposes, such as logging, compression, rate limiting, and authentication. In this section, we will explore how to use middleware to secure API endpoints with token-based authentication.
To secure an API endpoint with authentication, we need to ensure that only authenticated users can access it. One way to achieve this is to use middleware that verifies the user’s token before allowing access to the endpoint. Here is an example middleware function that does this:
use actix_web::{HttpRequest, Result, dev::Service, dev::ServiceRequest, dev::ServiceResponse};
use futures::future::{Future, Ready};

fn authentication_middleware(
    req: ServiceRequest,
    srv: &mut dyn Service<Request=ServiceRequest, Response=ServiceResponse, Error=actix_web::Error>,
) -> Box<dyn Future<Output=Result<ServiceResponse, actix_web::Error>>> {
    // Get the authorization header from the request
    if let Some(auth_header) = req.headers().get("Authorization") {
        // Extract the token from the header
        if let Ok(header_str) = auth_header.to_str() {
            let parts: Vec<&str> = header_str.split_whitespace().collect();
            if parts.len() == 2 && parts[0] == "Bearer" {
                let token = parts[1];

                // Verify the token here and return the future
                // that resolves to the response if the token is valid.
                // Otherwise, return an error response.
            }
        }
    }

    // If the header is missing or the token is invalid, return an error response.
    Box::new(futures::future::err(actix_web::HttpResponse::Unauthorized().finish().into()))
}
This middleware function checks if the Authorization header is present in the request and contains a valid bearer token. If the token is valid, the function continues processing the request by calling the next middleware or the request handler. If the token is invalid, the function returns an unauthorized response.
To use this middleware function in an Actix Web application, we can add it to the App builder using the wrap() method, like this:
let app = App::new()
    .wrap(authentication_middleware)
    .service(/* ... */);
This ensures that the authentication middleware is executed before handling any requests, allowing us to secure our API endpoints with token-based authentication. Storing user credentials securely with hashing and salting When it comes to storing user credentials, it is important to do so securely to prevent unauthorized access. One common approach is to use a technique called hashing and salting.
Hashing is the process of taking a password (or any data) and running it through a one-way function that produces a fixed-size output, called a hash. The resulting hash is unique to the input data, so even a small change in the input will produce a completely different hash.
Salting is the process of adding a random string (called a salt) to the password before hashing it. The salt is stored alongside the hashed password and is used to make it more difficult to crack the password using a technique called a dictionary attack. A dictionary attack involves pre-computing the hashes of many common passwords and comparing them against the stored hashes.
By using a unique salt for each password, even if two users have the same password, their stored hashes will be different. This makes it much more difficult for an attacker to pre-compute hashes for a dictionary attack.
In Actix Web, you can use the argon2 crate to perform hashing and salting. Here is an example of how to hash and salt a password:
use argon2::{self, Config};

fn hash_password(password: &str) -> String {
    let salt = rand::thread_rng().gen::<[u8; 32]>();
    let config = Config::default();
    argon2::hash_encoded(password.as_bytes(), &salt, &config).unwrap()
}
This function generates a random salt, creates a default configuration for argon2, and uses them to hash and encode the password. The resulting encoded hash can be stored in a database.
To verify a password, you can use the argon2::verify_encoded function:
fn verify_password(password: &str, hash: &str) -> bool {
    argon2::verify_encoded(hash, password.as_bytes()).unwrap()
}
This function takes a password and a stored hash, and returns true if the password matches the hash.
It’s important to note that while hashing and salting is a good practice, it’s not foolproof. Attackers can still use techniques like brute-force attacks to guess passwords, so it’s important to use strong and unique passwords, and to implement other security measures like rate limiting and account lockouts to prevent unauthorized access.
Implementing multi-factor authentication and password reset workflows
Multi-factor authentication (MFA) is a method of verifying a user’s identity by requiring the user to provide two or more forms of identification. This adds an extra layer of security to the authentication process and makes it harder for attackers to gain access to sensitive information or resources. One common form of MFA is time-based one-time passwords (TOTP), which involve generating a unique code that the user must enter along with their username and password.
In Actix Web, implementing MFA can be done by creating a middleware that checks if the user has already authenticated with their username and password, and then prompts them for a TOTP code or some other form of second factor. This middleware can then be applied to specific routes or the entire application as needed.
Similarly, implementing a password reset workflow can be done by creating a route that prompts the user to enter their email address or username, and then sends them a password reset link or code. The link or code can then be validated and used to update the user’s password in the database.
When storing user credentials, it’s important to use secure hashing algorithms that make it difficult for attackers to reverse engineer the original password. One common hashing algorithm used for this purpose is bcrypt, which generates a unique hash for each password and uses a “salt” value to add an extra layer of complexity. This salt value is unique for each password and is stored alongside the hash in the database. When a user logs in, their password is hashed using the same algorithm and salt value, and the resulting hash is compared to the one stored in the database.
In summary, implementing MFA and password reset workflows in Actix Web involves creating middleware and routes that prompt users for additional forms of identification or provide a way to reset their password. When storing user credentials, it’s important to use secure hashing algorithms and unique salt values to protect against attacks.
Integrating third-party authentication providers such as OAuth2 and OpenID Connect
Integrating third-party authentication providers such as OAuth2 and OpenID Connect is a common requirement for many web applications. Fortunately, Actix Web provides several libraries that make this process straightforward.
The most popular library for integrating with OAuth2 providers is actix-web-oauth2. This library provides middleware for handling OAuth2 authorization flows, as well as helper functions for retrieving access tokens and validating requests.
To use actix-web-oauth2, you’ll first need to configure an OAuth2 client with the provider you want to use. This typically involves registering your application with the provider and obtaining a client ID and secret. You’ll also need to specify the OAuth2 endpoints for the provider, such as the authorization and token endpoints.
Once you have your OAuth2 client configured, you can use the OAuth2 middleware provided by actix-web-oauth2 to handle authorization flows. This middleware intercepts requests to protected endpoints and redirects the user to the OAuth2 authorization endpoint if they are not authenticated. Once the user has authenticated and authorized your application, the middleware retrieves an access token and stores it in the request’s extensions for use by downstream handlers.
Here’s an example of how to use actix-web-oauth2 to authenticate with a hypothetical OAuth2 provider:
use actix_web::{get, web, App, HttpResponse, HttpServer, Responder};
use actix_web_oauth2::{AccessTokenError, OAuth2, OAuth2Provider, Scope};
use std::env;

#[get("/")]
async fn index(oauth2: OAuth2<OAuth2Provider>) -> impl Responder {
    // Check if the user is authenticated
    if let Some(token) = oauth2.access_token() {
        // Use the access token to make API requests
        let response = reqwest::get("https://api.example.com/me")
            .bearer_auth(token.secret())
            .send()
            .await
            .unwrap();
        let body = response.text().await.unwrap();
        HttpResponse::Ok().body(body)
    } else {
        // Redirect the user to the OAuth2 provider for authentication
        let authorization_uri = oauth2.authorize_url(Scope::new("openid".to_string()))
            .state("some-state".to_string())
            .url();
        HttpResponse::TemporaryRedirect()
            .header("Location", authorization_uri.as_str())
            .finish()
    }
}

#[actix_web::main]
async fn main() -> std::io::Result<()> {
    // Configure the OAuth2 client
    let client_id = env::var("OAUTH2_CLIENT_ID").unwrap();
    let client_secret = env::var("OAUTH2_CLIENT_SECRET").unwrap();
    let provider = OAuth2Provider::Google;
    let redirect_uri = "http://localhost:8080/callback";
    let client = provider
        .client(&client_id, &client_secret, redirect_uri)
        .authorize_url(provider.authorize_url())
        .token_url(provider.token_url())
        .redirect_uri(redirect_uri.to_string())
        .scope("openid".to_string())
        .build()
        .unwrap();

    HttpServer::new(move || {
        App::new()
            // Mount the OAuth2 middleware
            .wrap(oauth2::OAuth2::<OAuth2Provider>::new(client.clone()))
            // Mount the index handler
            .service(index)
    })
    .bind("127.0.0.1:8080")?
    .run()
    .await
}
This example uses Google as the OAuth2 provider, but you can replace OAuth2Provider::Google with the provider you want to use. The client_id and client_secret variables are loaded from environment variables, but you can replace them with actual values in development mode for testing purposes.
- Finally, we create a new
OAuth2Serviceinstance in theget_auth_servicefunction and use it to obtain the user’s access token from the provider. If the token is valid, we return the user’s information to the caller.
use actix_web::web;
use oauth2::basic::BasicClient;
use oauth2::reqwest::async_http_client;
use oauth2::{AccessToken, AuthUrl, ClientId, ClientSecret, CsrfToken, RedirectUrl, Scope, TokenResponse, TokenUrl};
use std::env;
use std::sync::Arc;

struct OAuth2Service {
    client: BasicClient,
    redirect_url: RedirectUrl,
    token_url: TokenUrl,
}

impl OAuth2Service {
    fn new() -> Self {
        let client_id = ClientId::new(env::var("OAUTH2_CLIENT_ID").unwrap());
        let client_secret = ClientSecret::new(env::var("OAUTH2_CLIENT_SECRET").unwrap());
        let auth_url = AuthUrl::new(env::var("OAUTH2_AUTH_URL").unwrap()).unwrap();
        let token_url = TokenUrl::new(env::var("OAUTH2_TOKEN_URL").unwrap()).unwrap();
        let redirect_url = RedirectUrl::new(env::var("OAUTH2_REDIRECT_URL").unwrap()).unwrap();

        let client = BasicClient::new(
            client_id,
            Some(client_secret),
            auth_url,
            Some(token_url),
        )
        .set_redirect_url(redirect_url);

        Self {
            client,
            redirect_url,
            token_url,
        }
    }

    async fn exchange_code(
        &self,
        code: String,
    ) -> Result<(String, String), Box<dyn std::error::Error>> {
        let token_response = self
            .client
            .exchange_code(AuthorizationCode::new(code))
            .request_async(async_http_client)
            .await?;

        let access_token = token_response.access_token().secret().to_string();
        let id_token = token_response.extra_fields().get("id_token").unwrap().to_string();

        Ok((access_token, id_token))
    }

    async fn get_user_info(
        &self,
        access_token: String,
        id_token: String,
    ) -> Result<UserInfo, Box<dyn std::error::Error>> {
        let user_info_url = Url::parse(&env::var("OAUTH2_USER_INFO_URL").unwrap())?;
        let user_info = self
            .client
            .get_user_info(&AccessToken::new(access_token))
            .unwrap()
            .request_async(async_http_client)
            .await?
            .json::<serde_json::Value>()
            .await?;

        // Extract user information from the id token
        let id_token_verifier = IdTokenVerifier::new(
            self.client.client_id().clone(),
            user_info_url.clone(),
            vec![],
        );

        let id_token_verifier = id_token_verifier
            .set_audience(&[&self.client.client_id().to_string()])
            .set_max_age(Duration::from_secs(3600));

        let id_token_verifier = if let Some(issuer) = user_info.get("iss") {
            id_token_verifier.set_issuer(issuer.as_str().unwrap())
        } else {
            id_token_verifier
        };

        let id_token_verifier = if let Some(keyset_url) = user_info.get("jwks_uri") {
            let jwks = reqwest::get(keyset_url.as_str().unwrap())
                .await?
                .json::<Jwks>()
                .await?;

            id_token_verifier
                .set_jwks(jwks.into_keys())
                .unwrap_or(id_token_verifier)
        } else {
            id_token_verifier
        };

        let id_token = id_token_verifier
            .verify(id_token, None)
            .await?
            .claims::<UserInfoClaims>()
            .map_err(|e| format!("Failed to parse UserInfo claims: {}", e))?;

        Ok(UserInfo {
            sub: id_token.subject().to_string(),
            name: id_token.claims.name,
            given_name: id_token.claims.given_name,
            family_name: id_token.claims.family_name,
            email: id_token.claims.email,
        })
    }
}

lazy_static! {
    static ref async_http_client: HttpClient = HttpClient::builder()
        .timeout(Duration::from_secs(5))
        .build()
        .unwrap();
}

#[derive(Debug, Clone, Deserialize, Serialize)]
struct Jwks {
    keys: Vec<serde_json::Value>,
}
Role-based access control and permission management in Actix Web
Role-based access control (RBAC) is a method of regulating access to resources based on the roles assigned to users. In RBAC, permissions are assigned to roles, and roles are then assigned to users. This allows for fine-grained control over who can access which resources.
In Actix Web, RBAC can be implemented using middleware that checks the user’s role before allowing them to access a particular endpoint. Here’s an example of how this can be done:
use actix_web::{web, App, HttpRequest, HttpResponse, HttpServer, Result};
use std::collections::HashSet;

// Define the roles that can be assigned to users
#[derive(Hash, Eq, PartialEq, Debug)]
enum Role {
    Admin,
    Editor,
    Viewer,
}

// Define the user structure
struct User {
    name: String,
    roles: HashSet<Role>,
}

// Define the middleware that checks the user's role
struct RBACMiddleware {
    allowed_roles: HashSet<Role>,
}

impl RBACMiddleware {
    fn new(allowed_roles: HashSet<Role>) -> Self {
        Self { allowed_roles }
    }
}

impl<S> actix_web::middleware::Transform<S> for RBACMiddleware
where
    S: actix_web::dev::Service<Request = actix_web::dev::ServiceRequest, Response = actix_web::dev::ServiceResponse, Error = actix_web::Error>,
    S::Future: 'static,
{
    type Request = actix_web::dev::ServiceRequest;
    type Response = actix_web::dev::ServiceResponse;
    type Error = actix_web::Error;
    type Transform = RBACMiddlewareService<S>;
    type InitError = ();
    type Future = futures_util::future::Ready<Result<Self::Transform, Self::InitError>>;

    fn new_transform(&self, service: S) -> Self::Future {
        futures_util::future::ok(RBACMiddlewareService {
            service,
            allowed_roles: self.allowed_roles.clone(),
        })
    }
}

struct RBACMiddlewareService<S> {
    service: S,
    allowed_roles: HashSet<Role>,
}

impl<S> actix_web::dev::Service for RBACMiddlewareService<S>
where
    S: actix_web::dev::Service<Request = actix_web::dev::ServiceRequest, Response = actix_web::dev::ServiceResponse, Error = actix_web::Error>,
    S::Future: 'static,
{
    type Request = actix_web::dev::ServiceRequest;
    type Response = actix_web::dev::ServiceResponse;
    type Error = actix_web::Error;
    type Future = futures_util::future::BoxFuture<'static, Result<Self::Response, Self::Error>>;

    fn poll_ready(&mut self, cx: &mut std::task::Context<'_>) -> std::task::Poll<Result<(), Self::Error>> {
        self.service.poll_ready(cx)
    }

    fn call(&mut self, req: actix_web::dev::ServiceRequest) -> Self::Future {
        let user = User {
            name: String::from("Alice"),
            roles: HashSet::from(vec![Role::Viewer]),
        };
        let allowed = self.allowed_roles.intersection(&user.roles).count() > 0;
        if allowed {
            let fut = self.service.call(req);
            Box::pin(async move {
                let res = fut.await?;
                Ok(res)
            })
        } else {
            let res = HttpResponse::Unauthorized()
                .content_type("text/plain")
                .body("Unauthorized");
            Box::pin(async move { Ok(req.into_response(res.into_body())) })
        }
    }
}

// Define a handler that requires authentication and permissions
async fn admin_only_handler(state: web::Data<AppState>, req: HttpRequest) -> impl Responder {
    let user_id = req.extensions().get::<AuthUser>().unwrap().id;

    // Check if user has the admin role
    if !state.auth.has_role(user_id, "admin") {
        return HttpResponse::Forbidden().body("Only admins are allowed");
    }

    // Perform admin-only action
    // ...

    HttpResponse::Ok().finish()
}

// Define a route with a guard that requires authentication and permissions
#[get("/admin")]
async fn admin_only_route(state: web::Data<AppState>, req: HttpRequest) -> impl Responder {
    admin_only_handler(state, req).await
        .map_err(|_| HttpResponse::InternalServerError())
}

// ...

// Create a new `Auth` instance and add roles and permissions
let mut auth = Auth::new();

auth.add_role("admin");
auth.add_role("user");

auth.add_permission("create_todo");
auth.add_permission("delete_todo");

auth.add_permission_to_role("admin", "create_todo");
auth.add_permission_to_role("admin", "delete_todo");

// ...

// Store `Auth` instance in application state
let state = AppState {
    auth: auth,
    // ...
};

// ...

// In the `admin_only_route` function, we use the `admin_only_handler` function
// as the route handler and add the `guard::PermissionGuard` guard to ensure
// that the user has the required permission
#[get("/admin")]
async fn admin_only_route(state: web::Data<AppState>, req: HttpRequest) -> impl Responder {
    admin_only_handler(state, req).await
        .map_err(|_| HttpResponse::InternalServerError())
        .with_guard(guard::PermissionGuard::new("create_todo"))
}
Implementing session-based authentication and CSRF protection Session-based authentication is another popular authentication mechanism that can be implemented with Actix Web. In this approach, the server creates a session object for each authenticated user and stores it on the server. The session object contains user-specific data such as the user’s ID and other relevant information. The server then sends the session ID to the client, which includes it in subsequent requests to identify the user.
To implement session-based authentication in Actix Web, we can use the actix-session crate, which provides a simple and flexible API for managing user sessions. Here’s an example of how we can use this crate to implement session-based authentication in Actix Web:
use actix_session::{CookieSession, Session};
use actix_web::{web, App, HttpResponse, HttpServer, Responder};

// Define a handler that requires authentication and session support
async fn protected(session: Session) -> impl Responder {
    // Check if the user is authenticated
    match session.get::<i32>("user_id") {
        Some(user_id) => {
            // User is authenticated, return protected content
            HttpResponse::Ok().body(format!("Protected content for user {}", user_id))
        },
        None => {
            // User is not authenticated, redirect to login page
            HttpResponse::Found().header("location", "/login").finish()
        }
    }
}

// Define a login handler that sets the user ID in the session
async fn login(session: Session) -> impl Responder {
    // Set the user ID in the session
    session.set("user_id", 42).unwrap();

    // Redirect to protected content
    HttpResponse::Found().header("location", "/protected").finish()
}

// Define a logout handler that removes the user ID from the session
async fn logout(session: Session) -> impl Responder {
    // Remove the user ID from the session
    session.remove("user_id");

    // Redirect to login page
    HttpResponse::Found().header("location", "/login").finish()
}

#[actix_web::main]
async fn main() -> std::io::Result<()> {
    HttpServer::new(|| {
        App::new()
            // Configure session middleware
            .wrap(CookieSession::signed(&[0; 32]).secure(false))
            // Define routes
            .route("/login", web::get().to(login))
            .route("/logout", web::get().to(logout))
            .route("/protected", web::get().to(protected))
    })
    .bind("localhost:8000")?
    .run()
    .await
}
In this example, we define three handlers: protected, login, and logout. The protected handler requires authentication and session support, and returns protected content if the user is authenticated, or redirects to the login page if the user is not authenticated. The login handler sets the user ID in the session and redirects to the protected content, while the logout handler removes the user ID from the session and redirects to the login page.
To enable session support, we add the CookieSession middleware to our application using the wrap method. We configure the middleware to use a signed cookie with a secret key of all zeroes for simplicity, but in a real-world application, we should use a secret key generated using a secure random number generator.
In addition to session-based authentication, we can also implement CSRF protection to prevent cross-site request forgery attacks. CSRF protection involves generating a random token for each session and including it in all forms and AJAX requests. The server verifies that the token included in each request matches the one associated with the user’s session to ensure that the request was initiated by the user and not by an attacker.
To implement CSRF protection, we need to generate a unique token for each user session and attach it to every form in our application. When the form is submitted, we check that the token matches the one in the user’s session.
Actix Web provides middleware to implement CSRF protection out of the box. Here’s an example of how to use it:
use actix_csrf::{CsrfConfig, CsrfFilter};
use actix_web::{web, App, HttpServer};

async fn index() -> &'static str {
    "Hello, world!"
}

#[actix_web::main]
async fn main() -> std::io::Result<()> {
    HttpServer::new(|| {
        let csrf_config = CsrfConfig::default();
        let csrf_filter = CsrfFilter::new(&csrf_config);

        App::new()
            .wrap(csrf_filter)
            .service(web::resource("/").to(index))
    })
    .bind("127.0.0.1:8080")?
    .run()
    .await
}
In this example, we create a new CsrfConfig with the default settings and pass it to a new CsrfFilter. We then wrap our application with the CsrfFilter using the wrap method, which adds the CSRF protection middleware to all routes.
Now, any form submitted to our application will include a hidden field with the CSRF token, and the middleware will verify that the token in the request matches the one in the user’s session.
To implement session-based authentication, we need to store information about the user’s session on the server side. This information can include the user ID, username, and any other relevant information.
Actix Web provides a simple way to store session data using middleware. Here’s an example of how to use it:
use actix_session::{CookieSession, Session};
use actix_web::{web, App, HttpResponse, HttpServer};

async fn login(session: Session) -> HttpResponse {
    session.set("user_id", 1234);
    HttpResponse::Ok().finish()
}

async fn index(session: Session) -> HttpResponse {
    if let Some(user_id) = session.get::<i32>("user_id").unwrap() {
        HttpResponse::Ok().body(format!("Hello, user {}", user_id))
    } else {
        HttpResponse::Unauthorized().finish()
    }
}

#[actix_web::main]
async fn main() -> std::io::Result<()> {
    HttpServer::new(|| {
        App::new()
            .wrap(CookieSession::signed(&[0; 32]).secure(false))
            .service(web::resource("/login").to(login))
            .service(web::resource("/").to(index))
    })
    .bind("127.0.0.1:8080")?
    .run()
    .await
}
In this example, we use the CookieSession middleware to store the user ID in a cookie-based session. We set the secure option to false for simplicity, but in production, we should set it to true to ensure that the session cookie is only sent over HTTPS.
When the user logs in, we set the user_id key in the session using the set method. When the user visits the index page, we retrieve the user_id key using the get method and return a personalized greeting if the user is logged in or an unauthorized error if they are not.
With session-based authentication and CSRF protection in place, our application is now more secure and can protect against common attacks such as cross-site scripting (XSS), cross-site request forgery (CSRF), and session hijacking. Building a custom authentication and authorization system using Actix Web Building a custom authentication and authorization system is a complex task that requires careful planning and design. It involves creating a database schema to store user data, designing API endpoints for user registration, authentication, and authorization, and implementing middleware and guards to protect sensitive resources. Here is a brief overview of the steps involved in building a custom authentication and authorization system using Actix Web:
-
Database schema design: Design the database schema to store user data such as usernames, passwords, roles, permissions, and other relevant information.
-
User registration: Implement API endpoints for user registration, which allow users to create an account by providing their personal information, such as name, email, username, and password.
-
Authentication: Implement API endpoints for user authentication, which allows users to log in to the system by providing their username/email and password. Use a secure hashing algorithm, such as bcrypt or scrypt, to store user passwords in the database.
-
Authorization: Implement middleware and guards to protect sensitive resources such as user profiles, settings, and other restricted areas of the application. Define roles and permissions for different types of users and use guards to restrict access to specific resources based on user roles and permissions.
-
Session management: Implement session management to keep track of authenticated users and to store user data in a secure and encrypted session. Use CSRF protection to prevent cross-site request forgery attacks.
-
Password reset: Implement a password reset workflow that allows users to reset their passwords in case they forget their current password. Use email verification and other security measures to prevent unauthorized password resets.
-
Token-based authentication: Implement token-based authentication, which allows users to authenticate with the system using a unique token instead of a username and password. This can be useful in cases where users want to authenticate with third-party applications or services.
-
Audit logs: Implement audit logs to track user activity and to identify potential security threats or unauthorized access attempts.
Building a custom authentication and authorization system can be a challenging task, but Actix Web provides many useful features and tools to help developers implement a secure and scalable authentication and authorization system. By following best practices and keeping security in mind, developers can build a robust and reliable authentication and authorization system that meets the needs of their users and protects their data from unauthorized access.
Chapter 5: Working with Databases in Actix Web
Introduction to Rust’s database ecosystem Rust’s database ecosystem includes a wide range of libraries and frameworks for interacting with various types of databases, both relational and non-relational. Some of the popular Rust database libraries and frameworks include:
-
Diesel: Diesel is a safe, extensible ORM and query builder for Rust that supports PostgreSQL, MySQL, and SQLite.
-
SQLx: SQLx is an async, pure Rust SQL crate that supports PostgreSQL, MySQL, SQLite, and Microsoft SQL Server.
-
Postgres: The postgres crate provides a native, synchronous Rust client for the PostgreSQL database.
-
MongoDB: The mongodb crate provides a native, synchronous Rust client for the MongoDB database.
-
Redis: The redis-rs crate provides a Redis client for Rust.
-
Rust-Postgres: Rust-Postgres is a native, synchronous Rust client for PostgreSQL.
-
Sled: Sled is a fast, modern storage engine that provides a key-value store and supports transactions, snapshots, and more.
-
RocksDB: RocksDB is a high-performance key-value store that supports SSDs, spinning disks, and memory.
These libraries and frameworks provide Rust developers with a variety of options for interacting with databases and building scalable, high-performance applications. They also take advantage of Rust’s safety and performance features, such as zero-cost abstractions, memory safety, and concurrency, to provide reliable and efficient data access. Using Diesel ORM for database operations Diesel is a popular Rust ORM (Object-Relational Mapping) tool that provides a type-safe query builder and schema migrations. It is a great tool for working with SQL databases and offers a clean and intuitive interface.
To use Diesel in your project, you’ll first need to add it to your Cargo.toml file:
[dependencies]
diesel = { version = "1.4.5", features = ["postgres", "r2d2"] }
Here, we are adding the diesel crate with the postgres and r2d2 features, which will allow us to use Diesel with a PostgreSQL database and with the R2D2 connection pool.
Next, you’ll need to configure Diesel with your database connection details. You can do this by creating a new module called database and a file called connection.rs inside it:
// database/connection.rs

use diesel::pg::PgConnection;
use diesel::r2d2::{ConnectionManager, Pool, PoolError};
use std::env;

pub type PgPool = Pool<ConnectionManager<PgConnection>>;

pub fn establish_connection_pool() -> Result<PgPool, PoolError> {
    let database_url = env::var("DATABASE_URL").expect("DATABASE_URL must be set");
    let manager = ConnectionManager::<PgConnection>::new(database_url);
    let pool = Pool::builder().build(manager)?;
    Ok(pool)
}
Here, we are defining a function establish_connection_pool that reads the database connection details from an environment variable called DATABASE_URL and creates a new connection pool using R2D2. We are also defining a type alias PgPool for this connection pool.
Now that we have set up our database connection, we can define our database schema using Diesel’s schema DSL. You can define your schema in a separate module called schema.rs:
// database/schema.rs

table! {
    users (id) {
        id -> Int4,
        name -> Varchar,
        email -> Varchar,
        password_hash -> Varchar,
        created_at -> Timestamp,
        updated_at -> Timestamp,
    }
}
Here, we are defining a table called users with columns for id, name, email, password_hash, created_at, and updated_at. You can define more tables and columns as needed.
With our schema defined, we can now define our models using Diesel’s model DSL. You can define your models in a separate module called models.rs:
// database/models.rs

use crate::schema::users;
use chrono::{NaiveDateTime, Utc};

#[derive(Debug, Queryable)]
pub struct User {
    pub id: i32,
    pub name: String,
    pub email: String,
    pub password_hash: String,
    pub created_at: NaiveDateTime,
    pub updated_at: NaiveDateTime,
}

#[derive(Insertable)]
#[table_name = "users"]
pub struct NewUser<'a> {
    pub name: &'a str,
    pub email: &'a str,
    pub password_hash: &'a str,
    pub created_at: NaiveDateTime,
    pub updated_at: NaiveDateTime,
}

impl<'a> NewUser<'a> {
    pub fn new(name: &'a str, email: &'a str, password_hash: &'a str) -> Self {
        let now = Utc::now().naive_utc();
        Self {
            name,
            email,
            password_hash,
            created_at: now,
            updated_at: now,
        }
    }
}
Here, we are
defining a new NewUser struct that represents the data needed to create a new user in the database. We are also defining a User struct that represents the data returned by the database when querying for a user.
We can now use Diesel to define the schema of our users table and generate the necessary Rust code to interact with the database. Here’s an example of what the schema definition might look like:
table! {
    users {
        id -> Integer,
        email -> Text,
        password_hash -> Text,
        created_at -> Timestamp,
        updated_at -> Timestamp,
    }
}
With this schema definition, we can generate the necessary Rust code using Diesel’s code generation tools. We can run the following command to generate the code:
diesel print-schema > src/schema.rsThis will generate a schema.rs file in the src directory that contains the Rust code needed to interact with the users table in the database.
We can now use this generated code to implement the database operations needed for our authentication system. For example, to insert a new user into the database, we can use the insert_into function provided by Diesel:
use diesel::prelude::*;
use diesel::insert_into;
use diesel::result::Error as DieselError;
use crate::models::{NewUser, User};

pub fn create_user(conn: &PgConnection, email: &str, password_hash: &str) -> Result<User, DieselError> {
    let new_user = NewUser::new(email, password_hash);
    insert_into(users::table)
        .values(&new_user)
        .get_result(conn)
}
Here, we are using the insert_into function to insert a new user into the users table in the database. We are passing in a reference to the PgConnection object, as well as the email and password hash for the new user. We are using the get_result function to retrieve the newly inserted row from the database and return it as a User object.
Similarly, we can implement other database operations such as querying for a user by email or updating a user’s password hash. We can also use Diesel’s powerful query building capabilities to construct complex queries that join multiple tables or filter by multiple criteria.
Overall, using Diesel ORM can greatly simplify the process of interacting with a database in Rust, while also providing powerful query building and type-safe database operations. Creating database schemas and models In order to interact with a database using Diesel, we need to define the schema of the database and models for the tables. Diesel provides a way to define the schema using Rust’s syntax, which allows for compile-time checking of the schema and models.
To define a schema, we create a new Rust module and define the schema using the table! macro. Here’s an example schema definition for a todos table:
table! {
    todos (id) {
        id -> Int4,
        title -> Varchar,
        completed -> Bool,
        created_at -> Timestamp,
        updated_at -> Timestamp,
    }
}
This defines a table called todos with columns for id, title, completed, created_at, and updated_at. The id column is defined as the primary key.
To define a model for the todos table, we create a new Rust struct with fields that correspond to the columns in the table. We then use the #[derive(Queryable)] and #[derive(Insertable)] macros to generate the necessary code for querying and inserting rows in the table. Here’s an example model definition for the todos table:
use crate::schema::todos;

#[derive(Queryable)]
pub struct Todo {
    pub id: i32,
    pub title: String,
    pub completed: bool,
    pub created_at: chrono::NaiveDateTime,
    pub updated_at: chrono::NaiveDateTime,
}

#[derive(Insertable)]
#[table_name = "todos"]
pub struct NewTodo<'a> {
    pub title: &'a str,
    pub completed: bool,
    pub created_at: chrono::NaiveDateTime,
    pub updated_at: chrono::NaiveDateTime,
}
Here, we’ve defined a Todo struct and a NewTodo struct. The Todo struct corresponds to a row in the todos table, and the NewTodo struct is used to insert new rows in the table.
With the schema and models defined, we can use Diesel’s API to perform database operations such as querying and inserting rows. Performing CRUD operations on a database Performing CRUD operations on a database using Diesel ORM involves creating, querying, updating, and deleting data from the database.
To create a new record in a table using Diesel ORM, we can use the insert_into function, which takes the table name as an argument and returns a struct with methods for specifying the values to insert. For example, to create a new todo record, we can use the following code:
use diesel::prelude::*;
use diesel_demo::models::NewTodo;
use diesel_demo::schema::todos::dsl::*;

let new_todo = NewTodo::new("New todo");

let inserted_todo = diesel::insert_into(todos)
    .values(&new_todo)
    .get_result::<Todo>(&conn)
    .expect("Error saving new todo");
Here, we first create a new NewTodo struct with the required fields for a new todo record. We then use the insert_into function to insert the values into the todos table and use the get_result method to execute the query and retrieve the newly inserted Todo record.
To query data from the database, we can use Diesel’s query builder DSL, which allows us to construct complex SQL queries using a Rust-based API. For example, to retrieve all todo records from the database, we can use the following code:
use diesel_demo::models::Todo;
use diesel_demo::schema::todos::dsl::*;

let todos = todos.load::<Todo>(&conn).expect("Error loading todos");

for todo in todos {
    println!("{}", todo.title);
}
Here, we use the load method on the todos table to retrieve all Todo records and store them in a Vec. We then iterate over the Vec and print each Todo record’s title field.
To update a record in the database, we can use the update function, which takes the table name as an argument and returns a struct with methods for specifying the values to update. For example, to update the title field of a todo record with a specific ID, we can use the following code:
use diesel_demo::schema::todos::dsl::*;

let updated_rows = diesel::update(todos.find(1))
    .set(title.eq("Updated todo"))
    .execute(&conn)
    .expect("Error updating todo");
Here, we use the update function to update the title field of the todo record with ID 1 and then use the execute method to execute the query and retrieve the number of updated rows.
To delete a record from the database, we can use the delete function, which takes the table name as an argument and returns a struct with methods for specifying the record to delete. For example, to delete a todo record with a specific ID, we can use the following code:
use diesel_demo::schema::todos::dsl::*;

let deleted_rows = diesel::delete(todos.find(1))
    .execute(&conn)
    .expect("Error deleting todo");
Here, we use the delete function to delete the todo record with ID 1 and then use the execute method to execute the query and retrieve the number of deleted rows.
use diesel::prelude::*;

pub fn delete_todo(conn: &PgConnection, id: i32) -> Result<usize, diesel::result::Error> {
    let rows_deleted = diesel::delete(todos.filter(id.eq(id)))
        .execute(conn)?;
    Ok(rows_deleted)
}
We can now use this function to delete a specific todo by ID.
let conn = establish_connection();
let todo = create_todo(&conn, "Finish project");
delete_todo(&conn, todo.id).unwrap();
Updating records
To update an existing record in the database, we can use the update function provided by Diesel. This function takes a table name and returns an instance of UpdateStatement, which we can then use to specify the update operations we want to perform.
For example, to update the text of a todo, we can use the following function:
use diesel::dsl::now;
use diesel::update;

pub fn update_todo(conn: &PgConnection, id: i32, new_text: &str) -> Result<usize, diesel::result::Error> {
    let now = now.nullable();
    let rows_updated = update(todos.filter(id.eq(id)))
        .set((text.eq(new_text), updated_at.eq(now)))
        .execute(conn)?;
    Ok(rows_updated)
}
In this function, we use the update function to create an instance of UpdateStatement for the todos table. We then use the set method to specify the fields we want to update, which in this case are the text and updated_at fields. Finally, we use the execute method to execute the query and retrieve the number of updated rows.
We can now use this function to update an existing todo:
let conn = establish_connection();
let todo = create_todo(&conn, "Finish project");
update_todo(&conn, todo.id, "Start new project").unwrap();
Conclusion
In this section, we have seen how to perform CRUD operations on a PostgreSQL database using Diesel. We have also seen how to define database schemas and models, and how to use migrations to manage database schema changes. Diesel provides a convenient and efficient way to work with databases in Rust, and is a great choice for building database-backed applications. Advanced database operations with Diesel, including joins, filters, and aggregations Diesel provides advanced database operations for performing complex queries, including joins, filters, and aggregations. These operations allow us to retrieve data from multiple tables, filter it based on specific conditions, and group or summarize it using various aggregation functions.
Here are some examples of these operations:
-
Joins: To perform a join between two tables, we can use the
joinmethod and specify the join condition. For example, to join theusersandpoststables based on theuser_idcolumn, we can use the following code:use crate::schema::users::dsl::*; use crate::schema::posts::dsl::*; let join_result = users .inner_join(posts.on(user_id.eq(id))) .select((name, title)) .load::<(String, String)>(&connection)?;This will return a list of tuples containing the
nameandtitleof each post written by the user with the specifiedid. -
Filters: To filter the results of a query based on specific conditions, we can use the
filtermethod and specify the filter condition. For example, to retrieve all posts with a title containing the word “Rust”, we can use the following code:use crate::schema::posts::dsl::*; let filter_result = posts .filter(title.like("%Rust%")) .load::<Post>(&connection)?;This will return a list of
Postobjects whosetitlecontains the word “Rust”. -
Aggregations: To group or summarize data based on specific criteria, we can use aggregation functions such as
count,sum,avg, andmin/max. For example, to count the number of posts written by each user, we can use the following code:use crate::schema::posts::dsl::*; let aggregation_result = posts .select((user_id, count(id))) .group_by(user_id) .load::<(i32, i64)>(&connection)?;This will return a list of tuples containing the
user_idand the number of posts written by that user.
Overall, Diesel provides a powerful and flexible API for working with databases in Rust, making it easy to perform advanced operations on data and retrieve it in a type-safe and efficient manner. Writing efficient database queries with Diesel’s query builder Diesel’s query builder provides a powerful way to write efficient database queries. It offers a fluent API for constructing SQL queries programmatically, allowing you to compose queries in a type-safe and composable way.
One of the key features of Diesel’s query builder is that it generates SQL statements at compile time, which means that you can catch errors early and benefit from compile-time optimizations.
Here’s an example of how to write a query with joins, filters, and aggregations using Diesel’s query builder:
use diesel::prelude::*;
use diesel::dsl::sum;

// Define a struct for the order summary
#[derive(Debug, Queryable)]
struct OrderSummary {
    customer_name: String,
    total_amount: i32,
}

// Define a function to get the order summary
fn get_order_summary(conn: &PgConnection) -> QueryResult<Vec<OrderSummary>> {
    use schema::{orders, customers};

    // Join the orders and customers tables
    let summary = orders::table
        .inner_join(customers::table)
        .select((customers::name, sum(orders::amount)))
        .group_by(customers::name)
        .load::<OrderSummary>(conn)?;

    Ok(summary)
}
In this example, we’re using PostgreSQL as the database backend, and we have two tables: orders and customers. We want to get the total amount of orders for each customer, so we need to join the two tables and aggregate the results.
To do this, we first define a struct OrderSummary that represents the result of our query. We then define a function get_order_summary that takes a reference to a PgConnection and returns a QueryResult containing a vector of OrderSummary structs.
Inside the function, we use the inner_join method to join the orders and customers tables, and the select method to select the customer name and the sum of the order amounts. We then use the group_by method to group the results by customer name, and the load method to execute the query and load the results into a vector of OrderSummary structs.
With Diesel’s query builder, we can easily compose complex queries in a type-safe and composable way, without having to write raw SQL statements. This makes it easier to write efficient database queries and catch errors early, while still benefiting from the power and flexibility of SQL. Implementing database migrations with Diesel Database migrations are an important part of any production-ready database-driven application. They allow for the safe and reliable evolution of a database schema over time, ensuring that changes to the database structure can be made without causing data loss or other issues.
In Rust, the Diesel ORM includes support for managing database migrations using a tool called diesel_cli. This tool provides a set of commands for creating, running, and reverting migrations, as well as generating Rust code for working with the database schema.
To use diesel_cli, you will first need to install it using Cargo:
cargo install diesel_cli --no-default-features --features postgresThis will install diesel_cli with support for PostgreSQL, which is one of the databases supported by Diesel.
Once diesel_cli is installed, you can create a new migration using the diesel migration generate command:
diesel migration generate create_usersThis will create a new migration file in the migrations directory with a name like 20210429212016_create_users. The timestamp in the file name ensures that the migrations are executed in the correct order.
You can then edit the migration file to define the changes you want to make to the database schema. Here is an example migration that creates a users table:
// migrations/20210429212016_create_users/up.sql

CREATE TABLE users (
    id SERIAL PRIMARY KEY,
    username VARCHAR(50) UNIQUE NOT NULL,
    email VARCHAR(100) UNIQUE NOT NULL,
    password_hash CHAR(60) NOT NULL,
    created_at TIMESTAMP NOT NULL DEFAULT NOW(),
    updated_at TIMESTAMP NOT NULL DEFAULT NOW()
);
// migrations/20210429212016_create_users/down.sql
DROP TABLE users;In this migration, we create a new table with columns for the user’s ID, username, email, password hash, and creation and update timestamps. We also define the UNIQUE constraint on the username and email columns to ensure that each user has a unique username and email address.
Once you have defined the migration, you can use the diesel migration run command to execute it:
diesel migration runThis will apply the migration to the database, creating the users table.
If you need to revert a migration, you can use the diesel migration revert command:
diesel migration revertThis will revert the last applied migration, undoing the changes made to the database schema.
Overall, Diesel’s migration system makes it easy to manage database schema changes in a safe and efficient manner, helping you avoid data loss and other issues that can arise from poorly managed migrations. Using Redis as a cache and session store for Actix Web applications Redis is a popular in-memory data store that can be used as a cache or session store in Actix Web applications. Redis provides fast read and write speeds, making it ideal for use cases that require fast access to frequently accessed data.
To use Redis in an Actix Web application, we first need to add the redis crate as a dependency in our Cargo.toml file:
[dependencies]
actix-web = "3"
redis = "0.18.0"
Next, we need to create a Redis client that we can use to perform Redis operations. We can do this by using the redis::Client::open method, which takes a Redis connection string as an argument. The connection string should be in the format redis://<hostname>:<port>/<db>, where <hostname> is the hostname of the Redis server, <port> is the port number that Redis is listening on, and <db> is the database number to use.
use redis::Client;

let client = Client::open("redis://127.0.0.1:6379/0").unwrap();
Once we have a Redis client, we can perform Redis operations such as GET, SET, DEL, and EXPIRE. For example, to store a value in Redis, we can use the SET command:
use redis::Commands;

let mut conn = client.get_connection().unwrap();
let _: () = conn.set("my_key", "my_value").unwrap();
To retrieve a value from Redis, we can use the GET command:
let mut conn = client.get_connection().unwrap();
let value: String = conn.get("my_key").unwrap();
To delete a key from Redis, we can use the DEL command:
let mut conn = client.get_connection().unwrap();
let _: () = conn.del("my_key").unwrap();
We can also set an expiration time for a key using the EXPIRE command:
let mut conn = client.get_connection().unwrap();
let _: () = conn.expire("my_key", 60).unwrap();
In addition to using Redis as a cache, we can also use it as a session store to store user session data. To do this, we can use the actix_session_redis crate, which provides a Redis-based session backend for Actix Web.
To use actix_session_redis, we first need to add it as a dependency in our Cargo.toml file:
[dependencies]
actix-session = "0.6"
actix-session-redis = "0.5"
redis = "0.18.0"
Next, we need to create a RedisSession middleware that we can use to store and retrieve session data:
use actix_session_redis::RedisSession;

let session_middleware = RedisSession::new("redis://127.0.0.1:6379/0", &[0; 32])
    .cookie_secure(true)
    .cookie_http_only(true)
    .cookie_name("my_session")
    .cookie_max_age(time::Duration::from_secs(3600));
Here, we are creating a new RedisSession middleware that connects to Redis using the connection string redis://127.0.0.1:6379/0 and uses a 32-byte random value as the encryption key for session data. We are also configuring the middleware to use secure and http-only cookies, set the cookie name to my_session, and set the maximum age of the cookie to one hour.
Finally, let’s define a struct called AppState that holds our Redis connection pool and the cookie signing key:
struct AppState {
    redis_pool: deadpool_redis::Pool,
    cookie_key: CookieKey,
}
Now, we can modify the create_app function to create our Redis connection pool and return an App instance with our new AppState:
async fn create_app() -> App<AppState> {
    let redis_url = "redis://localhost/";
    let redis_pool = deadpool_redis::Config::default()
        .create_pool(redis_url)
        .unwrap();
    let cookie_key = CookieKey::generate();

    App::new()
        .data(AppState {
            redis_pool,
            cookie_key,
        })
        .wrap(middleware::Logger::default())
        .service(web::resource("/login").route(web::post().to(login)))
        .service(web::resource("/logout").route(web::post().to(logout)))
        .service(web::resource("/").route(web::get().to(index)))
}
We can now modify our login handler to create a new session ID and store it in Redis, along with the user ID:
async fn login(
    form: web::Form<LoginForm>,
    state: web::Data<AppState>,
) -> Result<HttpResponse, Error> {
    let conn = state.redis_pool.get().await.unwrap();
    let user = authenticate_user(&conn, &form.username, &form.password).await?;

    let session_id = SessionId::generate();
    let session_key = session_id.to_string();
    let user_id = user.id.to_string();
    conn.set_ex(&session_key, &user_id, SESSION_TTL).await.unwrap();

    let mut builder = HttpResponse::SeeOther();
    builder.header(header::LOCATION, "/").cookie(
        Cookie::build(state.cookie_key.name.clone(), session_id.to_string())
            .secure(true)
            .http_only(true)
            .max_age(SESSION_TTL)
            .finish(),
    );
    Ok(builder.finish())
}
Note that we’re also setting a cookie with the session ID. This will allow the browser to send the session ID back to the server with each request, so we can retrieve the user ID from Redis and authenticate the request.
We can now modify our logout handler to delete the session from Redis and clear the session cookie:
async fn logout(state: web::Data<AppState>) -> Result<HttpResponse, Error> {
    let mut builder = HttpResponse::SeeOther();
    builder.header(header::LOCATION, "/").cookie(
        Cookie::build(state.cookie_key.name.clone(), "")
            .secure(true)
            .http_only(true)
            .max_age(time::Duration::from_secs(0))
            .finish(),
    );
    Ok(builder.finish())
}
Finally, we can modify our index handler to retrieve the user ID from Redis using the session ID stored in the cookie:
async fn index(state: web::Data<AppState>, req: HttpRequest) -> Result<HttpResponse, Error> {
    let session_id = match req.cookie(&state.cookie_key.name) {
        Some(cookie) => SessionId::from_str(cookie.value())?,
        None => return Ok(HttpResponse::SeeOther().header(header::LOCATION, "/login").finish()),
    };

    let conn = state.redis_pool.get().await.unwrap();
    let user_id = match conn.get::<_, String>(&session_id.to_string()).await? {
        Some(user_id) => user_id,
        None => return Ok(HttpResponse::SeeOther().header(header::LOCATION, "/login").finish()),
    };

    // ... continue handling the request ...
}
Working with NoSQL databases such as MongoDB and CouchDB in Actix Web Actix Web provides support for several NoSQL databases, including MongoDB and CouchDB. In this section, we will look at how to work with these databases in Actix Web.
MongoDB
MongoDB is a popular document-oriented NoSQL database that stores data in flexible, JSON-like documents. To work with MongoDB in Actix Web, we can use the official Rust driver for MongoDB, called mongodb. We first need to add the mongodb crate to our Cargo.toml file:
[dependencies]
actix-web = "3"
mongodb = "2"
Next, we need to establish a connection to the MongoDB server. Here is an example of how to do this:
use mongodb::{Client, options::ClientOptions};

async fn establish_connection() -> mongodb::error::Result<Client> {
    let mut client_options = ClientOptions::parse("mongodb://localhost:27017").await?;
    client_options.app_name = Some("my_app".to_string());
    let client = Client::with_options(client_options)?;
    Ok(client)
}
In this example, we first create a ClientOptions object that specifies the connection details for the MongoDB server. We then set the application name to my_app. Finally, we create a Client object with the given options.
Once we have established a connection to the MongoDB server, we can perform CRUD operations on the database. Here is an example of how to insert a document into a collection:
use mongodb::{bson::doc, error::Error};

async fn insert_document(client: &Client) -> Result<(), Error> {
    let db = client.database("my_db");
    let coll = db.collection("my_coll");

    let doc = doc! { "name": "John", "age": 30 };

    coll.insert_one(doc, None).await?;

    Ok(())
}
In this example, we first get a reference to a database and a collection. We then create a document using the doc! macro, which creates a BSON document. Finally, we call the insert_one method on the collection to insert the document.
We can also query the database using various filters and aggregations. Here is an example of how to find all documents in a collection that match a certain criteria:
use mongodb::{bson::doc, error::Error};

async fn find_documents(client: &Client) -> Result<(), Error> {
    let db = client.database("my_db");
    let coll = db.collection("my_coll");

    let filter = doc! { "name": "John" };
    let cursor = coll.find(filter, None).await?;

    for result in cursor {
        println!("{:?}", result?);
    }

    Ok(())
}
In this example, we first create a filter using the doc! macro. We then call the find method on the collection to find all documents that match the filter. Finally, we iterate over the results using a for loop and print each document.
CouchDB
CouchDB is another popular document-oriented NoSQL database that stores data in JSON-like documents. To work with CouchDB in Actix Web, we can use the couch_rs crate, which provides a Rust client for CouchDB.
We first need to add the couch_rs crate to our Cargo.toml file:
[dependencies]
actix-web = "3"
couch_rs = "0.2"
Next, we need to establish a connection to the CouchDB server. Here is an example of how to do this:
use couch_rs::{Client, Error};

async fn establish_connection() -> Result<Client, Error
> rust
use couch_rs::{Client, Error};

async fn establish_connection() -> Result<Client, Error> {
    let client = Client::new("http://localhost:5984")?;
    Ok(client)
}

async fn create_database(client: &Client, database_name: &str) -> Result<(), Error> {
    client.create_database(database_name).await?;
    Ok(())
}

async fn insert_document(client: &Client, database_name: &str, document: serde_json::Value) -> Result<(), Error> {
    client.insert_document(database_name, &document).await?;
    Ok(())
}

async fn get_document(client: &Client, database_name: &str, id: &str) -> Result<Option<serde_json::Value>, Error> {
    let document = client.get_document(database_name, id).await?;
    Ok(document)
}

async fn update_document(client: &Client, database_name: &str, id: &str, document: serde_json::Value) -> Result<(), Error> {
    client.update_document(database_name, id, &document).await?;
    Ok(())
}

async fn delete_document(client: &Client, database_name: &str, id: &str, rev: &str) -> Result<(), Error> {
    client.delete_document(database_name, id, rev).await?;
    Ok(())
}

#[actix_web::main]
async fn main() -> std::io::Result<()> {
    let client = establish_connection().await.expect("Failed to establish connection to CouchDB");

    let database_name = "my_database";
    create_database(&client, database_name).await.expect("Failed to create database");

    let document = serde_json::json!({
        "title": "My First Document",
        "content": "This is the content of my first document"
    });

    insert_document(&client, database_name, document).await.expect("Failed to insert document");

    let id = "1";
    let inserted_document = get_document(&client, database_name, id).await.expect("Failed to retrieve document").unwrap();

    let updated_document = serde_json::json!({
        "title": "My Updated Document",
        "content": "This is the updated content of my document"
    });

    let rev = inserted_document["_rev"].as_str().unwrap();
    update_document(&client, database_name, id, updated_document).await.expect("Failed to update document");

    let retrieved_document = get_document(&client, database_name, id).await.expect("Failed to retrieve document").unwrap();

    assert_eq!(retrieved_document["title"], "My Updated Document");

    delete_document(&client, database_name, id, rev).await.expect("Failed to delete document");

    Ok(())
}
Here, we define a few functions for performing CRUD operations on a CouchDB database using the couch_rs crate. We first establish a connection to the database server using the Client struct provided by the crate. We then define functions for creating a new database, inserting a document, getting a document by ID, updating a document, and deleting a document.
In the main function, we create a new database and insert a new document with a title and content. We then retrieve the document by ID, update its title and content, retrieve it again to verify the update, and finally delete the document.
This is a simple example, but it demonstrates how easy it is to work with a NoSQL database like CouchDB using Rust and the couch_rs crate.
Implementing full-text search and geospatial queries with Actix Web and Elasticsearch
Implementing full-text search and geospatial queries is a common requirement for many web applications. Elasticsearch is a popular search engine that provides powerful full-text search and geospatial capabilities, making it a great choice for this use case.
To use Elasticsearch with Actix Web, we first need to add the elastic crate to our project’s dependencies in Cargo.toml:
[dependencies]
actix-web = "3"
elastic = "7"
Next, we need to create a client for communicating with Elasticsearch. Here’s an example of how to do this:
use elastic::prelude::*;
use std::error::Error;

fn establish_connection() -> Result<Elasticsearch, Box<dyn Error>> {
    let client = Elasticsearch::default().url("http://localhost:9200").build()?;
    Ok(client)
}
This function creates a new Elasticsearch client with the default settings and sets the URL to http://localhost:9200. We can then use this client to perform search operations on our Elasticsearch cluster.
To perform a full-text search, we can use Elasticsearch’s Query DSL to construct a query that matches our search criteria. Here’s an example of how to search for documents containing the word “rust” in the title field:
use elastic::prelude::*;
use std::error::Error;

#[derive(Default, Serialize, Deserialize, ElasticType)]
struct Document {
    title: String,
    body: String,
}

fn search_documents(query: &str) -> Result<SearchResponse<Document>, Box<dyn Error>> {
    let client = establish_connection()?;
    let search_query = SearchParts::body(json!({
        "query": {
            "match": {
                "title": query
            }
        }
    }));
    let response = client.search::<Document>().index("my_index").body(search_query).send()?;
    Ok(response)
}
This function constructs a search query that looks for documents in the my_index index that match the specified search criteria. The search query uses the match clause to search for documents containing the specified query in the title field.
To perform a geospatial query, we can use Elasticsearch’s GeoShape Query DSL to construct a query that matches our search criteria. Here’s an example of how to search for documents that intersect with a specified polygon:
use elastic::prelude::*;
use elastic::search::query::Query;
use std::error::Error;

#[derive(Default, Serialize, Deserialize, ElasticType)]
struct Location {
    name: String,
    geo_shape: ElasticGeoShape,
}

fn search_locations(polygon: &str) -> Result<SearchResponse<Location>, Box<dyn Error>> {
    let client = establish_connection()?;
    let search_query = SearchParts::body(json!({
        "query": {
            "bool": {
                "filter": {
                    "geo_shape": {
                        "geo_shape": {
                            "shape": {
                                "type": "polygon",
                                "coordinates": [polygon]
                            },
                            "relation": "intersects"
                        }
                    }
                }
            }
        }
    }));
    let response = client.search::<Location>().index("my_index").body(search_query).send()?;
    Ok(response)
}
This function constructs a search query that looks for documents in the my_index index that intersect with the specified polygon. The search query uses the geo_shape clause to search for documents that have a geo_shape field that intersects with the specified polygon.
In summary, Elasticsearch provides powerful full-text search and geospatial capabilities that can be easily integrated with Actix Web applications using the elastic crate. By constructing search queries using Elasticsearch’s query DSL, we can perform advanced search operations on our data.
Here’s an example of how to perform a full-text search on a specific field in Elasticsearch using the elastic crate:
use elastic::{
    http::{Method, StatusCode},
    prelude::*,
};

#[derive(Debug, Serialize, Deserialize, ElasticType)]
struct Article {
    #[elastic(id)]
    id: String,
    title: String,
    body: String,
}

fn main() -> Result<(), Box<dyn std::error::Error>> {
    let client = SyncClientBuilder::new()
        .static_node("http://localhost:9200")
        .build()?;

    let search_result = client
        .search::<Article>()
        .index("articles")
        .body(json!({
            "query": {
                "match": {
                    "title": "rust"
                }
            }
        }))
        .send()?;

    if search_result.status_code() == StatusCode::OK {
        let articles = search_result.documents().collect::<Vec<_>>();
        println!("Found {} articles", articles.len());
    }

    Ok(())
}
This code performs a full-text search for articles with the term “rust” in the title field. The search_result.documents() method returns an iterator over the search results, which we can then collect into a vector.
Similarly, we can perform geospatial queries on data that has been indexed with Elasticsearch’s geo_point data type. Here’s an example of how to perform a geospatial query using the elastic crate:
use elastic::{
    http::{Method, StatusCode},
    prelude::*,
};

#[derive(Debug, Serialize, Deserialize, ElasticType)]
struct Place {
    #[elastic(id)]
    id: String,
    name: String,
    location: GeoPoint,
}

fn main() -> Result<(), Box<dyn std::error::Error>> {
    let client = SyncClientBuilder::new()
        .static_node("http://localhost:9200")
        .build()?;

    let search_result = client
        .search::<Place>()
        .index("places")
        .body(json!({
            "query": {
                "bool": {
                    "must": [
                        {
                            "match_all": {}
                        }
                    ],
                    "filter": {
                        "geo_distance": {
                            "distance": "10km",
                            "location": {
                                "lat": 37.7749,
                                "lon": -122.4194
                            }
                        }
                    }
                }
            }
        }))
        .send()?;

    if search_result.status_code() == StatusCode::OK {
        let places = search_result.documents().collect::<Vec<_>>();
        println!("Found {} places", places.len());
    }

    Ok(())
}
This code performs a geospatial query for places within 10 kilometers of the coordinates (37.7749, -122.4194), which correspond to San Francisco. The location field of the Place struct is annotated with the GeoPoint type from the elastic crate, which maps to Elasticsearch’s geo_point data type.
Chapter 6: Testing Actix Web Applications
Importance of testing in software development
Testing is a critical part of software development that helps ensure the quality, reliability, and functionality of a software application. Testing is important for several reasons:
-
Finding and fixing bugs: Testing helps identify and eliminate bugs and defects in software. By discovering these issues early in the development process, developers can avoid costly and time-consuming rework later on.
-
Improving software quality: Testing helps ensure that software meets its functional and non-functional requirements. By testing software against expected outcomes, developers can ensure that the software behaves as intended and delivers the expected results.
-
Ensuring software security: Testing helps identify security vulnerabilities and weaknesses in software. By conducting security testing, developers can ensure that software is protected against attacks and meets security standards.
-
Reducing risk: Testing helps reduce the risk of software failure and costly downtime. By testing software thoroughly, developers can ensure that it is reliable and stable, reducing the risk of business disruption or financial loss.
-
Enhancing user experience: Testing helps identify usability issues and other user experience problems. By conducting usability testing, developers can ensure that software is easy to use and meets the needs of its intended users.
Overall, testing is a critical part of software development that helps ensure the quality, reliability, and functionality of software. By testing software thoroughly, developers can reduce the risk of failure, improve the user experience, and ensure that software meets its functional and non-functional requirements.
Writing unit tests for Actix Web applications
In Actix Web, unit tests can be written using Rust’s built-in testing framework. The framework provides a #[test] attribute that can be used to mark a function as a unit test.
Let’s say we have a simple handler function that returns a static string:
use actix_web::{HttpResponse, Responder};

async fn index() -> impl Responder {
    HttpResponse::Ok().body("Hello world!")
}
We can write a unit test for this function like this:
use actix_web::{test, web, App};
use futures::FutureExt;

#[actix_rt::test]
async fn test_index() {
    let mut app = test::init_service(
        App::new().service(
            web::resource("/")
                .route(web::get().to(index))
        )
    ).await;

    let req = test::TestRequest::get().uri("/").to_request();
    let resp = app.call(req).await.unwrap();
    assert!(resp.status().is_success());

    let body = test::read_body(resp).await;
    assert_eq!(body, "Hello world!");
}
Here, we use the init_service function from actix_web::test to initialize the app for testing. We then create a test request using TestRequest::get().uri("/") and call the app using app.call(req).await.unwrap(). We assert that the response status is a success, and that the response body is equal to “Hello world!” using test::read_body(resp).await.
This is a basic example of a unit test for an Actix Web application. More complex tests can be written using additional testing utilities and frameworks, such as assert_json_snapshot for snapshot testing or mockito for mocking external dependencies.
It is important to note that while unit tests are important for ensuring that individual components of an application work as expected, they do not guarantee the correctness of the entire system. Integration and end-to-end tests are also necessary to ensure that all components work together as intended.
Integration testing with Actix Web’s test framework
Actix Web provides a built-in testing framework that makes it easy to write integration tests for your web applications. Integration tests are used to test the interaction between multiple components of your application and ensure that they work together correctly.
To write integration tests in Actix Web, you will typically create a separate test module in your application’s source code that contains functions to simulate HTTP requests and test the responses. You can use the actix_web::test module to create a test server that can handle the requests and provide responses for testing purposes.
Here’s an example of an integration test for a simple Actix Web application that returns a “hello world” message:
use actix_web::{test, App, http::StatusCode};

#[actix_rt::test]
async fn test_hello_world() {
    let mut app = test::init_service(App::new().route("/", web::get().to(|| "Hello, world!"))).await;
    let req = test::TestRequest::get().uri("/").to_request();
    let resp = test::call_service(&mut app, req).await;
    assert_eq!(resp.status(), StatusCode::OK);
    let body = test::read_body(resp).await;
    assert_eq!(body, "Hello, world!");
}
In this example, we first create an App object that defines the routes and handlers for our application. We then use test::init_service to create a test server from the App object, and use test::TestRequest to create a mock HTTP request to the root route (”/”). We then use test::call_service to send the request to the test server and receive the response, and use assertions to verify that the response status code is 200 OK and the response body is “Hello, world!“.
By writing integration tests like this, you can ensure that your application’s routes and handlers work correctly and respond appropriately to HTTP requests. Integration tests can also be used to test more complex scenarios, such as handling errors and processing data from requests and responses.
Mocking dependencies in tests
Mocking dependencies in tests is an important technique to isolate the code being tested from external dependencies, such as a database or a web service. This allows the tests to focus on specific parts of the code without being affected by the behavior of external services.
In Rust, there are several libraries that can be used for mocking dependencies, such as mockito, mockall, and mocktopus. These libraries allow you to define mock objects that can replace the real dependencies in your tests.
For example, let’s say we have a function that retrieves data from a database using Diesel:
use diesel::{self, prelude::*};
use myapp::models::User;

pub fn get_user_by_id(conn: &PgConnection, user_id: i32) -> QueryResult<User> {
    users::table.find(user_id).first(conn)
}
To test this function, we can use diesel::test::database to create a temporary test database and populate it with test data. However, this approach can be slow and cumbersome, especially if we need to test different scenarios.
Instead, we can use a mock object to replace the real database connection and return predefined data. Here’s an example using mockall:
use mockall::predicate::*;
use mockall::*;
use myapp::models::User;

#[automock]
pub trait Database {
    fn get_user_by_id(&self, user_id: i32) -> Result<User, diesel::result::Error>;
}

fn test_get_user_by_id() {
    let mut mock_db = MockDatabase::new();
    mock_db.expect_get_user_by_id()
        .with(eq(1))
        .returning(|_| Ok(User { id: 1, name: "Alice".to_string() }));

    let user = get_user_by_id(&mock_db, 1).unwrap();
    assert_eq!(user.id, 1);
    assert_eq!(user.name, "Alice");
}
In this example, we define a trait Database that represents the database connection, and we use #[automock] to automatically generate a mock object for this trait. We then define a mock expectation for the get_user_by_id method, which returns a Result<User, diesel::result::Error>. Finally, we call the get_user_by_id function with the mock object and verify that it returns the expected data.
Mocking dependencies can greatly simplify the testing process and make the tests more reliable and faster. However, it’s important to use mock objects carefully and avoid overusing them, as they can sometimes hide problems with the code being tested.
Load testing and performance benchmarking with Actix Web
Load testing and performance benchmarking are essential aspects of web application development. These techniques help developers to identify performance bottlenecks and measure the system’s scalability under different workloads.
Actix Web provides built-in support for load testing and performance benchmarking through the actix-web-test crate, which offers an API for sending mock HTTP requests to an Actix Web application and measuring its response times.
To use the actix-web-test crate, you need to add it as a development dependency in your Cargo.toml file:
[dev-dependencies]
actix-web-test = "0.10.0"
Here’s an example of how to write a load test for an Actix Web application using actix-web-test. Suppose we have an endpoint /users that returns a list of users from a database. We want to measure the response time of this endpoint under different workloads.
use actix_web::{test, App, web};
use myapp::handlers::users;
use myapp::models::User;
use myapp::repository::Repository;

#[actix_rt::test]
async fn test_users_endpoint() {
    // Create a mock repository with some sample users
    let repository = Repository::new();
    repository.create_user(User {
        id: 1,
        name: "Alice".to_string(),
        email: "alice@example.com".to_string(),
    });
    repository.create_user(User {
        id: 2,
        name: "Bob".to_string(),
        email: "bob@example.com".to_string(),
    });

    // Create the Actix Web application with the mock repository
    let app = App::new()
        .data(repository)
        .route("/users", web::get().to(users::list_users));

    // Send mock HTTP requests to the /users endpoint and measure the response time
    let mut response = test::TestRequest::get()
        .uri("/users")
        .to_request()
        .send_request(&app)
        .await
        .unwrap();

    assert!(response.status().is_success());

    // Measure the response time for 10 concurrent requests
    let requests = (0..10)
        .map(|_| test::TestRequest::get().uri("/users").to_request())
        .collect::<Vec<_>>();
    let start_time = std::time::Instant::now();
    let responses = test::call_service(&app, requests).await;
    let duration = start_time.elapsed();

    // Calculate the average response time and print it
    let total_time: u128 = responses.iter().map(|r| r.response().unwrap().body().len() as u128).sum();
    let avg_response_time = duration.as_micros() / 10;
    println!("Average response time: {} microseconds", avg_response_time);
}
In this example, we create a mock repository with some sample users and use it to create the Actix Web application. We then use the test::TestRequest API to send mock HTTP requests to the /users endpoint and measure the response time. We first send a single request to verify that the endpoint works correctly, and then send 10 concurrent requests to measure the response time under load. Finally, we calculate the average response time and print it to the console.
Load testing and performance benchmarking are critical for ensuring that your Actix Web application can handle the expected workload and provide fast response times to your users. By using the actix-web-test crate, you can easily create load tests and performance benchmarks for your application and identify any performance bottlenecks that need to be optimized.
Actix Web provides a built-in tool for load testing and benchmarking called actix-bench. This tool uses the popular wrk HTTP benchmarking tool and provides an easy way to run benchmarks against your Actix Web application.
To use actix-bench, you first need to install the wrk tool. You can do this on Ubuntu by running the following command:
sudo apt-get install wrkOnce you have wrk installed, you can use actix-bench to run benchmarks against your application. Here’s an example command to run a benchmark against the /api/users endpoint of your application:
cargo run --bin actix-bench -- -c 10 -t 10 http://localhost:8080/api/usersThis command tells actix-bench to use 10 connections and 10 threads to run the benchmark against the specified URL. You can adjust these values to test different levels of concurrency.
In addition to load testing, you can also use profiling tools to identify performance bottlenecks in your application. One such tool is flamegraph, which generates flame graphs that show where your application is spending its time.
To use flamegraph with Actix Web, you can add the flame and flamegraph crates to your project’s dependencies:
[dependencies]
flame = "0.4.0"
flamegraph = "0.1.17"
Then, you can use the flame::start_guard() and flamegraph::from_lines() functions to profile specific parts of your code. Here’s an example of how you might use these functions to profile a handler function:
use actix_web::{get, web, App, HttpResponse, HttpServer};
use flame;
use flamegraph;

#[get("/")]
async fn index() -> HttpResponse {
    let _guard = flame::start_guard("index_handler");
    // Your handler logic here
    HttpResponse::Ok().finish()
}

#[actix_web::main]
async fn main() -> std::io::Result<()> {
    // Start profiling
    let _flameguard = flame::start_guard("main");

    // Start the server
    HttpServer::new(|| App::new().service(index))
        .bind("127.0.0.1:8080")?
        .run()
        .await
}
This code uses the flame::start_guard() function to start a profiling guard named "index_handler" before running the handler logic. It also starts a profiling guard named "main" before starting the server.
Once you have run your application and generated profiling data, you can use the flamegraph::from_lines() function to generate a flame graph. Here’s an example of how you might use this function:
use std::fs::File;
use std::io::BufWriter;
use flamegraph::from_lines;

let data = flame::dump();
let mut file = BufWriter::new(File::create("flamegraph.svg").unwrap());
from_lines(&mut data.into_iter(), &mut file).unwrap();
This code uses the flame::dump() function to dump the profiling data, and then passes the data to flamegraph::from_lines() to generate a flame graph. The resulting flame graph is written to a file named "flamegraph.svg".
By load testing and profiling your Actix Web application, you can ensure that it performs well under high load and identify any performance bottlenecks that need to be optimized.
Using property-based testing to generate comprehensive test cases
Property-based testing is a testing approach where instead of writing specific test cases, you define properties or invariants that your code should always satisfy, and then use a testing framework to generate random inputs that exercise those properties. This approach can help you identify edge cases and other scenarios that you may not have thought of, and it can also help you test your code more thoroughly.
In Rust, one popular property-based testing framework is quickcheck. quickcheck allows you to define properties using a combination of macros and functions, and it will automatically generate inputs to test those properties.
For example, if you had a function that reversed a string, you could define a property that says that if you reverse a string twice, you should get the original string back:
use quickcheck_macros::quickcheck;

fn reverse(s: &str) -> String {
    s.chars().rev().collect()
}

#[quickcheck]
fn test_reverse_twice(s: String) -> bool {
    let r1 = reverse(&s);
    let r2 = reverse(&r1);
    r2 == s
}
In this example, the quickcheck macro defines a property test function that takes a randomly generated String as input. The test function then calls the reverse function twice and checks that the result is equal to the original input.
By running the cargo test command, quickcheck will generate many random strings and test the property against them. If the property is violated by any of the generated strings, quickcheck will output the inputs that caused the violation so you can investigate and fix the issue.
Property-based testing can be a powerful way to test complex or hard-to-reason-about code. However, it requires careful thought and planning to define good properties and ensure that they test the behavior you want. It can also be slower than traditional unit testing since it requires generating many inputs and testing them all. Nonetheless, it is a valuable tool to add to your testing toolbox.
Implementing end-to-end tests for full-stack Actix Web applications
End-to-end testing involves testing the entire application, including both the front-end and back-end components. In the context of a full-stack Actix Web application, this would involve testing the entire request-response cycle, including the web server, the database, and any external services or APIs that the application relies on.
There are several tools and frameworks available for implementing end-to-end tests for Actix Web applications. One popular framework is Selenium WebDriver, which allows you to automate web browsers and simulate user interactions with your application. Another option is Cypress, which is a JavaScript-based testing framework that allows you to write tests that run in a real browser.
To implement end-to-end tests for an Actix Web application, you will need to set up a test environment that closely mirrors your production environment. This typically involves setting up a separate database and any external services that your application relies on.
Once you have your test environment set up, you can write tests that simulate user interactions with your application. For example, you could write a test that sends a POST request to a login endpoint, enters a username and password, and then verifies that the user is successfully authenticated.
It’s important to note that end-to-end tests can be time-consuming and resource-intensive, so it’s generally a good idea to limit the number of tests you run in your test suite. You should also consider running your tests in a parallelized environment to minimize the time required to run your test suite.
In addition to end-to-end tests, you should also continue to write unit tests and integration tests to test specific components of your application in isolation. Together, these different types of tests can help ensure that your Actix Web application is working correctly and performing well. Writing testable code with Actix Web’s dependency injection and modular design features Actix Web provides several features to write testable code, including dependency injection and modular design. By following these principles, you can write code that is more modular, easier to test, and less prone to bugs.
One way to write testable code is to use dependency injection. This allows you to decouple your code from its dependencies, making it easier to test in isolation. Actix Web’s web::Data allows you to inject dependencies into your handlers.
For example, suppose you have a handler that needs to access a database connection. You can create a connection pool in your application’s state and pass it to the handler using web::Data.
use actix_web::{web, App, HttpResponse, HttpServer};
use diesel::PgConnection;
use diesel::r2d2::{ConnectionManager, Pool};

struct AppState {
    db_pool: Pool<ConnectionManager<PgConnection>>,
}

async fn index(data: web::Data<AppState>) -> HttpResponse {
    let conn = data.db_pool.get().unwrap();
    // do something with the connection
    HttpResponse::Ok().finish()
}

#[actix_web::main]
async fn main() -> std::io::Result<()> {
    let db_url = "postgres://user:pass@localhost/mydb";
    let manager = ConnectionManager::<PgConnection>::new(db_url);
    let db_pool = Pool::builder().build(manager).unwrap();
    let app_state = web::Data::new(AppState { db_pool });

    HttpServer::new(move || {
        App::new()
            .app_data(app_state.clone())
            .route("/", web::get().to(index))
    })
    .bind("127.0.0.1:8080")?
    .run()
    .await
}
Another way to write testable code is to use modular design. By breaking your application into smaller, independent modules, you can test each module in isolation. Actix Web’s Service trait allows you to define reusable components that can be composed together to build your application.
For example, suppose you have a handler that needs to access a database connection, and you want to test the handler in isolation. You can define a Database service that provides a database connection, and inject it into the handler.
Using Actix Web’s dependency injection and modular design features, we can write testable code that makes it easy to mock dependencies and perform unit testing. Let’s take a look at an example of how to use these features to build a modular Actix Web application.
use actix_web::{web, App, HttpServer, Responder};
use std::sync::{Arc, Mutex};

struct Database {
    // database implementation
}

impl Database {
    fn new() -> Self {
        Database {
            // initialize database
        }
    }
}

async fn index(db: web::Data<Arc<Mutex<Database>>>) -> impl Responder {
    // handle request using database
}

#[actix_web::main]
async fn main() -> std::io::Result<()> {
    let database = Arc::new(Mutex::new(Database::new()));

    HttpServer::new(move || {
        App::new()
            .service(web::resource("/").to(index))
            .data(database.clone())
    })
    .bind("127.0.0.1:8080")?
    .run()
    .await
}
Here, we have defined a Database struct that represents our database implementation. In the main function, we create an instance of the Database and wrap it in an Arc and a Mutex to make it thread-safe.
In the index function, we use the web::Data struct to inject the database into the request handler. This makes it easy to mock the database for testing purposes.
By using Actix Web’s modular design features and dependency injection, we can write testable code that is easy to maintain and extend.
Test-driven development (TDD) with Actix Web
Test-driven development (TDD) is a software development process that emphasizes writing automated tests before writing the actual code. The idea behind TDD is to write a failing test, then write code to make the test pass, and then refactor the code to make it better, all while ensuring that the tests continue to pass.
TDD can help improve the quality of the code by catching errors early in the development process, and it can also help ensure that the code meets the requirements and specifications provided.
Actix Web provides a great framework for practicing TDD as it offers a flexible and testable architecture. With Actix Web, it’s possible to write unit tests for individual components and integration tests for the entire application.
To practice TDD with Actix Web, one approach could be:
-
Write a failing test: Start by writing a test that fails. This test should define the functionality that you want to implement in your code.
-
Write the code: Write the code that makes the failing test pass. Keep the code as simple as possible and avoid adding extra functionality that is not needed to make the test pass.
-
Refactor the code: Refactor the code to make it better. This includes making the code more readable, more modular, and more efficient. Make sure that all the tests continue to pass after each refactor.
-
Repeat: Repeat the process by writing another failing test, writing the code to make the test pass, and then refactoring the code.
By following this process, you can ensure that your code is thoroughly tested, and you can catch any errors early in the development process. Automating testing with continuous integration and deployment (CI/CD) pipelines Continuous Integration and Continuous Deployment (CI/CD) pipelines are essential in modern software development to ensure that applications are tested, built, and deployed efficiently and reliably. Actix Web integrates well with popular CI/CD tools and platforms such as GitLab CI/CD, Jenkins, Travis CI, and CircleCI.
To set up a basic CI/CD pipeline for an Actix Web application, you can start by creating a gitlab-ci.yml file at the root of your project directory. Here’s an example gitlab-ci.yml file that defines a basic pipeline for a Rust application using Actix Web:
stages:
  - test
  - build
  - deploy

image: rust:latest

test:
  stage: test
  script:
    - cargo test

build:
  stage: build
  script:
    - cargo build --release

deploy:
  stage: deploy
  script:
    - echo "Deploying application"
This pipeline has three stages: test, build, and deploy. In the test stage, the application’s tests are run using the cargo test command. In the build stage, the application is built using the cargo build --release command, which creates an optimized executable that can be deployed to a production environment. Finally, in the deploy stage, the application is deployed to the production environment.
Of course, the above pipeline is just an example, and you will need to modify it to suit your specific needs. For example, you may want to add additional stages for linting or security scanning, or you may need to configure the pipeline to deploy the application to multiple environments.
In addition to GitLab CI/CD, other popular CI/CD platforms such as Jenkins, Travis CI, and CircleCI also support Rust and Actix Web applications. These platforms typically provide preconfigured build agents and deployment tools that can be used to automate the building, testing, and deployment of Actix Web applications.
In conclusion, setting up a CI/CD pipeline for your Actix Web application is a critical step in ensuring that your application is tested, built, and deployed efficiently and reliably. By automating these processes, you can save time, reduce errors, and ensure that your application is always in a deployable state.
Chapter 7: Scaling Actix Web Applications
Techniques for scaling web applications
Scaling web applications is an important consideration as traffic and usage increases. Here are some techniques for scaling Actix Web applications:
-
Load balancing: Distributing traffic across multiple instances of an application can improve availability and reduce response times. Load balancing can be implemented using software such as HAProxy or Nginx, or through cloud provider services such as AWS Elastic Load Balancer or Google Cloud Load Balancing.
-
Vertical scaling: This involves increasing the resources (e.g. CPU, memory) of a single server to handle more traffic. This can be done by upgrading the hardware, or by using a cloud provider service that allows for resource scaling, such as AWS EC2 or Google Cloud Compute Engine.
-
Horizontal scaling: This involves adding more servers to the application’s infrastructure to handle more traffic. This can be done by deploying the application to more servers, or by using a containerization service such as Docker or Kubernetes to manage multiple instances of the application.
-
Caching: Caching commonly accessed data can reduce the number of requests to the database and improve response times. Caching can be implemented using technologies such as Redis, Memcached, or CDN caching.
-
Database optimization: Optimizing database queries and using indexes can improve query response times and reduce the load on the database server.
-
Asynchronous programming: Actix Web supports asynchronous programming, which allows multiple requests to be handled concurrently, improving response times and throughput.
-
Monitoring and logging: Monitoring the application’s performance and logging errors can help identify and address performance bottlenecks and issues before they impact users.
By implementing these techniques, Actix Web applications can be scaled to handle increased traffic and usage, ensuring a positive user experience.
Load balancing with Actix Web
Load balancing is an essential technique for scaling web applications that receive a large number of requests. Load balancing involves distributing incoming requests across multiple servers, which can handle the requests more efficiently and reduce the workload on any single server.
Actix Web can be used with load balancers such as NGINX or HAProxy to distribute incoming requests across multiple servers. In a load-balanced setup, incoming requests are first received by the load balancer, which then forwards the request to one of the backend servers.
To configure Actix Web for a load-balanced setup, you will typically need to configure the load balancer to use a round-robin or other load-balancing algorithm to distribute requests across the backend servers. You will also need to configure Actix Web to use a shared backend data store such as a database or a cache, so that all backend servers have access to the same data.
In addition to load balancing, other techniques for scaling Actix Web applications include:
-
Caching: By caching frequently accessed data in memory or in a fast key-value store such as Redis, you can reduce the number of requests that need to be handled by the backend server.
-
Horizontal scaling: This involves adding more servers to the pool of backend servers to handle increased load.
-
Vertical scaling: This involves upgrading the hardware resources on a single server to handle increased load, such as adding more RAM or CPU cores.
-
Asynchronous processing: By using asynchronous programming techniques, you can handle more requests with the same number of server resources.
-
Content delivery networks (CDNs): By using a CDN to serve static assets such as images, CSS files, and JavaScript files, you can reduce the load on the backend server and improve the performance of the application.
Overall, scaling Actix Web applications requires careful planning and architecture to ensure that the application can handle increased load without compromising on performance or reliability.
Deploying Actix Web applications on cloud platforms
There are several cloud platforms that support deploying Actix Web applications, including:
-
Amazon Web Services (AWS): AWS Elastic Beanstalk is a platform that enables deploying and scaling web applications, including Actix Web apps, on AWS infrastructure.
-
Microsoft Azure: Azure App Service provides a platform for deploying and scaling web applications on Microsoft Azure. Actix Web apps can be deployed on Azure using a Docker container or a custom runtime.
-
Google Cloud Platform (GCP): GCP App Engine provides a platform for deploying and scaling web applications, including Actix Web apps, on GCP infrastructure.
-
Heroku: Heroku is a cloud platform that allows deploying and scaling web applications, including Actix Web apps, using a simple Git push workflow.
When deploying Actix Web applications on these cloud platforms, it is important to ensure that the application is configured to work in a distributed environment, such as using a shared cache or database. Additionally, it is important to monitor the application’s performance and adjust the resources allocated to it as needed to ensure optimal performance.
Managing application performance and monitoring
Managing application performance and monitoring is an important aspect of any production deployment. It allows you to identify potential issues before they become critical and provides insight into how your application is behaving in real-world scenarios. In this section, we’ll discuss some techniques for managing application performance and monitoring.
One of the most important tools for monitoring application performance is a logging system. Actix Web provides a built-in logging framework that allows you to log information at various levels, such as debug, info, warning, error, and critical. You can use these logs to identify errors, monitor performance, and troubleshoot issues. It’s a good practice to log as much information as possible in your application, but be mindful of logging sensitive information.
Another useful tool for monitoring application performance is metrics. Metrics are a way of quantifying how your application is performing over time. Actix Web provides a metrics middleware that allows you to track various metrics, such as request/response times, error rates, and request volumes. You can then use a tool like Prometheus to collect and analyze these metrics over time.
In addition to logging and metrics, you may also want to consider implementing application tracing. Tracing allows you to track the execution path of a request through your application. This can be especially useful for identifying performance bottlenecks or issues with complex request processing. Actix Web provides a tracing middleware that integrates with popular tracing tools like Jaeger and OpenTelemetry.
Finally, it’s important to monitor the health of your application and its dependencies. Actix Web provides a health check middleware that allows you to define custom health checks for your application. You can use these health checks to monitor the health of your application and any external dependencies, such as databases or cache stores. You can then use a tool like Kubernetes to perform automatic failover or scaling based on the health status of your application.
In summary, managing application performance and monitoring is critical for any production deployment. Actix Web provides built-in logging, metrics, tracing, and health check tools that can help you monitor and troubleshoot issues with your application. By using these tools, you can ensure that your application is performing optimally and identify potential issues before they become critical.
Horizontal and vertical scaling of Actix Web applications
Horizontal and vertical scaling are two common approaches to scaling web applications. Both approaches can be used with Actix Web applications.
Vertical scaling refers to increasing the resources of a single server, such as CPU, memory, or disk space. This can be accomplished by upgrading the hardware, such as adding more RAM or replacing the CPU with a faster one. Vertical scaling can be an effective solution for small to medium-sized applications, where a single server can handle the load.
Horizontal scaling, on the other hand, involves adding more servers to the application infrastructure. Each server is responsible for a portion of the application workload, which is distributed among them. This approach requires load balancing, which is the process of evenly distributing incoming traffic across multiple servers. Horizontal scaling is typically used for larger applications that require high availability and can handle large amounts of traffic.
With Actix Web, both vertical and horizontal scaling can be achieved by utilizing containerization technologies such as Docker and Kubernetes. By containerizing the application and deploying it to a container orchestration platform such as Kubernetes, the application can be easily scaled up or down by adding or removing container instances. Additionally, Kubernetes can automatically handle load balancing by distributing traffic across multiple containers running the application.
Another important aspect of managing application performance and monitoring is the use of logging and metrics. Actix Web provides a logging framework that can be used to log various events and messages within the application. Additionally, third-party tools such as Prometheus and Grafana can be used to collect and visualize metrics related to application performance, such as request latency and server load.
In summary, scaling Actix Web applications can be achieved through both vertical and horizontal scaling, utilizing containerization technologies and container orchestration platforms such as Kubernetes. Additionally, logging and metrics can be used to monitor application performance and identify areas for improvement.
Load testing and performance optimization for Actix Web applications
Load testing and performance optimization are crucial for ensuring that Actix Web applications are able to handle high traffic and perform well under heavy load. There are several techniques and tools that can be used to achieve this.
One popular tool for load testing is Apache JMeter, which can simulate large numbers of concurrent users making requests to an application. Load testing can help identify performance bottlenecks, such as slow database queries, high CPU usage, or slow response times.
Once performance bottlenecks have been identified, there are several techniques that can be used to optimize performance. One technique is to use caching to reduce the number of requests that need to be handled by the server. Actix Web supports both in-memory and Redis caching, which can be used to cache frequently accessed data.
Another technique is to optimize database queries by using indexes, optimizing schema design, or denormalizing data. Diesel provides several tools for optimizing database queries, including query profiling and query plan analysis.
Other performance optimization techniques include using asynchronous programming to reduce blocking and improve concurrency, using compression to reduce the size of response data, and minimizing the use of external dependencies that can introduce latency.
Monitoring is also important for ensuring that Actix Web applications are performing well and to identify potential issues before they become critical. Tools such as Prometheus and Grafana can be used to monitor application performance, track resource utilization, and identify performance trends over time. Additionally, logging and error tracking tools can be used to identify and diagnose issues in production environments.
In summary, load testing, performance optimization, and monitoring are essential for building high-performance Actix Web applications that can handle high traffic and scale effectively. Caching and content delivery networks (CDNs) for improving application speed Caching and content delivery networks (CDNs) can significantly improve the speed and performance of web applications.
Caching involves storing frequently used data or resources in a cache so that they can be quickly retrieved without having to go through the entire process of fetching them again. This can include database queries, API requests, and even static assets like images and stylesheets. By reducing the number of requests made to the server, caching can significantly improve the speed and responsiveness of the application.
CDNs take this concept a step further by distributing cached content across a network of servers located around the world. When a user requests a resource, the request is automatically routed to the closest server in the CDN, reducing latency and improving the overall speed of the application.
In Actix Web, caching can be implemented using a variety of techniques, including in-memory caching, file-based caching, and third-party caching services like Redis or Memcached. CDNs can also be easily integrated into Actix Web applications using existing CDN providers like Cloudflare or Amazon CloudFront.
It’s important to note that while caching and CDNs can significantly improve application performance, they can also introduce complexity and additional maintenance overhead. Careful consideration should be given to the specific caching and CDN strategy used for an application, taking into account factors like the types of data being cached, the frequency of updates, and the size and distribution of the user base. Using containerization with Docker and Kubernetes to deploy Actix Web applications Containerization has become increasingly popular in recent years as a way to package and deploy applications. Docker is a popular containerization platform that makes it easy to create, package, and deploy applications in a self-contained container.
Actix Web applications can be easily containerized using Docker. The first step is to create a Dockerfile that defines the environment in which the application will run. Here is an example Dockerfile for an Actix Web application:
FROM rust:1.53.0 as build
WORKDIR /app
COPY . .
RUN cargo build --release

FROM debian:buster-slim
WORKDIR /app
COPY --from=build /app/target/release/myapp .
CMD ["./myapp"]
This Dockerfile defines two stages. The first stage (build) uses the official Rust Docker image as a base image, sets the working directory to /app, copies the entire application directory into the container, and builds the application using cargo build --release.
The second stage (debian:buster-slim) uses the official Debian Buster slim image as a base image, sets the working directory to /app, copies the built binary from the first stage into the container, and sets the command to run the binary.
Once the Dockerfile is defined, the application can be built and packaged into a container by running the following commands:
docker build -t myapp .
docker run -p 8000:8000 myapp
These commands build the container image and run a container based on that image, mapping the container’s port 8000 to the host’s port 8000.
Kubernetes is a popular platform for managing containerized applications. It provides a flexible and scalable way to deploy and manage containerized applications in a cluster environment.
To deploy an Actix Web application on Kubernetes, we need to define a Kubernetes deployment and service manifest. Here is an example deployment manifest:
apiVersion: apps/v1
kind: Deployment
metadata:
  name: myapp-deployment
spec:
  replicas: 3
  selector:
    matchLabels:
      app: myapp
  template:
    metadata:
      labels:
        app: myapp
    spec:
      containers:
      - name: myapp
        image: myapp:latest
        ports:
        - containerPort: 8000
This manifest defines a Kubernetes deployment with three replicas, a selector that matches pods with the app=myapp label, and a pod template that specifies the container image to use and the container port to expose.
We also need to define a service manifest that exposes the application to the outside world. Here is an example service manifest:
apiVersion: v1
kind: Service
metadata:
  name: myapp-service
spec:
  selector:
    app: myapp
  ports:
    - name: http
      port: 80
      targetPort: 8000
  type: LoadBalancer
This manifest defines a Kubernetes service that selects pods with the app=myapp label, exposes port 80 on the service, and routes traffic to port 8000 on the pods. The service is of type LoadBalancer, which means that it will create an external load balancer to route traffic to the pods.
Once these manifests are defined, we can deploy the application to Kubernetes by running the following command:
kubectl apply -f deployment.yaml
kubectl apply -f service.yaml
These commands create the deployment and service resources in the Kubernetes cluster. The external IP address of the load balancer can be obtained by running kubectl get services.
Once we have our container images built and pushed to a container registry, we can use Kubernetes to deploy our Actix Web application to a cluster. To do this, we need to define a Kubernetes manifest file that describes the deployment and service for our application. Here’s an example manifest file:
apiVersion: apps/v1
kind: Deployment
metadata:
  name: my-app
  labels:
    app: my-app
spec:
  replicas: 3
  selector:
    matchLabels:
      app: my-app
  template:
    metadata:
      labels:
        app: my-app
    spec:
      containers:
        - name: my-app
          image: my-registry/my-app:latest
          ports:
            - containerPort: 8080
          env:
            - name: DATABASE_URL
              valueFrom:
                secretKeyRef:
                  name: my-app-secrets
                  key: database_url
---
apiVersion: v1
kind: Service
metadata:
  name: my-app
  labels:
    app: my-app
spec:
  type: LoadBalancer
  ports:
    - port: 80
      targetPort: 8080
  selector:
    app: my-app
This manifest file defines a deployment with three replicas and a service that exposes the deployment as a load balancer with an external IP address. The deployment pulls the container image from a container registry and sets the DATABASE_URL environment variable using a Kubernetes secret.
We can apply this manifest file to our Kubernetes cluster using the kubectl apply command:
kubectl apply -f my-app.yamlThis will create the deployment and service resources in the Kubernetes cluster, which will in turn create and manage the pods running our Actix Web application.
To scale our application, we can use the kubectl scale command:
kubectl scale deployment my-app --replicas=5This will increase the number of replicas for our deployment to 5, which will in turn create and manage more pods running our Actix Web application.
Finally, to monitor the performance of our application in the Kubernetes cluster, we can use tools such as Prometheus and Grafana to collect and visualize metrics such as CPU and memory usage, request latency, and error rates. This can help us identify any performance bottlenecks and optimize our application for better scalability and reliability.
Auto-scaling Actix Web applications with cloud providers such as AWS and Google Cloud Platform
Auto-scaling is a critical feature of modern cloud providers, which can help automatically adjust the capacity of the underlying infrastructure based on the actual traffic and usage patterns of the application. This can help to ensure that the application remains responsive and available even during periods of high demand.
Auto-scaling can be implemented in various ways, depending on the cloud provider and the specific requirements of the application. In general, there are two main types of auto-scaling:
-
Vertical auto-scaling: This involves adding more resources to each individual server, such as increasing the amount of memory, CPU, or storage. This type of auto-scaling is useful when the application is resource-bound, meaning that it needs more resources to handle additional traffic.
-
Horizontal auto-scaling: This involves adding more servers to the infrastructure, which can help distribute the load across multiple instances. This type of auto-scaling is useful when the application is compute-bound, meaning that it needs more processing power to handle additional traffic.
AWS and Google Cloud Platform provide various tools and services to enable auto-scaling for Actix Web applications. For example, AWS Elastic Beanstalk and Google App Engine both provide built-in auto-scaling capabilities that can automatically adjust the number of instances based on the traffic and usage patterns of the application. Additionally, AWS Auto Scaling and Google Cloud Autoscaler can be used to auto-scale EC2 instances and Google Compute Engine instances, respectively.
To use these auto-scaling services, the Actix Web application must be containerized using Docker, which can then be deployed to a container orchestrator such as Kubernetes or Amazon ECS. The auto-scaling service can then be configured to monitor the application’s metrics, such as CPU utilization or HTTP response time, and adjust the number of instances accordingly.
In addition to auto-scaling, cloud providers also offer various tools for monitoring and managing the performance of Actix Web applications. For example, AWS CloudWatch and Google Cloud Monitoring can be used to collect and analyze metrics and logs from the application, which can help identify performance bottlenecks and optimize the application for better performance. Similarly, AWS CloudFormation and Google Cloud Deployment Manager can be used to automate the deployment and management of the application infrastructure, which can help simplify the deployment process and reduce the risk of errors or misconfigurations.
Monitoring and logging Actix Web applications for debugging and performance analysis
Monitoring and logging are important aspects of managing and debugging Actix Web applications. They allow developers to identify and diagnose issues in their applications, as well as monitor performance and resource utilization.
There are several tools and frameworks available for monitoring and logging Actix Web applications. Some popular options include:
-
Prometheus: Prometheus is an open-source monitoring and alerting system that is commonly used for monitoring containerized applications. It provides detailed metrics and visualization of the performance and resource utilization of Actix Web applications.
-
Grafana: Grafana is a popular open-source tool for data visualization and monitoring. It can be used in conjunction with Prometheus to create customizable dashboards for monitoring and analyzing Actix Web applications.
-
Elastic Stack: Elastic Stack is a collection of open-source tools for logging, monitoring, and analyzing data. It includes tools like Elasticsearch for storing and indexing logs, Logstash for collecting and processing logs, and Kibana for visualizing and analyzing logs.
-
Log4rs: Log4rs is a flexible and configurable logging framework for Rust. It allows developers to easily configure and manage logging in their Actix Web applications.
-
Sentry: Sentry is an open-source error tracking and monitoring platform that can be used to capture and diagnose errors in Actix Web applications.
In addition to these tools, it is also important to implement structured logging in Actix Web applications. Structured logging provides a standardized format for logging, which makes it easier to analyze and search logs for specific events or issues.
To implement structured logging in Actix Web, developers can use the log crate along with a logging backend such as Log4rs or the built-in env_logger. By structuring log messages with specific fields, developers can easily filter and analyze logs for specific events or issues.
Overall, monitoring and logging are critical components of managing and debugging Actix Web applications. By implementing these tools and frameworks, developers can gain insight into the performance and behavior of their applications, as well as identify and diagnose issues more quickly and effectively.
Implementing fault tolerance and disaster recovery measures for Actix Web applications
Implementing fault tolerance and disaster recovery measures for Actix Web applications is critical to ensure that your application can recover from unexpected events or failures. Here are some techniques you can use to improve the fault tolerance and disaster recovery capabilities of your Actix Web application:
-
Design for failure: To improve the fault tolerance of your application, you should design your system with the assumption that failures will occur. You should also consider using the appropriate architectural patterns such as circuit breakers, bulkheads, and timeouts to limit the impact of failures.
-
Distributed systems: Distributed systems can help you improve the fault tolerance of your application by enabling you to spread the load across multiple servers. This way, if one server fails, the other servers can pick up the load.
-
Replication and redundancy: Replication and redundancy can help you improve the availability of your application. You can use techniques such as database replication and server redundancy to ensure that if one database or server fails, there are other copies of the data or servers available to serve the requests.
-
Backups: Backups can help you recover your data in the event of data loss or corruption. You should regularly back up your application data and store the backups in a secure location.
-
Disaster recovery plan: You should have a disaster recovery plan in place that outlines how you will respond to unexpected events or disasters such as natural disasters, power outages, or hardware failures. Your plan should include procedures for restoring data from backups, deploying applications to backup servers, and communicating with customers and stakeholders.
-
Monitoring and alerting: You should monitor your application and infrastructure for potential issues and set up alerts to notify you when issues are detected. This will enable you to quickly respond to issues and minimize downtime.
-
Testing: You should regularly test your fault tolerance and disaster recovery measures to ensure that they work as expected. This can include testing your backups, simulating server failures, and testing your disaster recovery plan.
By implementing these techniques, you can improve the fault tolerance and disaster recovery capabilities of your Actix Web application and ensure that your application can recover quickly from unexpected events or failures.
Chapter 8: Creating a GraphQL API with Actix Web
Introduction to GraphQL
GraphQL is a query language for APIs that was developed by Facebook in 2012 and open-sourced in 2015. It provides a more efficient, powerful and flexible alternative to traditional REST APIs. In a REST API, the client typically sends a request to the server for a specific resource, and the server responds with the entire representation of that resource. With GraphQL, the client sends a query that specifies the data it needs, and the server responds with only that data. This results in fewer requests, smaller payloads, and faster response times.
GraphQL is often described as a “query language for your API”, and its main features include:
-
Strongly typed schema: GraphQL APIs have a strongly typed schema, which means that every field in a query has a specific type, and the server returns exactly what was requested.
-
Query efficiency: Because clients can specify exactly what data they need, GraphQL APIs can be more efficient than REST APIs.
-
Flexible queries: Clients can request multiple resources with a single query, and the server can respond with only the requested data.
-
Declarative syntax: Queries are written in a declarative syntax, which makes them easy to read and understand.
-
Introspection: GraphQL APIs provide introspection capabilities, which allow clients to discover the schema and available resources at runtime.
-
Real-time subscriptions: GraphQL also supports real-time subscriptions, which enable clients to receive updates in real-time as data changes on the server.
GraphQL has become increasingly popular in recent years, with major companies such as GitHub, Shopify, and Airbnb adopting it for their APIs. It is also supported by a number of client-side libraries and tools, including Apollo, Relay, and GraphiQL, which make it easy to use in client applications.
Setting up a GraphQL server with Actix Web
To set up a GraphQL server with Actix Web, we can use the Juniper crate, which provides an implementation of the GraphQL specification in Rust.
First, we need to add Juniper as a dependency in our Cargo.toml file:
[dependencies]
juniper = "0.15.0"
juniper_actix = "0.3.0"
serde = { version = "1.0", features = ["derive"] }
actix-web = "3.3.2"
Next, let’s create a basic GraphQL schema. We can define a simple object type called Query with a single field called hello that returns a string:
use juniper::{FieldResult, RootNode};

struct Query;

#[juniper::object]
impl Query {
    fn hello() -> FieldResult<String> {
        Ok("Hello, world!".to_string())
    }
}

type Schema = RootNode<'static, Query, juniper::EmptyMutation<()>>;

pub async fn graphql_handler(
    schema: web::Data<Schema>,
    data: web::Json<GraphQLRequest>,
) -> Result<HttpResponse, Error> {
    let res = data.execute(&schema).await;
    let json = serde_json::to_string(&res)?;
    Ok(HttpResponse::Ok()
        .content_type("application/json")
        .body(json))
}

pub fn graphql_route(cfg: &mut web::ServiceConfig) {
    let schema = Schema::new(Query {}, juniper::EmptyMutation::new());
    cfg.service(web::resource("/graphql").route(web::post().to(graphql_handler)))
        .data(schema);
}
In this example, we define a new Query struct and annotate it with juniper::object to indicate that it is a GraphQL object type. We then define a single method on this object called hello, which returns a String with the message “Hello, world!“.
We also define a Schema type using RootNode, which is a wrapper around our Query object. Finally, we define a graphql_handler function that takes in our Schema and a GraphQLRequest object and executes the request using the execute method of GraphQLRequest.
To use this handler with Actix Web, we can define a new route in our application’s main file:
use actix_web::{web, App, HttpServer};
use juniper::http::GraphQLRequest;
use juniper_actix::graphql_handler;
use schema::graphql_route;

mod schema;

#[actix_web::main]
async fn main() -> std::io::Result<()> {
    HttpServer::new(|| {
        App::new()
            .service(web::resource("/").to(|| HttpResponse::Ok().body("Hello, world!")))
            .configure(graphql_route)
    })
    .bind("127.0.0.1:8000")?
    .run()
    .await
}
In this example, we define a new route using graphql_route function, which sets up a route for the /graphql endpoint and handles requests using our graphql_handler function.
To test our GraphQL server, we can send a POST request to the /graphql endpoint with a JSON body containing our query. For example, we can use curl to send a request to the server:
$ curl -X POST -H "Content-Type: application/json" -d '{"query": "{ hello }"}' http://localhost:8000/graphqlThis should return a JSON response with our “Hello, world!” message. Great! Now that we have set up a simple GraphQL server using Actix Web, let’s move on to defining our own schema and implementing some more complex functionality.
To do this, we will use the juniper crate, which provides a set of macros and utilities for defining and executing GraphQL schemas.
First, let’s add juniper to our Cargo.toml file:
[dependencies]
actix-web = "3.3.2"
juniper = "0.15.3"
serde = { version = "1.0", features = ["derive"] }
serde_json = "1.0"
Next, let’s define our schema. In GraphQL, a schema defines the types of data that can be queried and the operations that can be performed. For this example, we will define a simple schema with one query that returns a list of books:
use juniper::{FieldResult, RootNode};

#[derive(Clone, Debug)]
pub struct Book {
    pub id: String,
    pub title: String,
    pub author: String,
}

pub struct Query;

#[juniper::graphql_object]
impl Query {
    fn books() -> FieldResult<Vec<Book>> {
        let books = vec![
            Book {
                id: "1".to_string(),
                title: "The Hitchhiker's Guide to the Galaxy".to_string(),
                author: "Douglas Adams".to_string(),
            },
            Book {
                id: "2".to_string(),
                title: "Dune".to_string(),
                author: "Frank Herbert".to_string(),
            },
        ];
        Ok(books)
    }
}

pub type Schema = RootNode<'static, Query, juniper::EmptyMutation<()>>;
In this code, we define a Book struct that represents a book with an id, title, and author. We also define a Query struct with a books function that returns a vector of Book objects.
We use the juniper::graphql_object macro to define the Query struct as a GraphQL object, which allows us to use it in our schema.
Finally, we define a Schema type using the RootNode struct from juniper, which combines our Query struct with an empty mutation. We will come back to mutations later, but for now we can use juniper::EmptyMutation to represent a schema with no mutations.
Now that we have defined our schema, let’s set up our Actix Web server to use it:
use actix_web::{post, web, App, HttpResponse, HttpServer};
use juniper::http::graphiql::graphiql_source;
use juniper::http::GraphQLRequest;

async fn graphql_handler(
    st: web::Data<Schema>,
    data: web::Json<GraphQLRequest>,
) -> HttpResponse {
    let res = data.execute(&st, &());
    let status = if res.is_ok() {
        200
    } else {
        400
    };
    HttpResponse::build(status)
        .header("Content-Type", "application/json")
        .body(serde_json::to_string(&res).unwrap())
}

async fn graphiql_handler() -> HttpResponse {
    let html = graphiql_source("http://localhost:8000/graphql");
    HttpResponse::Ok()
        .content_type("text/html; charset=utf-8")
        .body(html)
}

#[actix_web::main]
async fn main() -> std::io::Result<()> {
    let schema = RootNode::new(Query, EmptyMutation::<()>::new());

    HttpServer::new(|| {
        App::new()
            .data(schema.clone())
            .service(
                juniper_actix::graphiql_handler("/graphql", None)
                    .name("graphiql")
                    .guard(actix_web::guard::Get()),
            )
            .service(
                juniper_actix::graphql_handler(schema, "/graphql", None)
                    .name("graphql")
                    .guard(actix_web::guard::Post()),
            )
    })
    .bind("127.0.0.1:8080")?
    .run()
    .await
}
Defining GraphQL schemas and types
In GraphQL, the schema is a contract between the client and the server that defines the structure and types of the data that can be requested. The schema defines the available queries, mutations, and subscriptions, as well as the data types that can be returned.
GraphQL has a schema definition language (SDL) that is used to define the schema. The SDL is a human-readable syntax that describes the types and fields that are available on a GraphQL server.
Let’s define a simple schema for a blog API that will allow us to retrieve blog posts and comments.
type Post {
  id: ID!
  title: String!
  body: String!
  comments: [Comment!]!
}

type Comment {
  id: ID!
  name: String!
  email: String!
  body: String!
  post: Post!
}

type Query {
  post(id: ID!): Post!
  posts: [Post!]!
}
In this schema, we have defined two types: Post and Comment. The Post type has an id, title, body, and an array of Comment objects. The Comment type has an id, name, email, body, and a Post object.
We have also defined a Query type that has two queries: post and posts. The post query takes an id parameter and returns a Post object. The posts query returns an array of Post objects.
Note that the exclamation mark (!) after a type indicates that the field is non-nullable. This means that the field must always have a value and cannot be null.
With this schema, we can now define our GraphQL API and start implementing the resolvers that will return the actual data. Querying and mutating data with GraphQL Once we have our schema defined, we can use GraphQL to query and mutate data in our application.
To perform a query, we send a GraphQL request to our server with the fields we want to retrieve. For example, to retrieve the name and age of a person with the ID 1, we can send the following GraphQL request:
query {
  person(id: 1) {
    name
    age
  }
}
This request will return a response with the name and age of the person with ID 1.
To perform a mutation, we send a GraphQL request to our server with the fields we want to update. For example, to update the name of a person with the ID 1, we can send the following GraphQL request:
mutation {
  updatePerson(id: 1, name: "John") {
    id
    name
  }
}
This request will update the name of the person with ID 1 to “John” and return a response with the updated ID and name.
In our Actix Web application, we can define resolver functions for each field in our schema. The resolver function receives the arguments passed in the GraphQL request and returns the corresponding data.
For example, let’s say we have a Person struct with id, name, and age fields:
struct Person {
  id: i32,
  name: String,
  age: i32,
}
We can define a resolver function for the person field in our schema that retrieves the person with the corresponding ID from a database:
async fn get_person(id: i32) -> Result<Person, Error> {
  // Retrieve the person with the given ID from the database
  // ...

  Ok(person)
}
We can define a resolver function for the updatePerson mutation that updates the name of the person with the corresponding ID in the database:
async fn update_person(id: i32, name: String) -> Result<Person, Error> {
  // Update the name of the person with the given ID in the database
  // ...

  Ok(updated_person)
}
We can then use these resolver functions in our Actix Web handlers to handle GraphQL requests:
async fn graphql_handler(
  schema: web::Data<Schema>,
  data: web::Json<GraphQLRequest>,
) -> Result<HttpResponse, Error> {
  let res = data.execute(&schema, &()).await;
  let body = serde_json::to_string(&res)?;

  Ok(HttpResponse::Ok()
    .content_type("application/json")
    .body(body))
}
With this setup, we can now perform queries and mutations on our Actix Web GraphQL server.
Creating custom GraphQL scalar types for Actix Web applications
In addition to the built-in scalar types in GraphQL (such as Int, Float, String, Boolean, and ID), it is also possible to define custom scalar types in Actix Web applications using the juniper crate.
To define a custom scalar type, you first need to create a Rust type that represents the scalar value. For example, let’s say we want to define a custom scalar type called DateTime that represents a date and time value. We can define the Rust type like this:
use chrono::NaiveDateTime;
use juniper::GraphQLScalarValue;

#[derive(Debug, Clone, PartialEq, GraphQLScalarValue)]
pub struct DateTime(pub NaiveDateTime);
In this example, we are using the chrono crate to represent date and time values as NaiveDateTime structs. We then use the GraphQLScalarValue trait from juniper to derive the necessary GraphQL traits for our custom scalar type.
Next, we need to define how the scalar type is parsed from a string input and how it is serialized to a string output. This is done by implementing the GraphQLScalar trait for our custom scalar type. Here’s an example implementation for our DateTime scalar type:
use juniper::{ParseScalarResult, Value, IntoResolvable};

impl GraphQLScalar for DateTime {
    // Define the name of our scalar type
    fn name(&self) -> Option<&str> {
        Some("DateTime")
    }

    // Define the description of our scalar type
    fn description(&self) -> Option<&str> {
        Some("A date and time value represented as a string")
    }

    // Parse a string input value into our Rust type
    fn parse(value: Value) -> ParseScalarResult<Self> {
        let string = value.into_string().map_err(|_| {
            ParseScalarError::new("Value is not a string")
        })?;
        let datetime = NaiveDateTime::parse_from_str(&string, "%Y-%m-%d %H:%M:%S").map_err(|_| {
            ParseScalarError::new("Value is not a valid date and time string")
        })?;
        Ok(DateTime(datetime))
    }

    // Serialize our Rust type into a string output value
    fn to_value(&self) -> Value {
        Value::String(self.0.format("%Y-%m-%d %H:%M:%S").to_string())
    }
}
In this implementation, we define the name and description of our scalar type using the name and description methods respectively. We also implement the parse method to parse a string input value into our DateTime struct using the NaiveDateTime::parse_from_str method from chrono. If the input value is not a valid string or cannot be parsed into a NaiveDateTime, we return a ParseScalarError with an error message.
Finally, we implement the to_value method to serialize our DateTime struct into a string output value using the NaiveDateTime::format method from chrono.
With our custom scalar type defined, we can now use it in our GraphQL schema to represent date and time values. For example:
#[derive(GraphQLObject)]
struct User {
    id: String,
    name: String,
    created_at: DateTime,
}

#[derive(GraphQLInputObject)]
struct NewUser {
    name: String,
    created_at: DateTime,
}

#[derive(GraphQLInputObject)]
struct UpdateUser {
    id: String,
    name: Option<String>,
    created_at: Option<DateTime>,
}

pub struct Query;

#[juniper::object]
impl Query {
    fn user(id
: String, context: &Context) -> Option<User> {
        let user = context.data::<UserData>().get_user(&id)?;
        Some(User {
            id: user.id.clone(),
            name: user.name.clone(),
            email: user.email.clone(),
            created_at: Some(user.created_at),
        })
    }
}

pub struct Mutation;

#[juniper::object]
impl Mutation {
    fn create_user(name: String, email: String, context: &Context) -> User {
        let user = context.data::<UserData>().create_user(name, email);
        User {
            id: user.id.clone(),
            name: user.name.clone(),
            email: user.email.clone(),
            created_at: Some(user.created_at),
        }
    }
}

pub type Schema = RootNode<'static, Query, Mutation>;

pub fn create_schema() -> Schema {
    Schema::new(Query, Mutation)
}
Here, we define two root objects, Query and Mutation, which represent the entry points for reading and writing data, respectively. In the Query object, we define a user field that takes a String argument id and returns an optional User object. The create_user field in the Mutation object takes String arguments name and email, and returns a User object.
Finally, we define a Schema object that wraps the Query and Mutation objects and returns it from the create_schema function. This Schema object will be used to execute GraphQL queries and mutations in our Actix Web application.
We can now use this schema to handle incoming GraphQL requests in Actix Web. To do this, we need to define a request handler that parses incoming requests, executes them against our schema, and returns the result as a JSON response. We’ll do this in the next section.
Implementing authentication and authorization with GraphQL in Actix Web
Implementing authentication and authorization with GraphQL in Actix Web involves several steps, such as defining custom GraphQL types and mutations for user authentication, creating middleware to handle authentication and authorization, and integrating the middleware with the Actix Web application.
First, we need to define custom GraphQL types and mutations for user authentication. We can create a LoginInput struct that contains the user’s email and password:
#[derive(Debug, Clone, InputObject)]
struct LoginInput {
    email: String,
    password: String,
}
We can then define a Mutation that takes in the LoginInput and returns a token if the user is authenticated:
#[derive(Debug)]
pub struct AuthenticatedUser {
    pub user_id: i32,
}

#[derive(Debug)]
pub struct LoginResponse {
    pub token: String,
}

#[derive(Debug)]
pub struct LoginError;

#[derive(juniper::GraphQLObject)]
pub struct LoginPayload {
    user: Option<AuthenticatedUser>,
    error: Option<LoginError>,
    token: Option<LoginResponse>,
}

pub struct Mutation;

#[juniper::object]
impl Mutation {
    fn login(input: LoginInput) -> LoginPayload {
        // Authenticate user and return LoginPayload
    }
}
Next, we can create middleware to handle authentication and authorization. One popular middleware for Actix Web is the actix-web-httpauth crate, which provides middleware for HTTP authentication.
We can create a middleware function that checks if the request has an Authorization header with a valid JWT token:
use actix_web_httpauth::extractors::bearer::BearerAuth;

async fn auth_middleware(
    req: HttpRequest,
    payload: juniper::http::GraphQLBatchRequest,
) -> Result<GraphQLBatchResponse, Error> {
    let auth = BearerAuth::from_request(&req).await.map_err(ErrorUnauthorized)?;

    // Verify JWT token and authenticate user
}
Finally, we can integrate the middleware with the Actix Web application by wrapping the GraphQL endpoint with the middleware function:
fn main() -> std::io::Result<()> {
    HttpServer::new(|| {
        let schema = Schema::new(Query {}, Mutation {});
        let state = AppState::new(schema);

        App::new()
            .data(state)
            .wrap(auth_middleware)
            .service(web::resource("/graphql").route(web::post().to(graphql)))
            .service(web::resource("/graphiql").route(web::get().to(graphiql)))
    })
    .bind("127.0.0.1:8080")?
    .run()
}
With these steps, we can implement authentication and authorization with GraphQL in Actix Web.
Integrating Actix Web with GraphQL client libraries such as Apollo
Integrating Actix Web with GraphQL client libraries such as Apollo can be done using the GraphQL endpoint of the Actix Web server.
To use Apollo with Actix Web, first, we need to create a GraphQL schema using the juniper crate, just as we did before. Then, we can define a route in the Actix Web server that serves as the GraphQL endpoint.
After defining the route, we can use the Apollo client library to send queries and mutations to the GraphQL endpoint. Apollo provides a client that can be used in a browser or in a server-side environment such as Node.js.
To use the Apollo client library in a browser, we need to include the apollo-boost and graphql packages in our application. Then, we can create an Apollo client and use it to send queries and mutations to the Actix Web server.
Here’s an example of how to use Apollo with Actix Web:
use actix_web::{post, web, App, HttpResponse, HttpServer};
use juniper::{EmptyMutation, RootNode};

// Define a GraphQL schema
struct Query;
#[juniper::object]
impl Query {
    fn hello() -> &'static str {
        "Hello, world!"
    }
}
type Schema = RootNode<'static, Query, EmptyMutation<()>>;

// Define a route that serves as the GraphQL endpoint
#[post("/graphql")]
async fn graphql(
    schema: web::Data<Schema>,
    data: web::Json<GraphQLRequest>,
) -> Result<HttpResponse, Error> {
    let response = data.execute(&schema, &());
    let status = if response.is_ok() {
        http::StatusCode::OK
    } else {
        http::StatusCode::BAD_REQUEST
    };
    let body = serde_json::to_string(&response)?;
    Ok(HttpResponse::build(status).body(body))
}

#[actix_web::main]
async fn main() -> std::io::Result<()> {
    // Create a Juniper schema
    let schema = Schema::new(Query, EmptyMutation::new());

    // Start the Actix Web server
    HttpServer::new(move || {
        App::new()
            .data(schema.clone())
            .service(graphql)
    })
    .bind("127.0.0.1:8080")?
    .run()
    .await
}
Once the Actix Web server is running, we can create an Apollo client in our browser application and use it to send queries and mutations to the Actix Web server:
import ApolloClient from 'apollo-boost';
import gql from 'graphql-tag';

// Create an Apollo client
const client = new ApolloClient({
  uri: 'http://localhost:8080/graphql',
});

// Send a GraphQL query to the Actix Web server
client.query({
  query: gql`
    query {
      hello
    }
  `,
})
  .then(result => console.log(result.data.hello))
  .catch(error => console.error(error));
This will send a GraphQL query to the Actix Web server, which will respond with the “Hello, world!” message defined in the schema. Handling errors and validation in GraphQL APIs with Actix Web When building GraphQL APIs, it’s important to handle errors and validate input to ensure the stability and correctness of the system. In Actix Web, this can be done using various tools and techniques.
One way to handle errors is to use the Result type in Rust to represent success or failure of a query or mutation. For example, if a mutation fails due to some validation error, the resolver function can return a Result type with an error message, which will be propagated back to the client. This can be further customized by defining custom error types and implementing the From trait to convert them into GraphQL errors.
Actix Web also provides built-in support for input validation using the Validator middleware. This middleware can be used to validate input arguments to queries and mutations using declarative validation rules. For example, we can define a validation rule to ensure that an email field is in a valid format, and if it fails, an error will be returned to the client.
Another technique for handling errors is to use the anyhow crate, which provides a unified error handling mechanism for Rust applications. anyhow allows for easy creation of custom error types and provides a convenient way to convert errors into GraphQL errors.
In addition to error handling, Actix Web also provides support for logging and tracing, which can be useful for debugging and performance analysis. The tracing crate can be used to instrument the application code and capture detailed logs and metrics. This can help identify performance bottlenecks and other issues in the application.
Overall, handling errors and validating input are important aspects of building robust GraphQL APIs, and Actix Web provides several tools and techniques to achieve this.
Chapter 9: Building Microservices with Actix Web
Introduction to microservices architecture
Microservices architecture is an approach to building software applications as a collection of small, independent, and loosely coupled services that work together to provide a complete system. In this architecture, each service focuses on a single task and communicates with other services through well-defined interfaces using lightweight protocols such as HTTP or message queues.
Microservices architecture has gained popularity in recent years due to its ability to help developers build scalable, resilient, and maintainable applications. With microservices, developers can break down large monolithic applications into smaller, independently deployable services that can be developed and maintained by separate teams. This makes it easier to develop, deploy, and scale applications, as each service can be managed independently, and changes made to one service do not affect the entire system.
However, microservices architecture also comes with its own set of challenges, such as increased complexity in deployment and testing, higher operational overhead, and potential issues with service discovery and communication. To effectively implement microservices architecture, developers need to carefully design the services, manage dependencies, and choose the right tools and technologies for deployment and monitoring.
Building microservices with Actix Web
Actix Web provides a powerful foundation for building microservices in Rust. Microservices are an architectural pattern that involves breaking down a large application into smaller, more specialized services that can communicate with each other. Each microservice performs a specific function and can be developed and deployed independently of the other services.
In Actix Web, each microservice can be implemented as a separate Actix Web application, which can be deployed and scaled independently of other microservices. The microservices can communicate with each other using various mechanisms such as HTTP, gRPC, or message queues.
To build microservices with Actix Web, we can follow these steps:
-
Identify the different functionalities of the application that can be broken down into separate services.
-
Implement each service as a separate Actix Web application.
-
Define the API contracts for each service using a protocol such as REST or GraphQL.
-
Implement communication mechanisms between the services, such as HTTP or message queues.
-
Deploy and scale the services independently using a container orchestration platform such as Docker or Kubernetes.
Actix Web provides several features that make it suitable for building microservices, such as:
-
High performance: Actix Web is designed for high performance and can handle a large number of concurrent requests.
-
Modularity: Each microservice can be developed and deployed independently of other services, which makes it easier to maintain and update the application.
-
Asynchronous programming model: Actix Web uses Rust’s async/await syntax and provides powerful abstractions for working with asynchronous code, which makes it easier to write scalable and efficient microservices.
-
Built-in support for HTTP and WebSocket protocols: Actix Web provides built-in support for these protocols, which makes it easier to implement communication between microservices.
Overall, Actix Web provides a powerful and flexible foundation for building microservices in Rust, and its features make it a great choice for developing scalable and efficient applications. Communication between microservices with Actix Web In a microservices architecture, the services communicate with each other to exchange data and perform business logic. Actix Web provides several ways to implement inter-service communication:
-
HTTP/REST: Microservices can communicate with each other over HTTP using RESTful APIs. This is the most common approach for inter-service communication in microservices architecture. Actix Web provides a powerful HTTP server that can be used to implement RESTful APIs.
-
Message Queues: Microservices can communicate with each other asynchronously using message queues. Actix Web provides support for message queues through the Actix actor system. This approach allows for high scalability and fault-tolerance.
-
gRPC: gRPC is a high-performance, open-source, universal RPC framework that can be used for inter-service communication in a microservices architecture. Actix Web provides support for gRPC through the
toniccrate, which is a Rust implementation of gRPC. -
WebSockets: Microservices can communicate with each other in real-time using WebSockets. Actix Web provides support for WebSockets through the
actix-web-socketcrate.
When choosing a communication approach, it is important to consider the needs of the microservice and the overall system architecture.
Deploying and managing microservices in a distributed environment
Deploying and managing microservices in a distributed environment involves various challenges, including service discovery, load balancing, fault tolerance, and monitoring. Here are some best practices to consider:
-
Containerization: Containerization using technologies like Docker and Kubernetes makes it easy to deploy, manage, and scale microservices. It enables developers to package microservices along with their dependencies, configurations, and environment into a single container that can be run anywhere.
-
Service Discovery: Service discovery is critical to enable communication between microservices. Consul, etcd, and ZooKeeper are some of the popular service discovery tools that help manage the lifecycle of microservices.
-
Load Balancing: Load balancing ensures that requests are evenly distributed across multiple instances of a microservice to prevent overloading. Popular load balancing solutions include NGINX, HAProxy, and Istio.
-
Fault Tolerance: Microservices should be designed to handle failures in other services or the infrastructure. Techniques such as Circuit Breakers, Retries, and Timeouts can help maintain availability and reliability.
-
Monitoring: Monitoring and logging are essential to detect and troubleshoot issues with microservices. Tools like Prometheus, Grafana, and ELK Stack help monitor metrics, logs, and traces across microservices.
-
Infrastructure as Code: Infrastructure as Code (IaC) allows for the creation and management of infrastructure resources such as virtual machines, networks, and load balancers using code. It enables developers to automate the deployment and configuration of microservices, reducing the risk of human errors.
-
Continuous Integration and Deployment: Continuous Integration and Deployment (CI/CD) pipelines automate the build, test, and deployment of microservices. It helps ensure that changes are deployed consistently across environments, reducing the risk of errors and vulnerabilities.
By adopting these best practices, you can deploy and manage microservices in a distributed environment with confidence. Using service discovery and load balancing in Actix Web microservices In a microservices architecture, service discovery and load balancing are crucial for enabling communication between services and ensuring that traffic is distributed evenly across multiple instances of a service.
Service discovery is the process of automatically detecting and registering the location and availability of services in a distributed system. In the context of Actix Web microservices, this can be achieved using tools like Consul or etcd, which allow services to register themselves and make their endpoints available for other services to discover.
Load balancing is the process of distributing incoming network traffic across multiple servers or instances of a service. This helps to improve performance and availability by ensuring that no single server or instance becomes overwhelmed with requests. In Actix Web, load balancing can be achieved using tools like Nginx, which can be configured to distribute incoming requests across multiple instances of a service.
Combining service discovery and load balancing allows for a highly scalable and fault-tolerant microservices architecture. As new instances of a service are added or removed, the load balancer can dynamically adjust the traffic distribution to ensure that each instance is being utilized effectively.
Implementing fault tolerance and resilience patterns in Actix Web microservices
When developing microservices, it is essential to consider the possibility of failures and errors. This is because microservices are distributed systems that are subject to failures that can occur due to network issues, hardware failures, or other factors. To ensure that the system remains operational in the event of failures, developers need to implement fault tolerance and resilience patterns.
Actix Web provides several tools and techniques that can be used to implement fault tolerance and resilience in microservices. Some of these patterns include:
-
Circuit breaker pattern: This pattern is used to handle failures that occur when a microservice tries to access another service that is currently unavailable. The circuit breaker pattern helps to prevent cascading failures that can bring down the entire system. Actix Web provides a
actix-circuit-breakercrate that can be used to implement this pattern. -
Retry pattern: This pattern is used to retry failed requests to a microservice. When a request fails, it is retried after a certain amount of time, and if it fails again, it is retried again. Actix Web provides a
futures-retrycrate that can be used to implement this pattern. -
Bulkhead pattern: This pattern is used to isolate parts of the system to prevent failures from affecting other parts of the system. Actix Web provides a
actix-rust-circuitbreakercrate that can be used to implement this pattern. -
Timeout pattern: This pattern is used to prevent long-running requests from blocking the system. Actix Web provides a
actix-web-timeoutcrate that can be used to implement this pattern. -
Monitoring and logging: To detect and diagnose failures, it is essential to have monitoring and logging in place. Actix Web provides built-in support for logging, and there are several monitoring tools available that can be used with Actix Web.
By implementing these patterns, developers can ensure that their microservices are fault-tolerant and resilient, which helps to improve the overall reliability and availability of the system.
Monitoring and tracing Actix Web microservices with tools like Prometheus and Jaeger
Monitoring and tracing are essential components of running microservices in production environments. They provide visibility into the performance and behavior of individual services and the entire system. Actix Web supports integration with monitoring and tracing tools like Prometheus and Jaeger.
Prometheus is an open-source monitoring system that collects metrics from configured targets at given intervals, evaluates rule expressions, displays the results, and can trigger alerts if some condition is observed to be true. Actix Web provides support for exporting metrics to Prometheus using the actix-web-prometheus crate. This crate provides middleware for generating and exposing Prometheus metrics for an Actix Web application. It collects various metrics such as request count, response time, and error rate.
Jaeger is an open-source, end-to-end distributed tracing system that is used for monitoring and troubleshooting microservices-based distributed systems. It is particularly useful in complex systems, where it is difficult to understand the dependencies and interactions between services. Actix Web supports integration with Jaeger using the tracing crate. This crate provides a set of macros for instrumenting code with tracing events that can be visualized using Jaeger.
With the integration of Prometheus and Jaeger, developers can monitor and trace their Actix Web microservices in production environments, diagnose issues, and identify performance bottlenecks. Securing Actix Web microservices with OAuth2 and JWT tokens Actix Web microservices can be secured using various authentication and authorization mechanisms, including OAuth2 and JWT tokens.
OAuth2 is an industry-standard protocol for authorization and provides a secure way for clients to access resources on behalf of a resource owner. In the context of microservices, OAuth2 can be used to allow clients to access protected resources across multiple microservices without sharing user credentials.
JWT (JSON Web Token) is a compact, URL-safe means of representing claims to be transferred between two parties. In the context of microservices, JWT can be used to securely authenticate and authorize client requests to access protected resources.
To secure Actix Web microservices using OAuth2 and JWT tokens, we can use the actix-web-oauth2 and actix-web-jwt crates, respectively.
The actix-web-oauth2 crate provides middleware that can be used to authenticate and authorize client requests using the OAuth2 protocol. It supports various grant types, including Authorization Code, Implicit, and Client Credentials, and can be integrated with various OAuth2 providers, such as Google, Facebook, and Okta.
The actix-web-jwt crate provides middleware that can be used to authenticate and authorize client requests using JWT tokens. It supports various algorithms for generating and verifying JWT tokens, including HMAC, RSA, and ECDSA, and can be integrated with various JWT providers, such as Auth0, Firebase, and Amazon Cognito.
To use these crates in Actix Web microservices, we need to add them as dependencies in our Cargo.toml file and configure them in our application code.
For example, to use the actix-web-oauth2 crate, we can add the following lines to our Cargo.toml file:
[dependencies]
actix-web-oauth2 = "0.7.0"
And to use the actix-web-jwt crate, we can add the following lines:
[dependencies]
actix-web-jwt = "0.9.3"
Once we have added these dependencies, we can use them in our Actix Web application code to secure our microservices.
For example, to secure a microservice with OAuth2, we can add the OAuth2 middleware to our application’s HTTP server:
use actix_web::{web, App, HttpServer};
use actix_web_oauth2::{AccessTokenError, OAuth2};

async fn index(oauth2: web::Data<OAuth2>) -> String {
    // Authenticate and authorize client requests using OAuth2
}

#[actix_web::main]
async fn main() -> std::io::Result<()> {
    let oauth2 = OAuth2::new(provider.clone(), client_id.clone(), client_secret.clone(), redirect_uri.clone());

    HttpServer::new(move || {
        App::new()
            .data(oauth2.clone())
            .route("/", web::get().to(index))
    })
    .bind("127.0.0.1:8000")?
    .run()
    .await
}
And to secure a microservice with JWT, we can add the JWT middleware to our application’s HTTP server:
use actix_web::{web, App, HttpServer};
use actix_web_jwt::JWT;

async fn index(jwt: web::Data<JWT>) -> String {
    // Authenticate and authorize client requests using JWT
}

#[actix_web::main]
async fn main() -> std::io::Result<()> {
    let jwt = JWT::new("secret".to_owned());

    HttpServer::new(move || {
        App::new()
            .data(jwt.clone())
            .route("/", web::get().to(index))
    }).bind("127.0.0.1:8000")?
    .use_identity_service()
    .start();
In the above code, we have defined the JwtTokenService using the actix_identity crate to create and verify JWT tokens. We also define the use_identity_service method to enable authentication and authorization using the JWT token service.
To secure our microservices, we can use OAuth2 and JWT tokens. OAuth2 is a widely used authentication and authorization protocol that allows users to grant access to third-party applications without revealing their credentials. We can use an OAuth2 provider like Google or Facebook to authenticate users and issue access tokens that can be used to access our microservices.
JWT tokens, on the other hand, are a secure way of transmitting information between parties. They are signed and encrypted, making them difficult to tamper with or forge. We can use JWT tokens to authenticate and authorize requests to our microservices.
To implement authentication and authorization with OAuth2 and JWT tokens, we can use the actix_oauth2 and actix_jwt crates respectively. These crates provide middleware and functions that can be used to secure our microservices and validate tokens.
Overall, Actix Web provides a robust framework for building microservices that can be secured using various authentication and authorization methods. By implementing fault tolerance and monitoring mechanisms, we can ensure that our microservices are highly available and performant, even under heavy loads.
Chapter 10: Integrating Actix Web with Other Technologies
Integrating Actix Web with front-end frameworks Actix Web can be integrated with front-end frameworks through various mechanisms. Here are some of the ways to do it:
-
RESTful API: One of the simplest ways to integrate Actix Web with a front-end framework is to build a RESTful API with Actix Web and consume it from the front-end. The front-end can use JavaScript libraries like Axios, Fetch or jQuery to make API requests and update the UI accordingly.
-
GraphQL API: Actix Web also supports building a GraphQL API. Front-end frameworks can use Apollo Client, Relay, or other GraphQL client libraries to consume the GraphQL API and fetch data. GraphQL provides a more efficient way of fetching data and reduces the number of network requests required.
-
Server-Side Rendering (SSR): Actix Web can be used to serve HTML templates that are rendered on the server-side. This can be useful for SEO optimization and providing a better user experience. Popular front-end frameworks like React and Vue.js have server-side rendering support.
-
Websockets: Actix Web also supports Websockets which allows real-time communication between the server and the client. This can be useful for building real-time chat applications, multiplayer games, or other applications that require real-time updates.
-
Reverse Proxy: Actix Web can be run behind a reverse proxy like Nginx, which can handle the SSL termination, load balancing, and serve static files. This can be useful for serving a static front-end application like React or Vue.js while also using Actix Web for the API and server-side rendering.
-
WebAssembly: Rust can be compiled to WebAssembly, which allows running Rust code in the browser. Front-end frameworks like React, Vue.js, and Angular can use Rust code compiled to WebAssembly as a library. This can provide a more efficient and secure way of executing code in the browser. Building a frontend with React and Actix Web To build a frontend with React and Actix Web, we can create a new React project and use Axios or another HTTP client library to make requests to the Actix Web backend API.
First, we need to create a new React project using Create React App. In the terminal, navigate to the directory where you want to create your project and run the following command:
npx create-react-app my-appNext, we can create a new component that will make a request to our Actix Web API. Here is an example component that makes a GET request to the /api/data endpoint:
import React, { useState, useEffect } from "react";
import axios from "axios";

function DataDisplay() {
  const [data, setData] = useState([]);

  useEffect(() => {
    async function fetchData() {
      const result = await axios("/api/data");
      setData(result.data);
    }
    fetchData();
  }, []);

  return (
    <div>
      <h2>Data from Actix Web API:</h2>
      <ul>
        {data.map((item) => (
          <li key={item.id}>{item.name}</li>
        ))}
      </ul>
    </div>
  );
}

export default DataDisplay;
In this component, we use the useState hook to create a state variable called data that will hold the response data from our Actix Web API. We also use the useEffect hook to make a GET request to the /api/data endpoint and update the data state variable with the response data.
To use this component in our app, we can import it into our App.js file and add it to our component tree:
import React from "react";
import DataDisplay from "./DataDisplay";

function App() {
  return (
    <div className="App">
      <DataDisplay />
    </div>
  );
}

export default App;
Finally, we need to start our Actix Web server and our React app. In two separate terminal windows, navigate to the root directory of your Actix Web project and your React project and run the following commands:
cargo runnpm startThis will start both the Actix Web server and the React app, and you should see the data from your Actix Web API displayed in your React app. Building a frontend with Vue.js and Actix Web Vue.js is a popular JavaScript framework for building user interfaces, and it can be easily integrated with Actix Web to build modern web applications. In this section, we will discuss how to build a frontend with Vue.js and Actix Web.
Prerequisites
Before starting, make sure you have the following software installed on your system:
- Node.js
- Vue CLI
- Rust
- Actix Web
Creating a new Vue.js project
To create a new Vue.js project, you can use the Vue CLI tool. Open your terminal and run the following command:
vue create frontendThis will create a new Vue.js project in a folder named frontend. Follow the prompts and select the default settings.
Configuring the Vue.js project
After creating the Vue.js project, navigate to the frontend folder and open the src/main.js file. Add the following code to import the Axios library, which will be used to make API calls to the Actix Web backend:
import Vue from 'vue'
import App from './App.vue'
import axios from 'axios'

Vue.config.productionTip = false

Vue.prototype.$http = axios.create({
  baseURL: 'http://localhost:8000/api/',
})
Here, we are creating a new instance of Axios with a baseURL of http://localhost:8000/api/. This is where the Actix Web backend will be running.
Creating a Vue.js component
Next, let’s create a Vue.js component to display a list of items retrieved from the Actix Web backend. Create a new file named Items.vue in the src/components folder with the following code:
<template>
  <div>
    <h1>Items</h1>
    <ul>
      <li v-for="item in items" :key="item.id">
        {{ item.name }}
      </li>
    </ul>
  </div>
</template>

<script>
export default {
  data() {
    return {
      items: [],
    };
  },
  mounted() {
    this.$http.get('items').then((response) => {
      this.items = response.data;
    });
  },
};
</script>
This component will display a list of items retrieved from the Actix Web backend. The mounted function is called when the component is loaded and makes a GET request to the Actix Web API to retrieve the list of items.
Adding the Vue.js component to the app
To display the Items component, open the App.vue file and replace the existing code with the following:
<template>
  <div id="app">
    <Items />
  </div>
</template>

<script>
import Items from './components/Items.vue';

export default {
  name: 'App',
  components: {
    Items,
  },
};
</script>
This will import the Items component and add it to the App component.
Creating an Actix Web API
Next, let’s create an Actix Web API that the Vue.js frontend can interact with. In your terminal, create a new Actix Web project using the following command:
cargo new backend --binThis will create a new Rust project in a folder named backend.
Open the backend/Cargo.toml file and add the following dependencies:
[dependencies]
actix-web = "3"
serde = { version = "1.0", features = ["derive"] }
serde_json = "1.0"
These dependencies are required to build the Actix Web API.
Next, create a new file named src/main.rs with
the following content:
use actix_web::{get, App, HttpServer, Responder};

#[get("/")]
async fn index() -> impl Responder {
    "Hello, world!"
}

#[actix_web::main]
async fn main() -> std::io::Result<()> {
    HttpServer::new(|| {
        App::new().service(index)
    })
    .bind("127.0.0.1:8000")?
    .run()
    .await
}
This creates a basic Actix Web application with a single GET endpoint that returns a “Hello, world!” message.
To build and run the application, use the following command:
cargo runThis should start the Actix Web server at http://127.0.0.1:8000/. Opening this URL in a web browser should display the “Hello, world!” message.
Now, let’s integrate this Actix Web API with a Vue.js frontend. We’ll create a new Vue.js project using the Vue CLI.
First, make sure you have Node.js and the Vue CLI installed. You can download Node.js from the official website: https://nodejs.org/en/download/. To install the Vue CLI, use the following command:
npm install -g @vue/cliNext, create a new Vue.js project using the following command:
vue create my-appReplace my-app with the name of your project. This will create a new Vue.js project with default settings. Once the project is created, navigate to the project directory:
cd my-appNow, let’s install the necessary dependencies for the project. We’ll need the axios library for making HTTP requests to the Actix Web API, and the bootstrap library for styling the frontend. Use the following commands to install these dependencies:
npm install axios bootstrapThis should install the axios and bootstrap libraries in your project directory.
Next, let’s create a new Vue.js component to display the “Hello, world!” message from the Actix Web API. Create a new file named src/components/HelloWorld.vue with the following content:
<template>
  <div class="container">
    <h1>{{ message }}</h1>
  </div>
</template>

<script>
import axios from 'axios';

export default {
  name: 'HelloWorld',
  data() {
    return {
      message: '',
    };
  },
  mounted() {
    axios.get('http://127.0.0.1:8000/')
      .then((response) => {
        this.message = response.data;
      })
      .catch((error) => {
        console.log(error);
      });
  },
};
</script>

<style scoped>
.container {
  margin-top: 2rem;
}
</style>
This component uses the axios library to make a GET request to the Actix Web API and displays the response message.
Next, let’s include this component in the main Vue.js application. Open the src/App.vue file and replace the content with the following:
<template>
  <div id="app">
    <HelloWorld />
  </div>
</template>

<script>
import HelloWorld from './components/HelloWorld.vue';

export default {
  name: 'App',
  components: {
    HelloWorld,
  },
};
</script>

<style>
#app {
  font-family: 'Avenir', Helvetica, Arial, sans-serif;
  -webkit-font-smoothing: antialiased;
  -moz-osx-font-smoothing: grayscale;
  text-align: center;
}
Integrating Actix Web with messaging systems Actix Web can be integrated with various messaging systems such as RabbitMQ, Kafka, and AWS Simple Notification Service (SNS). This allows for building event-driven architectures where microservices can exchange events asynchronously.
To integrate Actix Web with messaging systems, we need to use a library that provides a client for the messaging system. Let’s take RabbitMQ as an example.
Using RabbitMQ with Actix Web
To use RabbitMQ with Actix Web, we can use the lapin library, which provides an AMQP 0.9.1 client. Here’s an example of how to use lapin with Actix Web:
use actix_web::{web, App, HttpResponse, HttpServer, Responder};
use lapin::{Connection, ConnectionProperties, Result};

async fn publish_to_queue(msg: String) -> Result<()> {
    // connect to RabbitMQ
    let conn = Connection::connect(
        "amqp://guest:guest@localhost:5672",
        ConnectionProperties::default(),
    )
    .await?;

    // create a channel
    let channel = conn.create_channel().await?;

    // declare a queue
    let queue_name = "my_queue";
    channel
        .queue_declare(queue_name, lapin::options::QueueDeclareOptions::default(), Default::default())
        .await?;

    // publish a message to the queue
    let msg = msg.as_bytes().to_vec();
    channel
        .basic_publish("", queue_name, lapin::options::BasicPublishOptions::default(), msg, Default::default())
        .await?;

    Ok(())
}

async fn index() -> impl Responder {
    // publish a message to the queue
    publish_to_queue("Hello, RabbitMQ!".to_string()).await.unwrap();

    HttpResponse::Ok().body("Message published to queue!")
}

#[actix_web::main]
async fn main() -> std::io::Result<()> {
    HttpServer::new(|| {
        App::new()
            .service(web::resource("/").to(index))
    })
    .bind("127.0.0.1:8000")?
    .run()
    .await
}
In this example, we define a publish_to_queue function that publishes a message to a queue named “my_queue” in RabbitMQ. We then call this function in the index function, which is the handler for the root endpoint of our Actix Web application. When the root endpoint is accessed, a message is published to the RabbitMQ queue and a response is returned.
Note that we’re using async functions here to communicate with RabbitMQ, as these operations can be time-consuming and we don’t want to block the thread. Using async functions allows us to handle these operations asynchronously, which improves the performance of our application.
Using Kafka with Actix Web
To use Kafka with Actix Web, we can use the rdkafka library, which provides a high-performance Kafka client. Here’s an example of how to use rdkafka with Actix Web:
use actix_web::{web, App, HttpResponse, HttpServer, Responder};
use rdkafka::config::ClientConfig;
use rdkafka::producer::{FutureProducer, FutureRecord};

async fn publish_to_topic(msg: String) -> Result<(), rdkafka::error::KafkaError> {
    // create a Kafka producer
    let producer: FutureProducer = ClientConfig::new()
        .set("bootstrap.servers", "localhost:9092")
        .create()
        .unwrap();

    // publish a message to a topic
    let record = FutureRecord::to("my_topic")
        .key
(format!("Key {}", i))
        .payload(format!("Message {}", i));
    let _ = producer.send(record, Duration::from_secs(0)).await;

    // consume messages from a topic
    let consumer: BaseConsumer<DefaultConsumerContext> = consumer_config.create().await?;
    consumer.subscribe(&["my_topic"])?;

    let mut message_stream = consumer.stream();
    while let Some(message) = message_stream.next().await {
        match message {
            Ok(consumer_record) => {
                println!("Received message: {:?}", consumer_record);
            }
            Err(e) => {
                println!("Error while consuming message: {:?}", e);
            }
        }
    }

    Ok(())
}

async fn index() -> impl Responder {
    HttpResponse::Ok().body("Hello, world!")
}

#[actix_web::main]
async fn main() -> std::io::Result<()> {
    HttpServer::new(|| {
        App::new()
            .service(web::resource("/").to(index))
    })
    .bind("127.0.0.1:8000")?
    .run()
    .await
}
Using Actix Web with Kafka Apache Kafka is a popular distributed streaming platform used for building real-time data pipelines and streaming applications. Actix Web can be used to build Kafka consumers and producers to interact with Kafka clusters.
To use Actix Web with Kafka, we need to include the rdrkafka crate in our project’s Cargo.toml file:
[dependencies]
actix-web = "3.3.2"
rdrkafka = "0.25.0"
We also need to install Kafka on our local machine or server and have a Kafka cluster running.
Once the Kafka cluster is up and running, we can create a Kafka consumer using the rdrkafka crate as follows:
use actix_web::{web, App, HttpResponse, HttpServer, Responder};
use futures::StreamExt;
use rdkafka::consumer::{Consumer, StreamConsumer};
use rdkafka::message::Message;
use rdkafka::config::ClientConfig;

async fn consume() -> impl Responder {
    let consumer: StreamConsumer = ClientConfig::new()
        .set("group.id", "my_group_id")
        .set("bootstrap.servers", "localhost:9092")
        .create()
        .expect("Consumer creation failed");

    consumer.subscribe(&["my_topic"]).expect("Can't subscribe to specified topic");

    loop {
        match consumer.recv().await {
            Ok(msg) => {
                if let Some(Ok(payload)) = msg.payload_view::<str>() {
                    println!("Received message: {}", payload);
                }
            },
            Err(e) => {
                println!("Error while receiving from Kafka: {:?}", e);
                break;
            }
        }
    }

    HttpResponse::Ok().body("Consumed messages from Kafka")
}

#[actix_rt::main]
async fn main() -> std::io::Result<()> {
    HttpServer::new(|| {
        App::new()
            .service(web::resource("/consume").to(consume))
    })
    .bind("127.0.0.1:8000")?
    .run()
    .await
}
In the consume function, we create a Kafka consumer by setting the group.id and bootstrap.servers configurations. We then subscribe to a Kafka topic and receive messages from the Kafka cluster using the recv function.
To create a Kafka producer in Actix Web, we can modify the index function from earlier as follows:
use actix_web::{web, App, HttpResponse, HttpServer, Responder};
use futures::FutureExt;
use rdkafka::producer::{FutureProducer, FutureRecord};
use rdkafka::config::ClientConfig;

async fn index(producer: web::Data<FutureProducer>, data: web::Json<Data>) -> impl Responder {
    let message = serde_json::to_string(&data.into_inner()).unwrap();
    let record = FutureRecord::to("my_topic").key("my_key").payload(&message);
    let result = producer.send(record, 0).await;

    match result {
        Ok(_) => HttpResponse::Ok().finish(),
        Err(e) => HttpResponse::InternalServerError().body(e.to_string()),
    }
}

#[actix_rt::main]
async fn main() -> std::io::Result<()> {
    let producer: FutureProducer = ClientConfig::new()
        .set("bootstrap.servers", "localhost:9092")
        .create()
        .expect("Producer creation error");

    HttpServer::new(move || {
        App::new()
            .data(producer.clone())
            .service(web::resource("/").to(index))
    })
    .bind("127.0.0.1:8000")?
    .run()
    .await?;

    Ok(())
While building a Kafka consumer in Actix Web, we need to install the Kafka client library. We can use the rust-rdkafka crate to interact with Kafka in Rust. Add the following line to the [dependencies] section of Cargo.toml:
rdkafka = "0.25.0"After installing the crate, we can use it in our code to create a Kafka consumer. Here’s an example of how to create a Kafka consumer that listens to a topic:
use rdkafka::consumer::{Consumer, StreamConsumer};
use rdkafka::config::ClientConfig;

async fn consume_kafka() -> Result<(), rdkafka::error::KafkaError> {
    let mut consumer: StreamConsumer = ClientConfig::new()
        .set("group.id", "my_group_id")
        .set("bootstrap.servers", "localhost:9092")
        .set("auto.offset.reset", "earliest")
        .create()?;

    consumer.subscribe(&["my_topic"])?;

    loop {
        match consumer.recv().await {
            Err(e) => {
                println!("Error while receiving from Kafka: {:?}", e);
                break;
            },
            Ok(msg) => {
                println!("Received message from Kafka: {:?}", msg);
                // do something with the message
            },
        }
    }

    Ok(())
}
This code creates a StreamConsumer with the specified configuration and subscribes to the my_topic topic. It then enters an infinite loop where it waits for messages to be received from Kafka. When a message is received, it prints the message and performs any necessary processing.
We can integrate this Kafka consumer with our Actix Web server by spawning a new task to run the consumer when the server starts:
use actix_web::{get, web, App, HttpResponse, HttpServer, Responder};
use rdkafka::consumer::{Consumer, StreamConsumer};
use rdkafka::config::ClientConfig;
use std::thread;

async fn consume_kafka() -> Result<(), rdkafka::error::KafkaError> {
    // same as before...
}

#[get("/")]
async fn index() -> impl Responder {
    "Hello, world!"
}

#[actix_rt::main]
async fn main() -> std::io::Result<()> {
    HttpServer::new(|| {
        App::new()
            .service(index)
    })
    .bind("127.0.0.1:8000")?
    .run();

    // spawn a new task to run the Kafka consumer
    thread::spawn(move || {
        actix_rt::System::new().block_on(async {
            consume_kafka().await.unwrap();
        });
    });

    Ok(())
}
This code spawns a new task to run the consume_kafka() function and waits for it to complete. This allows the Kafka consumer to run concurrently with the Actix Web server, ensuring that the server remains responsive while messages are being received from Kafka.
Using Actix Web with RabbitMQ
Actix Web can also be used with RabbitMQ, a message broker widely used for building distributed systems. RabbitMQ provides a flexible messaging model and can be used for various messaging patterns such as pub/sub, point-to-point, and request-response.
To use RabbitMQ with Actix Web, we need to use a RabbitMQ client library. There are several RabbitMQ client libraries available for Rust, including amiquip, lapin, and carrot. In this example, we will use the lapin library.
To use lapin, we need to add it as a dependency in our Cargo.toml file:
[dependencies]
actix-web = "3.3.2"
lapin = "1.8.0"
Next, we can create a connection to RabbitMQ and publish a message to a queue using lapin. Here is an example:
use actix_web::{web, App, HttpServer};
use lapin::{
    options::*, types::FieldTable, BasicProperties, Connection, ConnectionProperties, Result,
};
use serde::{Deserialize, Serialize};

#[derive(Serialize, Deserialize)]
struct Message {
    content: String,
}

async fn index(msg: web::Json<Message>) -> Result<String> {
    let conn = Connection::connect(
        "amqp://guest:guest@localhost:5672",
        ConnectionProperties::default(),
    )
    .await?;

    let channel = conn.create_channel().await?;
    let queue = channel
        .queue_declare("my_queue", QueueDeclareOptions::default(), FieldTable::default())
        .await?;

    let msg = Message {
        content: msg.content.clone(),
    };
    let msg = serde_json::to_string(&msg)?;

    channel
        .basic_publish(
            "",
            queue.name().as_str(),
            BasicPublishOptions::default(),
            msg.as_bytes().to_vec(),
            BasicProperties::default(),
        )
        .await?;

    Ok("Message published to RabbitMQ".into())
}

#[actix_web::main]
async fn main() -> std::io::Result<()> {
    HttpServer::new(|| {
        App::new()
            .route("/", web::post().to(index))
    })
    .bind("127.0.0.1:8000")?
    .run()
    .await
}
In this example, we define a Message struct that we will use to serialize and deserialize our message payload. In the index function, we establish a connection to RabbitMQ, declare a queue named my_queue, and publish a message to the queue. Finally, we return a response indicating that the message has been published.
We can test this by running the Actix Web application and sending a POST request to http://localhost:8000 with a JSON payload containing the message content:
$ curl -H "Content-Type: application/json" -d '{"content": "Hello, RabbitMQ!"}' http://localhost:8000This will publish a message to the my_queue queue in RabbitMQ. We can consume messages from the queue using a RabbitMQ client or library.
Using Actix Web with containerization technologies
Actix Web applications can be containerized using technologies such as Docker and Kubernetes to enable easier deployment and management.
To containerize an Actix Web application with Docker, you would typically create a Dockerfile that specifies the base image, copies the application code into the container, and installs any dependencies. Here’s an example Dockerfile for an Actix Web application:
FROM rust:1.55 as builder

WORKDIR /usr/src/myapp
COPY . .
RUN cargo build --release

FROM debian:buster-slim
COPY --from=builder /usr/src/myapp/target/release/myapp /usr/local/bin/
CMD ["myapp"]
This Dockerfile starts by using the Rust 1.55 image as the build environment. It then copies the application code into the container, builds the application with Cargo, and creates a release build. Finally, it copies the release binary into a slim Debian-based image and specifies the command to run the application.
Once you have a Dockerfile, you can build the container image with the docker build command and deploy it with docker run. Alternatively, you can use a container orchestration platform like Kubernetes to deploy and manage the containers.
To deploy an Actix Web application with Kubernetes, you would typically create a Kubernetes deployment that specifies the container image, the desired number of replicas, and any other configuration options. Here’s an example deployment configuration for an Actix Web application:
apiVersion: apps/v1
kind: Deployment
metadata:
  name: myapp
spec:
  replicas: 3
  selector:
    matchLabels:
      app: myapp
  template:
    metadata:
      labels:
        app: myapp
    spec:
      containers:
      - name: myapp
        image: myregistry/myapp:v1
        ports:
        - containerPort: 8000
This deployment configuration specifies a deployment named myapp with three replicas. It uses a label selector to ensure that the deployment matches pods labeled with app=myapp. The pod template specifies a container named myapp that uses the myregistry/myapp:v1 container image and exposes port 8000.
Once you have a deployment configuration, you can use the kubectl apply command to deploy the application to a Kubernetes cluster.
Deploying Actix Web applications with Docker
Docker is a popular tool for containerization that enables developers to create, deploy, and run applications in a containerized environment. With Docker, you can package your Actix Web application and its dependencies into a single container that can be run on any platform that supports Docker.
To deploy an Actix Web application with Docker, you will need to create a Dockerfile that describes how to build your application image. A Dockerfile is a script that contains instructions for building a Docker image, which is a lightweight, standalone, and executable package that includes everything needed to run your application, including the application code, runtime environment, and system tools.
Here is an example Dockerfile for an Actix Web application:
# base image
FROM rust:1.55.0 AS builder

# set the working directory
WORKDIR /app

# copy the project files
COPY . .

# build the application
RUN cargo build --release

# create a new image based on the minimal Alpine Linux distribution
FROM alpine:latest

# copy the built application from the previous stage
COPY --from=builder /app/target/release/myapp .

# set the entrypoint
CMD ["./myapp"]
In this Dockerfile, we first create a builder stage that uses the official Rust image as its base. We set the working directory to /app and copy the project files into it. Then, we build the application using cargo build --release.
In the next stage, we create a new image based on the latest Alpine Linux distribution. We copy the built application from the previous stage into the root directory of the image and set the entrypoint to run the application.
To build and run the Docker image, use the following commands:
docker build -t myapp .
docker run -p 8000:8000 myapp
The docker build command builds the Docker image and tags it with the name myapp. The docker run command runs the image and maps port 8000 on the container to port 8000 on the host.
With these commands, you should now be able to access your Actix Web application at http://localhost:8000.
You can also deploy your Dockerized Actix Web application to cloud platforms such as AWS and Google Cloud Platform by pushing your Docker image to a container registry and creating a containerized deployment on the cloud platform. Deploying Actix Web applications with Kubernetes Kubernetes is a popular container orchestration platform that provides a robust and scalable way to deploy and manage containerized applications. In this section, we will explore how to deploy Actix Web applications on Kubernetes.
Before we start, you should have a basic understanding of Kubernetes and its components. If you are new to Kubernetes, it’s recommended to go through its official documentation to get started.
To deploy an Actix Web application on Kubernetes, we need to perform the following steps:
- Containerize the application and push it to a container registry.
- Create a Kubernetes deployment and service for the application.
- Expose the service to the internet using a Kubernetes ingress resource.
Let’s look at each step in more detail.
Containerizing the Application and Pushing to a Container Registry
The first step is to containerize the Actix Web application and push it to a container registry such as Docker Hub or Google Container Registry.
To containerize the application, we need to create a Dockerfile in the root directory of the application. Here’s an example Dockerfile:
FROM rust:latest as builder

WORKDIR /usr/src/app

COPY . .

RUN cargo build --release

FROM debian:buster-slim

WORKDIR /usr/src/app

COPY --from=builder /usr/src/app/target/release/actix-web-app .

CMD ["./actix-web-app"]
This Dockerfile starts with the official Rust image as the build environment, copies the source code into the container, and runs the cargo build --release command to build the application. Then, it creates a new container with the Debian Buster Slim image and copies the binary file from the build environment to the new container.
To build the Docker image, run the following command in the same directory as the Dockerfile:
docker build -t <your-username>/<image-name>:<tag> .For example:
docker build -t john/actix-web-app:1.0 .After the image is built, we need to push it to a container registry:
docker push <your-username>/<image-name>:<tag>Creating a Kubernetes Deployment and Service
The next step is to create a Kubernetes deployment and service for the Actix Web application. The deployment defines the desired state of the application, such as the number of replicas, while the service provides a stable IP address and DNS name for accessing the application.
Here’s an example deployment YAML file:
apiVersion: apps/v1
kind: Deployment
metadata:
  name: actix-web-app-deployment
  labels:
    app: actix-web-app
spec:
  replicas: 3
  selector:
    matchLabels:
      app: actix-web-app
  template:
    metadata:
      labels:
        app: actix-web-app
    spec:
      containers:
        - name: actix-web-app
          image: <your-username>/<image-name>:<tag>
          ports:
            - containerPort: 8000
This deployment YAML file defines a deployment with three replicas of the Actix Web application. It also specifies the image to use and the port on which the application listens.
To create the deployment, run the following command:
kubectl apply -f deployment.yamlNext, let’s create a Kubernetes service to expose the application:
apiVersion: v1
kind: Service
metadata:
  name: actix-web-app-service
  labels:
    app: actix-web-app
spec:
  type: ClusterIP
  selector:
    app: actix-web-app
  ports:
    - protocol: TCP
      port: 8000
      targetPort:
 8000
  type: LoadBalancer
In this configuration, we have specified a deployment named “actix-web-app” that creates two replicas of the Actix Web application. We have also created a service that exposes port 8000 for accessing the application. The service is of type LoadBalancer, which creates an external load balancer for distributing traffic to the replicas.
After creating the deployment and service configurations, we can apply them to our Kubernetes cluster using the kubectl apply command:
kubectl apply -f deployment.yaml
kubectl apply -f service.yaml
Once the deployment and service are created, we can check the external IP address of the load balancer using kubectl get services and access the Actix Web application from a web browser or HTTP client.
Using Kubernetes for deploying Actix Web applications provides several benefits, such as automatic scaling, rolling updates, and self-healing capabilities. We can also integrate Kubernetes with cloud providers for easier management of the infrastructure, such as using AWS Elastic Kubernetes Service (EKS) or Google Kubernetes Engine (GKE).
In conclusion, Actix Web is a powerful and flexible web framework for building high-performance applications in Rust. It provides features for handling HTTP requests, WebSocket connections, GraphQL APIs, and microservices architecture. By integrating Actix Web with containerization technologies such as Docker and Kubernetes, we can easily deploy and manage our applications in a scalable and efficient manner. Exploring Actix Web’s compatibility with other Rust libraries Actix Web is built on top of other Rust libraries and can be integrated with them seamlessly. Here are some popular Rust libraries that work well with Actix Web:
-
Diesel: Diesel is an Object Relational Mapper (ORM) that makes it easy to interact with databases in Rust. It supports a variety of databases, including PostgreSQL, MySQL, and SQLite. Actix Web can be integrated with Diesel to build web applications that interact with databases.
-
Serde: Serde is a Rust library for serializing and deserializing data structures. It supports JSON, YAML, and many other data formats. Actix Web can use Serde to convert data structures to and from JSON for use in web APIs.
-
Redis: Redis is an in-memory data structure store that can be used as a cache, message broker, or database. Actix Web can be integrated with Redis to build high-performance web applications that use Redis for caching or message passing.
-
Reqwest: Reqwest is a Rust HTTP client library that makes it easy to make HTTP requests from Rust code. Actix Web can use Reqwest to make HTTP requests to external APIs.
-
Tera: Tera is a template engine for Rust that makes it easy to generate HTML pages from templates. Actix Web can use Tera to generate HTML pages for web applications.
These are just a few examples of the many Rust libraries that work well with Actix Web. Because Rust is a language that emphasizes compatibility and interoperability, Actix Web can be used with many other Rust libraries without any issues. Integrating Actix Web with Rocket Actix Web and Rocket are both popular Rust web frameworks. While they have different design philosophies, they share some similarities and can be used together in the same project.
One possible way to integrate Actix Web with Rocket is by using Actix Web as a reverse proxy for Rocket. This means that requests would be first handled by Actix Web, which would forward them to Rocket for further processing.
To implement this, you would need to define a route in Actix Web that matches the path of the requests you want to handle with Rocket, and then use Actix Web’s client module to send the requests to Rocket’s server. Here is an example:
use actix_web::{web, App, HttpServer, Result};
use reqwest::Url;
use serde::Deserialize;

#[derive(Debug, Deserialize)]
struct User {
    id: u32,
    name: String,
}

async fn index() -> Result<String> {
    let url = Url::parse("http://localhost:8001/users").unwrap();
    let users: Vec<User> = reqwest::get(url)
        .await?
        .json()
        .await?;
    Ok(format!("{:?}", users))
}

#[actix_rt::main]
async fn main() -> std::io::Result<()> {
    HttpServer::new(|| {
        App::new()
            .route("/", web::get().to(index))
    })
    .bind("127.0.0.1:8000")?
    .run()
    .await
}
In this example, Actix Web listens on port 8000 and forwards requests to http://localhost:8001/users to Rocket, which is assumed to be listening on port 8001 and handling requests to the /users endpoint.
Note that in order to send HTTP requests from Actix Web to Rocket, we are using the reqwest crate, which provides a convenient HTTP client for Rust. Also note that we are deserializing the response from Rocket into a Vec<User> using serde.
Of course, this is just one example of how Actix Web and Rocket can be integrated. Depending on your specific use case, there may be other approaches that work better for you. However, the basic idea of using Actix Web as a reverse proxy for Rocket can be a useful technique in many cases. Integrating Actix Web with Warp Warp is another popular Rust web framework that focuses on performance and ergonomics. It provides a powerful and flexible routing system, as well as support for async/await syntax and non-blocking I/O.
Integrating Actix Web with Warp is similar to integrating it with any other Rust library. You can use Actix Web’s HttpServer to serve Warp’s Filter as a service. Here’s an example:
use actix_web::{web, App, HttpResponse, HttpServer};
use warp::Filter;

#[tokio::main]
async fn main() -> Result<(), Box<dyn std::error::Error>> {
    // Define a Warp filter
    let hello = warp::path!("hello" / String)
        .map(|name| format!("Hello, {}!", name))
        .map(HttpResponse::Ok);

    // Serve the Warp filter with Actix Web
    HttpServer::new(|| App::new().service(web::scope("/").service(warp::any().and(hello))))
        .bind("127.0.0.1:8000")?
        .run()
        .await?;

    Ok(())
}
In this example, we define a simple Warp filter that takes a string parameter and returns a greeting. We then use Actix Web’s web::scope() to wrap the filter and serve it as a service.
By integrating Actix Web with Warp, you can take advantage of Warp’s powerful routing system and Actix Web’s performance and scalability. Implementing server-side caching to improve performance Server-side caching is a technique used to store frequently accessed data in the server’s memory, reducing the number of requests made to the database or other external services. This can improve the performance of an Actix Web application by reducing response time and decreasing the load on the underlying systems.
Actix Web provides support for server-side caching using a crate called actix-web-httpauth. This crate allows developers to add authentication and authorization middleware to their applications and provides a caching layer to store authenticated users’ data.
To use actix-web-httpauth, add the following dependency to your Cargo.toml file:
actix-web-httpauth = "2.0.0-beta.2"Next, create a new middleware function to authenticate users and store the user data in the cache. Here’s an example:
use actix_web::{web, HttpResponse, HttpMessage, HttpRequest, Result};
use actix_web_httpauth::middleware::HttpAuthentication;

fn auth_cache() -> impl Fn(&HttpRequest) -> Option<String> {
    |req| {
        let header = req.headers().get("Authorization");
        match header {
            Some(value) => {
                // do some authentication logic here
                let user_id = "user123".to_string();
                Some(user_id)
            },
            None => None
        }
    }
}

#[get("/")]
async fn index(auth: web::Data<HttpAuthentication>) -> Result<HttpResponse> {
    let cache = auth_cache();
    let user_id = cache(&auth)?;
    Ok(HttpResponse::Ok().body(format!("Hello, {}!", user_id)))
}
In this example, we defined a auth_cache function that checks the authorization header and performs some authentication logic to retrieve the user ID. The HttpAuthentication middleware is then passed as a web::Data parameter to the index function, and the auth_cache function is used to retrieve the user ID from the cache.
Actix Web provides several cache implementations, including the actix-cache crate, which provides a simple, in-memory cache. To use actix-cache, add the following dependency to your Cargo.toml file:
actix-cache = "0.4.0"Next, create a new cache instance and add it to the Actix Web App:
use actix_cache::{Cache, Cacheable};
use std::time::Duration;

fn main() {
    let cache = Cache::new(Duration::from_secs(60 * 10)); // cache for 10 minutes

    HttpServer::new(|| {
        App::new()
            .data(cache.clone())
            .service(index)
    })
    .bind("127.0.0.1:8000")
    .unwrap()
    .run()
    .unwrap();
}
In this example, we created a new cache instance with a 10-minute expiry time and added it to the Actix Web App using the data method. The cache.clone() call is used to clone the cache instance for each worker thread, ensuring that each thread has its own cache.
Now, we can modify the auth_cache function to store the user ID in the cache and retrieve it later:
fn auth_cache(cache: web::Data<Cache<String>>) -> impl Fn(&HttpRequest) -> Option<String> {
    move |req| {
        let header = req.headers().get("Authorization");
        match header {
            Some(value) => {
                // do some authentication logic here
                let user_id = "user123".to_string();
                cache.set(&user_id, user_id.clone(), Duration::from_secs(60 * 10));

                // return the user ID from the cache
                Ok(HttpResponse::Ok().body(user_id))
            }
        })
        .bind("127.0.0.1:8000")?
        .run()
        .await
}
In the code above, we use the cache instance to check if the requested user ID is already in the cache. If it is, we return the value from the cache. If not, we generate a new user ID, set it in the cache with a timeout of 10 minutes, and return the newly generated user ID.
This implementation uses an in-memory cache, which is not suitable for production use cases. In a production environment, you might use a distributed cache like Redis or Memcached to enable multiple server instances to share the same cache. Additionally, you might want to use a more sophisticated caching strategy that takes into account factors like cache eviction policies and cache size limits.
Overall, adding server-side caching can significantly improve the performance of your Actix Web applications by reducing the load on your database and other external dependencies. Using Actix Web’s Actor model to manage stateful connections Actix Web’s Actor model is a powerful feature that can be used to manage stateful connections in an efficient and scalable way. Actors are lightweight, independent units of computation that can be used to represent entities in your system, such as users, devices, or even connections to clients. Each actor has its own state and can receive messages that trigger actions and state changes.
To use the Actor model in Actix Web, you can define a new type that implements the Actor trait. For example, let’s say we want to manage WebSocket connections to our server using the Actor model. We can define a new type MyWebSocket that implements the Actor trait and has its own state:
use actix::prelude::*;

struct MyWebSocket {
    pub id: usize,
    pub socket: WebSocket,
}

impl Actor for MyWebSocket {
    type Context = ws::WebsocketContext<Self>;

    fn started(&mut self, ctx: &mut Self::Context) {
        // perform any necessary setup when the actor is started
    }

    fn stopped(&mut self, ctx: &mut Self::Context) {
        // perform any necessary cleanup when the actor is stopped
    }
}
In this example, MyWebSocket has two fields: id and socket. The id field can be used to identify the WebSocket connection, while the socket field is the actual WebSocket connection object.
To handle incoming messages, you can implement the Handler trait for MyWebSocket. For example, if we want to handle a message that sends a text message to the WebSocket connection, we can define a new message type and implement the Handler trait for it:
struct TextMessage(pub String);

impl Message for TextMessage {
    type Result = Result<(), ws::ProtocolError>;
}

impl Handler<TextMessage> for MyWebSocket {
    type Result = Result<(), ws::ProtocolError>;

    fn handle(&mut self, msg: TextMessage, ctx: &mut Self::Context) -> Self::Result {
        self.socket.text(msg.0);
        Ok(())
    }
}
In this example, TextMessage is a new message type that contains a String representing the text message to send. When a TextMessage is received, the handle method of MyWebSocket is called, and the text message is sent to the WebSocket connection.
To create a new instance of MyWebSocket, you can use the Addr type, which is a lightweight handle to an actor instance. For example, to create a new instance of MyWebSocket and send a message to it, you can do the following:
use actix_web::{web, Error, HttpResponse};
use actix_web_actors::ws;

async fn websocket_handler(
    req: HttpRequest,
    stream: web::Payload,
    srv: web::Data<Addr<MyWebSocket>>,
) -> Result<HttpResponse, Error> {
    let res = ws::start(MyWebSocket { id: 0, socket: WebSocket::new(req.head()) }, &req, stream)?;
    srv.get_ref().do_send(TextMessage("Hello, world!".to_string()));
    Ok(res)
}
In this example, websocket_handler is an asynchronous function that handles WebSocket connections. It creates a new instance of MyWebSocket and sends a TextMessage to it using the Addr handle.
Using the Actor model can help you manage stateful connections in a more scalable and efficient way, as each connection is managed independently and can handle messages asynchronously. This can be particularly useful in applications that need to handle a large number of concurrent connections.
Yes, that’s correct! The Actor model can be especially useful for managing stateful connections in applications that need to handle a large number of concurrent connections. With the Actor model, each connection can be represented by an actor that manages its state and handles its messages independently, reducing the need for shared state and locking mechanisms that can lead to performance issues and race conditions.
Actix Web provides a powerful implementation of the Actor model through the Actix framework, which can be used to build highly concurrent and scalable applications. In Actix, actors are defined as structs that implement the Actor trait and can handle messages of various types using the Handle trait. Actors can also be supervised by other actors, allowing for fault tolerance and automatic recovery in case of failures.
To demonstrate how the Actor model can be used in Actix Web, let’s consider a simple example of a chat application. In this application, users can connect to a WebSocket endpoint and exchange messages in real-time. Each user is represented by an actor that manages its WebSocket connection and handles its messages.
Here’s an example implementation of the user actor:
use actix::prelude::*;
use actix_web_actors::ws::{Message, ProtocolError, WebsocketContext};

struct UserActor {
    id: String,
    ws: WebsocketContext<Self>,
}

impl Actor for UserActor {
    type Context = WebsocketContext<Self>;

    fn started(&mut self, ctx: &mut Self::Context) {
        // send a welcome message to the user
        let welcome_msg = Message::text(format!("Welcome, {}!", self.id));
        ctx.text(welcome_msg);
    }
}

impl StreamHandler<Result<Message, ProtocolError>> for UserActor {
    fn handle(&mut self, msg: Result<Message, ProtocolError>, ctx: &mut Self::Context) {
        match msg {
            Ok(Message::Text(text)) => {
                // handle text messages
                println!("Received message from {}: {}", self.id, text);

                // broadcast the message to all other users
                let broadcast_msg = Message::text(format!("{}: {}", self.id, text));
                ctx.text(broadcast_msg);
            }
            _ => {
                // ignore other message types
            }
        }
    }
}

impl Handler<Message> for UserActor {
    type Result = ();

    fn handle(&mut self, msg: Message, ctx: &mut Self::Context) {
        // handle custom message types
    }
}
In this example, the UserActor struct implements the Actor trait and defines a Context type that is specific to WebSocket connections (WebsocketContext<Self>). The actor’s state consists of an id string that identifies the user and a ws field that represents the WebSocket connection. The started method is called when the actor is started and sends a welcome message to the user.
The UserActor also implements the StreamHandler trait, which allows it to handle incoming messages from the WebSocket connection. In this example, the handle method matches on the type of the message (text or binary) and either broadcasts it to all other users or ignores it, depending on the message type.
Finally, the UserActor implements the Handler trait, which allows it to handle custom message types. This can be useful for implementing application-specific logic, such as handling user authentication or managing user-specific state.
To use the UserActor in an Actix Web application, we can define a WebSocket endpoint that creates a new actor for each user that connects:
use actix::prelude::*;
use actix_web::{web, App, Error, HttpRequest, HttpResponse, HttpServer};
use actix_web_actors::ws;

// Define a WebSocket actor
struct UserActor {
    // You can define actor-specific state here
}

impl Actor for UserActor {
    type Context = ws::WebsocketContext<Self>;
}

// Handle WebSocket messages
impl StreamHandler<Result<ws::Message, ws::ProtocolError>> for UserActor {
    fn handle(&mut self, msg: Result<ws::Message, ws::ProtocolError>, ctx: &mut Self::Context) {
        match msg {
            Ok(ws::Message::Ping(msg)) => {
                ctx.pong(&msg);
            }
            Ok(ws::Message::Text(text)) => {
                // Handle incoming text messages
                println!("Received message: {}", text);
                ctx.text(text);
            }
            _ => (),
        }
    }
}

// WebSocket endpoint handler
async fn ws_index(req: HttpRequest, stream: web::Payload) -> Result<HttpResponse, Error> {
    let res = ws::start(UserActor {}, &req, stream)?;
    Ok(res)
}

#[actix_web::main]
async fn main() -> std::io::Result<()> {
    HttpServer::new(|| {
        App::new()
            .route("/ws/", web::get().to(ws_index))
    })
    .bind("127.0.0.1:8080")?
    .run()
    .await
}
Utilizing Rust’s async/await features to write efficient asynchronous code Rust’s async/await feature allows developers to write efficient asynchronous code by avoiding the overhead of creating new threads or processes for each connection. In Actix Web, async/await can be used to improve the performance of I/O-bound operations such as network requests and database queries.
To use async/await in Actix Web, the actix-web and futures crates need to be imported. actix-web provides an implementation of Future for the Actix MessageResponse type, while futures provides the core asynchronous programming primitives such as Future, Stream, and AsyncRead/Write.
Here’s an example of using async/await to make a network request in Actix Web:
use actix_web::{get, web, App, HttpResponse, HttpServer};
use futures::future::{self, FutureExt};

async fn get_remote_data(url: String) -> Result<String, reqwest::Error> {
    let body = reqwest::get(&url)
        .await?
        .text()
        .await?;
    Ok(body)
}

#[get("/{url}")]
async fn index(web::Path(url): web::Path<String>) -> HttpResponse {
    let result = get_remote_data(url).await;
    match result {
        Ok(body) => HttpResponse::Ok().body(body),
        Err(_) => HttpResponse::InternalServerError().finish(),
    }
}

#[actix_web::main]
async fn main() -> std::io::Result<()> {
    HttpServer::new(|| App::new().service(index))
        .bind("127.0.0.1:8000")?
        .run()
        .await
}
In this example, the get_remote_data function makes a network request using the reqwest crate, which is a popular HTTP client library in Rust. The function returns a Result<String, reqwest::Error> which contains the body of the response if the request was successful, or an error if it failed.
The index function is marked as async and calls get_remote_data using the await keyword. This means that the function will return a Future instead of blocking until the request is complete. The Future will resolve to a Result<String, reqwest::Error> which can be used to construct an appropriate HttpResponse.
Note that when using async/await in Actix Web, it’s important to ensure that all I/O operations are non-blocking and do not block the event loop. Blocking operations should be moved to a separate thread pool or executed in a separate thread to avoid blocking the event loop and causing a decrease in performance. Optimizing Actix Web’s runtime configuration for production deployment. When deploying Actix Web applications in production, it is important to optimize the runtime configuration to ensure optimal performance and stability. Here are some tips for optimizing Actix Web’s runtime configuration:
-
Use thread pools: By default, Actix Web uses a single-threaded event loop. However, you can improve performance by using a thread pool to handle incoming requests. This allows the application to handle more concurrent requests by utilizing multiple CPU cores. You can configure a thread pool using the
actix_web::rt::System::new()method. -
Use HTTPS: HTTPS provides encryption and authentication, making it more secure than HTTP. However, it can also have an impact on performance. To optimize HTTPS performance, you can use TLS session resumption, which allows clients to resume previous sessions instead of creating new ones. You can configure TLS session resumption using the
ssl::AcceptorBuilder::set_session_cache_mode()method. -
Use connection keep-alive: Connection keep-alive allows clients to reuse existing TCP connections for multiple requests, rather than creating new ones for each request. This can significantly reduce the overhead of establishing new connections. You can configure connection keep-alive using the
keep_alive()method onHttpServer. -
Use caching: Caching can significantly improve performance by reducing the number of requests that need to be processed. Actix Web provides built-in support for caching using the
actix_web::middleware::cache::Cachemiddleware. You can configure caching using theCacheBuilderstruct. -
Use compression: Compression can significantly reduce the size of HTTP responses, improving performance and reducing bandwidth usage. Actix Web provides built-in support for compression using the
actix_web::middleware::Compressmiddleware. You can configure compression using theCompressConfigstruct. -
Tune resource limits: Depending on the resources available on your system, you may need to adjust the maximum number of connections, worker threads, and other resources used by Actix Web. You can configure these settings using the
HttpServer::max_connections(),HttpServer::workers(), and other related methods.
By following these tips, you can optimize Actix Web’s runtime configuration for production deployment, resulting in improved performance and stability for your application.
Chapter 11: Implementing Real-World Applications with Actix Web
Implementing a social media platform with Actix Web Building a social media platform with Actix Web is a complex task that requires several components and features. In this section, we will provide an overview of how to implement some of the essential features of a social media platform using Actix Web.
User authentication and authorization
User authentication and authorization are essential components of any social media platform. Actix Web provides several mechanisms for implementing authentication and authorization, including:
- Session-based authentication
- Token-based authentication
Session-based authentication is the process of authenticating users based on a session that is stored on the server-side. To implement session-based authentication in Actix Web, you can use the actix-session crate, which provides middleware for managing user sessions.
Token-based authentication is the process of authenticating users based on tokens that are passed in HTTP headers. To implement token-based authentication in Actix Web, you can use the actix-web-httpauth crate, which provides middleware for verifying JSON Web Tokens (JWTs).
User profiles
A social media platform should allow users to create profiles and customize their profiles. User profiles typically include information such as the user’s name, profile picture, bio, and social media links.
To implement user profiles in Actix Web, you can create a User struct that contains fields for the user’s profile information. You can then store user profiles in a database, such as PostgreSQL or MySQL, and retrieve them when needed.
User posts
A social media platform should allow users to create posts and share them with other users. User posts typically include text, images, and videos.
To implement user posts in Actix Web, you can create a Post struct that contains fields for the post’s content and metadata. You can then store user posts in a database, such as PostgreSQL or MySQL, and retrieve them when needed.
Newsfeed
A social media platform should provide a newsfeed that allows users to see posts from other users that they follow. The newsfeed should be sorted by recency and relevance.
To implement a newsfeed in Actix Web, you can use a combination of database queries and caching to retrieve and sort posts from users that a given user follows. You can also implement algorithms to improve the relevance of the newsfeed, such as by promoting posts that are liked or commented on by many users.
Real-time notifications
A social media platform should provide real-time notifications to users when they receive likes, comments, or other interactions on their posts. Real-time notifications can be implemented using WebSockets or server-sent events (SSE).
To implement real-time notifications in Actix Web, you can use the actix-web-socket crate to create WebSocket connections between the server and clients. You can then send notifications to clients over the WebSocket connection when events occur.
Conclusion
In this section, we have provided an overview of how to implement some of the essential features of a social media platform using Actix Web. While building a social media platform is a complex task, Actix Web provides the tools and libraries needed to implement the core functionality of such a platform.
To build a social media platform with Actix Web, we can start by defining the core features of the platform. A social media platform typically has features such as user registration, user authentication, posting and sharing of content, commenting, liking, and following other users.
We can begin by defining the database schema for the platform using a Rust ORM like Diesel. We can define tables for users, posts, comments, likes, and follows. Once we have defined the database schema, we can use Diesel’s code generation feature to generate Rust structs and functions for interacting with the database.
Next, we can define the Actix Web API for the platform. We can define routes for user registration, user authentication, creating and retrieving posts, creating and retrieving comments, liking and unliking posts, and following and unfollowing other users. We can use Actix Web’s authentication middleware to authenticate users and authorize them to access protected routes.
To handle real-time updates of the platform, we can use Actix Web’s WebSocket support. We can define WebSocket handlers for receiving and broadcasting updates to posts, comments, likes, and follows.
Finally, we can build a front-end for the social media platform using a modern JavaScript framework like React or Vue.js. We can use the Actix Web API to retrieve and update data on the platform and use WebSockets to receive real-time updates.
In summary, Actix Web provides a powerful set of tools for building a social media platform. With Actix Web, we can easily define a database schema, create an API, handle real-time updates, and build a front-end. Creating user profiles, timelines, and social graphs In a social media platform, user profiles are the heart of the platform. Users can update their profile information and share updates with their friends or followers. In Actix Web, user profiles can be represented using structs, and their details can be stored in a database such as PostgreSQL.
Here’s an example of how to create a user profile struct and its corresponding database table using the Diesel ORM:
use chrono::NaiveDateTime;
use diesel::{Insertable, Queryable, SqliteConnection};
use serde::{Deserialize, Serialize};
use uuid::Uuid;

use crate::schema::users;

#[derive(Debug, Serialize, Deserialize, Queryable, Insertable)]
#[table_name = "users"]
pub struct User {
    pub id: Uuid,
    pub username: String,
    pub email: String,
    pub password: String,
    pub created_at: NaiveDateTime,
}

impl User {
    pub fn create(conn: &SqliteConnection, user: &NewUser) -> User {
        diesel::insert_into(users::table)
            .values(user)
            .execute(conn)
            .unwrap();

        users::table.order(users::id.desc()).first(conn).unwrap()
    }

    pub fn find_by_id(conn: &SqliteConnection, user_id: Uuid) -> Option<User> {
        users::table.find(user_id).first(conn).ok()
    }

    pub fn find_by_username(conn: &SqliteConnection, username: &str) -> Option<User> {
        users::table
            .filter(users::username.eq(username))
            .first(conn)
            .ok()
    }
}

#[derive(Debug, Deserialize, Insertable)]
#[table_name = "users"]
pub struct NewUser {
    pub username: String,
    pub email: String,
    pub password: String,
    pub created_at: NaiveDateTime,
}
In addition to user profiles, a social media platform also needs to support user timelines, which are essentially collections of posts created by the user and the users they follow. Actix Web can be used to create endpoints for retrieving a user’s timeline, as well as endpoints for creating new posts.
Here’s an example of how to create a Post struct and its corresponding database table using Diesel:
use chrono::NaiveDateTime;
use diesel::{Insertable, Queryable};
use serde::{Deserialize, Serialize};
use uuid::Uuid;

use crate::schema::posts;

#[derive(Debug, Serialize, Deserialize, Queryable, Insertable)]
#[table_name = "posts"]
pub struct Post {
    pub id: Uuid,
    pub user_id: Uuid,
    pub content: String,
    pub created_at: NaiveDateTime,
}

#[derive(Debug, Deserialize, Insertable)]
#[table_name = "posts"]
pub struct NewPost {
    pub user_id: Uuid,
    pub content: String,
    pub created_at: NaiveDateTime,
}
Finally, social media platforms also need to support social graphs, which represent the relationships between users. Actix Web can be used to create endpoints for creating and retrieving social graphs.
Here’s an example of how to create a SocialGraph struct and its corresponding database table using Diesel:
use diesel::{ExpressionMethods, Queryable, RunQueryDsl};
use serde::{Deserialize, Serialize};
use uuid::Uuid;

use crate::schema::social_graph;

#[derive(Debug, Serialize, Deserialize, Queryable, Insertable)]
#[table_name = "social_graph"]
pub struct SocialGraph {
    pub user_id: Uuid,
    pub follower_id: Uuid,
}

impl SocialGraph {
    pub fn follow(conn: &SqliteConnection, user_id: Uuid, follower_id: Uuid) {
        let new_follow = NewFollow {
            user_id,
            follower_id,
        };

        diesel::insert_into(social_graph::table)
            .values(&new_follow)
            .execute(conn)
            .expect("Error inserting new follow");
    }

    pub fn unfollow(conn: &SqliteConnection, user_id: Uuid, follower_id: Uuid) {
        diesel::delete(social_graph::table.filter(
            social_graph::user_id
                .eq(user_id)
                .and(social_graph::follower_id.eq(follower_id)),
        ))
        .execute(conn)
        .expect("Error deleting follow");
    }

    pub fn is_following(conn: &SqliteConnection, user_id: Uuid, follower_id: Uuid) -> bool {
        let follow = social_graph::table
            .filter(
                social_graph::user_id
                    .eq(user_id)
                    .and(social_graph::follower_id.eq(follower_id)),
            )
            .first::<SocialGraph>(conn)
            .optional()
            .unwrap_or(None);

        follow.is_some()
    }
}

impl User {
    pub fn create(conn: &SqliteConnection, username: &str, email: &str, password: &str) -> User {
        let salt = generate_salt();
        let password_hash = hash_password(password, &salt);

        let new_user = NewUser {
            username: username.to_string(),
            email: email.to_string(),
            password_hash: password_hash,
            salt: salt,
        };

        diesel::insert_into(users::table)
            .values(&new_user)
            .execute(conn)
            .expect("Error inserting new user");

        let user = users::table
            .filter(users::username.eq(username))
            .first(conn)
            .expect("Error retrieving new user");

        User::from(user)
    }

    pub fn update(
        conn: &SqliteConnection,
        id: Uuid,
        username: Option<&str>,
        email: Option<&str>,
        password: Option<&str>,
    ) -> User {
        let mut user = users::table
            .find(id)
            .first::<User>(conn)
            .expect("Error retrieving user");

        if let Some(new_username) = username {
            user.username = new_username.to_string();
        }

        if let Some(new_email) = email {
            user.email = new_email.to_string();
        }

        if let Some(new_password) = password {
            let new_salt = generate_salt();
            let new_password_hash = hash_password(new_password, &new_salt);

            user.password_hash = new_password_hash;
            user.salt = new_salt;
        }

        diesel::update(users::table.find(id))
            .set((
                users::username.eq(user.username.clone()),
                users::email.eq(user.email.clone()),
                users::password_hash.eq(user.password_hash.clone()),
                users::salt.eq(user.salt.clone()),
            ))
            .execute(conn)
            .expect("Error updating user");

        User::from(user)
    }

    pub fn delete(conn: &SqliteConnection, id: Uuid) {
        diesel::delete(users::table.find(id))
            .execute(conn)
            .expect("Error deleting user");
    }

    pub fn from(user: UserRecord) -> User {
        User {
            id: user.id,
            username: user.username,
            email: user.email,
            created_at: user.created_at,
            updated_at: user.updated_at,
        }
    }

    pub fn find_by_id(conn: &SqliteConnection, id: Uuid) -> Option<User> {
        let user = users::table.find(id).first::<UserRecord>(conn).optional();

        match user {
            Some(record) => Some(User::from(record)),
            None => None,
        }
    }
}
Implementing social features like following, friending, and messaging To implement social features like following, friending, and messaging, we can extend the existing functionality of our social media platform.
For following and friending, we can add a new API endpoint that allows users to follow or friend another user. This endpoint will take in the user ID of the user being followed or friended, and add that user to the list of followed or friended users for the current user.
Here’s an example implementation for the follow endpoint:
async fn follow(
    state: web::Data<AppState>,
    follower_id: web::Path<Uuid>,
    followee_id: web::Path<Uuid>,
) -> Result<HttpResponse, Error> {
    let conn = state.db.get()?;
    let result = Graph::follow(&conn, follower_id.into_inner(), followee_id.into_inner());

    match result {
        Ok(_) => Ok(HttpResponse::Ok().finish()),
        Err(_) => Err(ErrorInternalServerError("Failed to follow user")),
    }
}
Here, we’re using the Graph::follow function that we previously defined to add the user to the list of followed users for the current user.
Similarly, we can implement an endpoint for friending other users. Here’s an example implementation:
async fn friend(
state: web::Data<AppState>,
user_id: web::Path<Uuid>,
friend_id: web::Path<Uuid>,
) -> Result<HttpResponse, Error> {
let conn = state.db.get()?;
let result = User::friend(&conn, user_id.into_inner(), friend_id.into_inner());
match result {
Ok(_) => Ok(HttpResponse::Ok().finish()),
Err(_) => Err(ErrorInternalServerError("Failed to friend user")),
}
}Here, we’re using the User::friend function that we previously defined to add the friend to the list of friends for the current user.
For messaging, we can implement a messaging API that allows users to send messages to each other. This endpoint will take in the user ID of the recipient and the message content, and add the message to the recipient’s message inbox.
Here’s an example implementation for the send_message endpoint:
async fn send_message(
state: web::Data<AppState>,
user_id: web::Path<Uuid>,
recipient_id: web::Path<Uuid>,
message: web::Json<Message>,
) -> Result<HttpResponse, Error> {
let conn = state.db.get()?;
let message = message.into_inner();
let result = Message::send(&conn, user_id.into_inner(), recipient_id.into_inner(), &message);
match result {
Ok(_) => Ok(HttpResponse::Ok().finish()),
Err(_) => Err(ErrorInternalServerError("Failed to send message")),
}
}Here, we’re using the Message::send function that we previously defined to add the message to the recipient’s message inbox.
With these endpoints in place, users of our social media platform can follow and friend other users, as well as send messages to each other.
To implement the follow and friend features, we need to modify the users and followers tables to keep track of the relationships between users. We can do this by adding new columns to these tables that will store the IDs of the users that each user is following and/or friends with.
Let’s first modify the users table to add a new column for the friends of each user:
ALTER TABLE users ADD COLUMN friends TEXT;The friends column will store a comma-separated list of the user IDs of each user’s friends.
Next, let’s modify the followers table to add a new column for the users that each user is following:
ALTER TABLE followers ADD COLUMN following TEXT;The following column will store a comma-separated list of the user IDs that each user is following.
With the database schema updated, we can now modify our Rust code to implement the follow and friend features.
To allow a user to follow another user, we’ll add a new endpoint to the users module that takes a user_id and a follower_id as parameters. The endpoint will add the follower_id to the list of followers for the user with the given user_id.
Here’s the implementation of the follow endpoint:
#[post("/{user_id}/follow")]
async fn follow(
pool: web::Data<SqlitePool>,
web::Path(user_id): web::Path<Uuid>,
web::Json(follower_id): web::Json<Uuid>,
) -> Result<HttpResponse, Error> {
let conn = pool.get()?;
User::follow(&conn, user_id, follower_id)?;
Ok(HttpResponse::NoContent().finish())
}The follow endpoint takes a user_id and a follower_id as input parameters. We extract these parameters from the HTTP request using the web::Path and web::Json extractors.
The follow method of the User struct is responsible for adding the follower_id to the list of followers for the user with the given user_id. Here’s the implementation of the follow method:
fn follow(conn: &SqliteConnection, user_id: Uuid, follower_id: Uuid) -> Result<(), Error> {
use crate::schema::users::dsl::*;
let user = users.find(user_id).first::<User>(conn)?;
let mut followers: Vec<Uuid> = serde_json::from_str(&user.followers).unwrap_or_default();
if !followers.contains(&follower_id) {
followers.push(follower_id);
}
let update = diesel::update(users.find(user_id))
.set(followers.eq(serde_json::to_string(&followers)?))
.execute(conn)?;
if update == 0 {
return Err(Error::NotFound);
}
Ok(())
}The follow method first retrieves the user with the given user_id from the database. It then deserializes the followers column of the user into a vector of UUIDs. If the follower_id is not already in this vector, it adds it. It then serializes the vector back into a JSON string and updates the followers column of the user in the database.
If the update query affected no rows (i.e., if the user with the given user_id doesn’t exist), the method returns a NotFound error.
To allow a user to friend another user, we’ll add a new endpoint to the users module that takes a user_id and a friend_id as parameters. The endpoint will add the friend_id
Building a file sharing service with Actix Web
Building a file-sharing service with Actix Web involves creating an API that allows users to upload, download, and delete files. The service should also have authentication and authorization features to ensure that only authorized users can access and manage files. In this section, we will explore how to build a simple file-sharing service with Actix Web.
Setting up the project
To get started, we need to set up a new Actix Web project. We can create a new project using the following command:
cargo new file-sharing-service --binNext, we need to add the Actix Web dependency to our project by adding the following line to the [dependencies] section of our Cargo.toml file:
actix-web = "3.3.2"We will also use the dotenv crate to load configuration variables from a .env file, so we will add the following line to our Cargo.toml file:
dotenv = "0.16.0"Next, we can create a new .env file in the root directory of our project and add the following configuration variables:
DATABASE_URL=sqlite://file-sharing-service.sqliteThis will tell Actix Web to use a SQLite database to store information about our files.
Creating the API
Now that we have set up our project, we can start creating the API. We will define three routes: one for uploading files, one for downloading files, and one for deleting files.
Uploading files
To upload a file, we will create a POST route that accepts a file and saves it to our database. We will also generate a unique identifier for the file and return it to the user so that they can use it to download or delete the file later.
use actix_web::{web, App, HttpResponse, HttpServer, Responder};
use dotenv::dotenv;
use std::env;
use uuid::Uuid;
struct AppState {
db: SqliteConnection,
}
#[derive(Debug, Clone, Queryable, Serialize)]
struct File {
id: Uuid,
name: String,
content_type: String,
data: Vec<u8>,
}
#[derive(Deserialize)]
struct FileUpload {
name: String,
content_type: String,
data: Vec<u8>,
}
async fn upload_file(
state: web::Data<AppState>,
file: web::Json<FileUpload>,
) -> impl Responder {
let id = Uuid::new_v4();
let file = File {
id: id,
name: file.name.clone(),
content_type: file.content_type.clone(),
data: file.data.clone(),
};
diesel::insert_into(files::table)
.values(&file)
.execute(&state.db)
.expect("Error inserting file into database");
HttpResponse::Ok().json(id)
}In the code above, we define a File struct to represent the files in our database. We also define a FileUpload struct to represent the files uploaded by the user. When a file is uploaded, we generate a unique identifier for it using the Uuid::new_v4() method. We then create a File struct with the file data and insert it into our database using Diesel, a query builder and ORM for Rust.
Downloading files
To download a file, we will create a GET route that accepts the unique identifier of the file and returns the file data.
async fn download_file(
state: web::Data<AppState>,
id: web::Path<Uuid>,
) -> impl Responder {
let file = files::table
.filter(files::id.eq(id.into_inner()))
.first::<File>(&conn)
.map_err(|e| HttpResponse::InternalServerError().body(e.to_string()))?;
let file_path = Path::new(&state.files_directory).join(&file.filename);
HttpResponse::Ok()
.content_type("application/octet-stream")
.header(
header::CONTENT_DISPOSITION,
format!("attachment; filename={}", file.filename),
)
.header(header::CONTENT_LENGTH, file.size)
.body(Body::from_file(&file_path).map_err(|e| {
HttpResponse::InternalServerError().body(e.to_string())
})?)
}
#[actix_rt::main]
async fn main() -> Result<(), Error> {
let database_url = env::var("DATABASE_URL").expect("DATABASE_URL must be set");
let files_directory = env::var("FILES_DIRECTORY").expect("FILES_DIRECTORY must be set");
let conn = SqliteConnection::establish(&database_url)
.expect(&format!("Error connecting to {}", database_url));
files::create_table(&conn).expect("Error creating table files");
HttpServer::new(move || {
App::new()
.data(AppState {
conn: conn.clone(),
files_directory: files_directory.clone(),
})
.service(
web::resource("/files")
.route(web::post().to(upload_file))
.route(web::get().to(get_files)),
)
.service(web::resource("/files/{id}").route(web::get().to(download_file)))
})
.bind("127.0.0.1:8000")?
.run()
.await?;
Ok(())
}
This is a basic implementation of a file sharing service with Actix Web. The upload_file function handles file uploads, the get_files function returns a list of files, and the download_file function downloads a specific file by ID. The AppState struct contains the application state, which includes the database connection and the directory where files are stored.
To use this service, you would send a POST request to the /files endpoint with a file attached to the request. This would add the file to the database and store it in the file directory. You could then send a GET request to the /files endpoint to retrieve a list of all files, and a GET request to the /files/{id} endpoint to download a specific file by ID.
This is a very basic example, and you would likely want to add additional functionality to handle file deletion, file metadata, and user authentication. However, this example should give you a good starting point for building your own file sharing service with Actix Web. Uploading and downloading files securely When building a file sharing service, security is of utmost importance. Users need to be able to upload and download files securely, without worrying about their data being compromised. Here are some steps to ensure that your file sharing service is secure:
-
Use HTTPS: Make sure that all communication between the client and the server is encrypted using HTTPS. This ensures that data transmitted over the network is secure and cannot be intercepted by attackers.
-
Validate user input: When accepting file uploads, make sure to validate user input to prevent malicious files from being uploaded. Check the file type, size, and contents to ensure that they meet your criteria.
-
Use file hashing: Hashing the contents of the file before storing it can help ensure its integrity. This way, if the file is tampered with, the hash will change, and the server will know that the file has been compromised.
-
Limit file access: Only allow users to access files that they have permission to access. Use access control mechanisms such as authentication and authorization to ensure that users can only access files that they are authorized to access.
-
Secure file storage: Store files in a secure location and ensure that only authorized users can access them. Use encryption and access control mechanisms to protect the files from unauthorized access.
-
Use secure file transfer protocols: When transferring files between servers, use secure protocols such as SFTP or SCP to ensure that the files are transferred securely.
By implementing these measures, you can ensure that your file sharing service is secure and your users can safely upload and download files. Implementing file sharing permissions and access control Implementing file sharing permissions and access control is an essential part of a file sharing service. In Actix Web, this can be done by defining roles and permissions for each user and enforcing them through middleware.
First, we need to define the roles that users can have in the system. For example, we can have the following roles:
- Owner: can upload, download, and manage files
- Collaborator: can upload and download files, but cannot manage them
- Viewer: can only view files that have been shared with them
Next, we need to define the permissions that each role has. For example:
- Owner: can create, read, update, and delete files and folders
- Collaborator: can create and read files and folders, but cannot update or delete them
- Viewer: can only read files and folders that have been shared with them
We can implement these roles and permissions using Actix Web middleware. Middleware is code that is executed before or after a request is handled by a handler function. We can use middleware to check if a user has the correct permissions to perform an action, and return an error response if they do not.
Here is an example middleware function that checks if a user has permission to access a file:
async fn check_file_permission(
req: ServiceRequest,
permissions: Vec<Permission>,
) -> Result<ServiceRequest, Error> {
let state = req.app_data::<AppState>().unwrap();
// Get the user ID from the authorization token
let user_id = match get_user_id_from_token(&req) {
Some(id) => id,
None => return Err(ErrorUnauthorized("Invalid or missing authorization token")),
};
// Get the file ID from the path parameter
let file_id = match req.match_info().get("file_id") {
Some(id) => Uuid::parse_str(id).unwrap(),
None => return Err(ErrorBadRequest("Missing file ID")),
};
// Check if the user has the required permissions for the file
let has_permission = state.db.run(move |conn| {
let file = files::table
.filter(files::id.eq(file_id))
.filter(files::owner_id.eq(user_id))
.filter(files::permissions.contains(permissions))
.first::<File>(conn);
file.is_ok()
});
if has_permission {
Ok(req)
} else {
Err(ErrorForbidden("You do not have permission to access this file"))
}
}This middleware function takes a vector of permissions as an argument, which represents the permissions required to access the file. It then gets the user ID from the authorization token, and the file ID from the path parameter. Finally, it checks if the user has the required permissions for the file by querying the database.
We can use this middleware function in our handler functions to enforce file sharing permissions. For example, here is a handler function that returns the contents of a file:
async fn get_file(
state: web::Data<AppState>,
id: web::Path<Uuid>,
) -> impl Responder {
web::pipeline()
.wrap(check_file_permission(vec![Permission::Read]))
.to(|| async move {
// Get the file from the database
let file = state.db.run(move |conn| {
files::table
.filter(files::id.eq(*id))
.first::<File>(conn)
});
// Return the file contents
match file {
Ok(file) => HttpResponse::Ok().body(file.contents),
Err(_) => HttpResponse::NotFound().finish(),
}
})
.await
}This handler function uses the check_file_permission middleware to check if
This handler function uses the check_file_permission middleware to check if
the user has permission to view the file before returning a response. If the user does not have permission, a Forbidden response is returned.
To implement the check_file_permission middleware, add the following function to the middleware module:
use actix_web::{Error, HttpRequest, HttpResponse, dev::Payload, middleware::Middleware};
use futures::future::{FutureExt, LocalBoxFuture};
struct CheckFilePermission;
impl Middleware<AppState> for CheckFilePermission {
fn start(&self, req: &HttpRequest<AppState>) -> LocalBoxFuture<Result<(), Error>> {
let file_id = req.match_info().query("file_id").parse().unwrap();
let user_id = req.extensions().get::<UserId>().unwrap().0;
let conn = req.app_data().db_pool.clone().get().unwrap();
files::table
.filter(files::id.eq(file_id))
.filter(
files::user_id
.eq(user_id)
.or(files::permission.eq(FilePermission::Public)),
)
.select(files::id)
.get_result::<Uuid>(&*conn)
.map(move |_| Ok(()))
.map_err(|_| HttpResponse::Forbidden().finish().into())
.boxed_local()
}
}This middleware function checks if the file exists and if the user has permission to access it. If the user has permission, the middleware passes control to the next handler in the chain. If the user does not have permission, a Forbidden response is returned.
To use the CheckFilePermission middleware, add it to the config function in the main.rs file:
App::new()
.wrap(CheckUserAuth)
.configure(config)
.wrap(Cors::default())
.wrap(CheckFilePermission)Now, only authorized users who have permission to access a file can download it. Developing a blogging site To develop a blogging site with Actix Web, we can utilize the Rust programming language’s powerful libraries and frameworks. Actix Web can be used to build the backend server that can handle the site’s RESTful API calls, and Rust’s templating engine, such as Handlebars, can be used to generate HTML pages. Here’s a possible approach to building a simple blogging site with Actix Web:
- Setting up the project structure: We can start by creating a new Rust project and setting up the project structure. We can use the Cargo package manager to generate the initial project files and directory structure.
$ cargo new myblog
$ cd myblog- Adding the required dependencies: In the project’s
Cargo.tomlfile, we can add the necessary dependencies, including Actix Web, a database ORM (such as Diesel), a templating engine (such as Handlebars), and any other required dependencies.
[dependencies]
actix-web = "3.3.2"
actix-rt = "2.4.1"
diesel = { version = "1.4.6", features = ["sqlite"] }
handlebars = "3.5.3"- Setting up the database: We can set up a SQLite database for the blog posts and comments. We can use Diesel to manage the database and provide an ORM for the Rust code. We can create a
models.rsfile to define the blog post and comment structs and their associated Diesel schema.
use diesel::prelude::*;
#[derive(Queryable)]
pub struct BlogPost {
pub id: i32,
pub title: String,
pub body: String,
}
#[derive(Queryable)]
pub struct Comment {
pub id: i32,
pub post_id: i32,
pub name: String,
pub email: String,
pub body: String,
}
table! {
posts (id) {
id -> Integer,
title -> Text,
body -> Text,
}
}
table! {
comments (id) {
id -> Integer,
post_id -> Integer,
name -> Text,
email -> Text,
body -> Text,
}
}- Implementing the RESTful API: We can use Actix Web to implement the backend RESTful API for the blogging site. We can define the API routes and handlers in a
main.rsfile. For example, we can define routes for getting a list of blog posts, creating a new blog post, getting a single blog post, and creating a new comment on a blog post.
use actix_web::{get, post, web, App, HttpResponse, HttpServer, Responder};
use diesel::prelude::*;
use diesel::SqliteConnection;
use handlebars::Handlebars;
use serde::{Deserialize, Serialize};
mod models;
use models::{BlogPost, Comment};
#[derive(Deserialize, Serialize)]
struct CreatePostRequest {
title: String,
body: String,
}
#[derive(Deserialize, Serialize)]
struct CreateCommentRequest {
post_id: i32,
name: String,
email: String,
body: String,
}
async fn list_posts(db: web::Data<SqliteConnection>) -> impl Responder {
let results = BlogPost::table().load::<BlogPost>(&**db).unwrap();
HttpResponse::Ok().json(results)
}
async fn create_post(
db: web::Data<SqliteConnection>,
request: web::Json<CreatePostRequest>,
) -> impl Responder {
let new_post = BlogPost {
title: request.title.clone(),
body: request.body.clone(),
};
}Next, we need to insert this new blog post into our database. To do this, we will use the diesel ORM to create a new record in the blog_posts table. We will define a new function called create_blog_post in our db.rs module to handle this:
use crate::models::BlogPost;
use crate::schema::blog_posts::dsl::*;
use diesel::prelude::*;
use uuid::Uuid;
pub async fn create_blog_post(
conn: &SqliteConnection,
user_id: Uuid,
post: &NewBlogPost,
) -> QueryResult<BlogPost> {
let new_post = BlogPost {
id: Uuid::new_v4(),
user_id,
title: post.title.clone(),
body: post.body.clone(),
};
diesel::insert_into(blog_posts)
.values(&new_post)
.execute(conn)?;
Ok(new_post)
}This function takes a reference to a NewBlogPost object, which contains the new post’s title and body, as well as the ID of the user who created the post. It uses the Uuid crate to generate a new UUID for the post, creates a new BlogPost object with this UUID and the provided title and body, and inserts it into the blog_posts table using diesel::insert_into.
Now that we can create new blog posts, let’s add a new handler function to retrieve all blog posts from the database:
use crate::db;
use crate::models::BlogPost;
use actix_web::{get, web, HttpResponse, Responder};
use diesel::prelude::*;
#[get("/posts")]
pub async fn get_blog_posts(db: web::Data<db::DbState>) -> impl Responder {
let conn = db.conn.lock().await;
let posts = db::blog_posts::table
.load::<BlogPost>(&*conn)
.expect("Error loading blog posts from database");
HttpResponse::Ok().json(posts)
}This function retrieves a lock on the database connection from the DbState object, then loads all records from the blog_posts table using diesel::load. Finally, it returns an HTTP response containing the retrieved blog posts as JSON.
We also need to add a new route to our routes.rs file to map this handler function to the /posts URL:
use crate::handlers;
use actix_web::{web, Scope};
pub fn blog_scope() -> Scope {
web::scope("/blog")
.route("", web::post().to(handlers::create_blog_post))
.route("/posts", web::get().to(handlers::get_blog_posts))
}Now we can create and retrieve blog posts. However, we still need to implement a way to retrieve a specific blog post by its ID. To do this, we will add another handler function:
use crate::db;
use crate::models::BlogPost;
use actix_web::{get, web, HttpResponse, Responder};
use diesel::prelude::*;
use uuid::Uuid;
#[get("/posts/{id}")]
pub async fn get_blog_post(
db: web::Data<db::DbState>,
id: web::Path<Uuid>,
) -> impl Responder {
let conn = db.conn.lock().await;
let post = db::blog_posts::table
.filter(db::blog_posts::id.eq(*id))
.first::<BlogPost>(&*conn)
.expect("Error loading blog post from database");
HttpResponse::Ok().json(post)
}This function takes a Creating and editing blog posts To create and edit blog posts, we need to implement two more endpoints in our Actix Web API.
First, let’s create a new endpoint to create a new blog post. We can define a new route that accepts a POST request at the endpoint /blog-posts and a JSON payload containing the title and body of the new post.
async fn create_post(
state: web::Data<AppState>,
new_post: web::Json<NewBlogPost>,
) -> impl Responder {
let post = new_post.into_inner().to_blog_post();
let new_post = db::create_blog_post(&state.db_pool, &post).await.unwrap();
HttpResponse::Created().json(&new_post)
}Here, we use the create_blog_post function to insert the new post into our database. We then return a 201 Created response with the newly created post as JSON.
Next, we can create an endpoint to edit an existing blog post. We can define a new route that accepts a PUT request at the endpoint /blog-posts/{id} where {id} is the ID of the blog post to edit. The JSON payload should contain the updated title and body of the post.
async fn update_post(
state: web::Data<AppState>,
id: web::Path<Uuid>,
updated_post: web::Json<UpdatedBlogPost>,
) -> impl Responder {
let post_id = id.into_inner();
let post = updated_post.into_inner().to_blog_post();
let updated_post = db::update_blog_post(&state.db_pool, &post_id, &post).await.unwrap();
HttpResponse::Ok().json(&updated_post)
}In this handler function, we first extract the id parameter from the request URL. We then extract the updated post from the request body, convert it to a BlogPost struct, and use the update_blog_post function to update the post in our database. Finally, we return a 200 OK response with the updated post as JSON.
With these two new endpoints, users of our blogging site can create and edit blog posts as needed. Implementing commenting and moderation features To implement commenting and moderation features in our blogging site, we need to create a new model to represent comments, add database migrations to create the corresponding table, and implement the API endpoints to create, edit, and delete comments.
Let’s start by creating the Comment model. Create a new file named comment.rs in the models directory and add the following code:
use crate::schema::comments;
use chrono::{DateTime, Utc};
use diesel::{Insertable, Queryable};
use serde::{Deserialize, Serialize};
use uuid::Uuid;
#[derive(Debug, Clone, Serialize, Deserialize, Queryable)]
pub struct Comment {
pub id: Uuid,
pub post_id: Uuid,
pub user_id: Uuid,
pub body: String,
pub created_at: DateTime<Utc>,
}
#[derive(Debug, Clone, Serialize, Deserialize, Insertable)]
#[table_name = "comments"]
pub struct NewComment {
pub post_id: Uuid,
pub user_id: Uuid,
pub body: String,
}This creates the Comment model and a corresponding NewComment struct for inserting new comments into the database.
Next, let’s create the database migrations to create the comments table. Create a new file named 2022-05-01-183000_create_comments_table. in the migrations` directory and add the following SQL code:
CREATE TABLE comments (
id UUID PRIMARY KEY,
post_id UUID NOT NULL,
user_id UUID NOT NULL,
body TEXT NOT NULL,
created_at TIMESTAMP WITH TIME ZONE NOT NULL DEFAULT NOW()
);
CREATE INDEX ON comments (post_id);
CREATE INDEX ON comments (user_id);This creates the comments table with columns for the comment’s ID, the ID of the post it belongs to, the ID of the user who created it, the comment body, and the creation timestamp. We also create indexes on the post_id and user_id columns to improve query performance.
Next, let’s implement the API endpoints for creating, editing, and deleting comments. Add the following code to the routes.rs file:
use crate::db::DbPool;
use crate::models::{Comment, NewComment};
use actix_web::{delete, get, post, put, web, HttpResponse, Responder};
use uuid::Uuid;
#[post("/posts/{id}/comments")]
async fn create_comment(
pool: web::Data<DbPool>,
post_id: web::Path<Uuid>,
user_id: web::Json<Uuid>,
comment: web::Json<NewComment>,
) -> impl Responder {
let conn = pool.get().expect("couldn't get db connection from pool");
let new_comment = NewComment {
post_id: *post_id,
user_id: comment.user_id,
body: comment.body.clone(),
};
let comment = conn.transaction::<_, diesel::result::Error, _>(|| {
diesel::insert_into(comments::table)
.values(&new_comment)
.get_result::<Comment>(&conn)
});
match comment {
Ok(comment) => HttpResponse::Ok().json(comment),
Err(e) => {
eprintln!("Error creating comment: {:?}", e);
HttpResponse::InternalServerError().finish()
}
}
}
async fn update_comment(
pool: web::Data<DbPool>,
auth: Auth,
comment_id: web::Path<i32>,
request: web::Json<CommentRequest>,
) -> Result<HttpResponse, Error> {
let conn = pool.get().expect("couldn't get db connection from pool");
let comment = comments::table
.find(comment_id.into_inner())
.first::<Comment>(&conn)
.optional()
.map_err(|e| error::ErrorInternalServerError(e))?;
if let Some(comment) = comment {
if comment.author_id != auth.id {
return Err(error::ErrorForbidden("not authorized to update this comment"));
}
diesel::update(comments::table.find(comment.id))
.set(UpdateCommentRequest {
body: Some(request.body.clone()),
})
.execute(&conn)
.map_err(|e| error::ErrorInternalServerError(e))?;
Ok(HttpResponse::Ok().finish())
} else {
Err(error::ErrorNotFound("comment not found"))
}
}This handler function takes in the comment ID as a path parameter and the updated comment information in the request body. It first retrieves the corresponding comment from the database and checks if the authenticated user is the author of the comment. If not, it returns a 403 Forbidden error. If the user is the author, it updates the comment in the database with the new information and returns a 200 OK response.
To implement comment moderation, you can add an is_approved field to the comments table and update the comment creation and update handlers to set this field to false by default. You can then create a moderation endpoint that allows moderators to approve or reject comments. Here’s an example implementation:
async fn moderate_comment(
pool: web::Data<DbPool>,
auth: Auth,
comment_id: web::Path<i32>,
request: web::Json<ModerationRequest>,
) -> Result<HttpResponse, Error> {
let conn = pool.get().expect("couldn't get db connection from pool");
let comment = comments::table
.find(comment_id.into_inner())
.first::<Comment>(&conn)
.optional()
.map_err(|e| error::ErrorInternalServerError(e))?;
if let Some(comment) = comment {
if auth.role != Role::Moderator {
return Err(error::ErrorForbidden("not authorized to moderate comments"));
}
diesel::update(comments::table.find(comment.id))
.set(UpdateCommentRequest {
is_approved: Some(request.is_approved),
})
.execute(&conn)
.map_err(|e| error::ErrorInternalServerError(e))?;
Ok(HttpResponse::Ok().finish())
} else {
Err(error::ErrorNotFound("comment not found"))
}
}This handler function takes in the comment ID as a path parameter and the moderation request in the request body. It first retrieves the corresponding comment from the database and checks if the authenticated user is a moderator. If not, it returns a 403 Forbidden error. If the user is a moderator, it updates the is_approved field of the comment in the database with the new value and returns a 200 OK response.
With these handlers in place, you can implement a basic commenting system with editing and moderation features. Of course, you may want to add more features such as notifications, threaded comments, and more sophisticated moderation tools depending on the needs of your blogging platform.